Alarm settings
Changelog
| Version | Author | Update date | Comment |
|---|---|---|---|
| 1.0.1 | ITsung.Shen | 2023/11/16 | First Version |
| 2.2.0 | ITsung.Shen | 2024/10/15 | Update chapter 2.2 and New chapter 4 |
1. Introduction
In the settings for each parameter's Alarm/Event, we support users in associating their desired alarm level and alarm category with the configured Alarm rule. In addition to the default values provided by the system, we also support the independent configuration of alarm levels and alarm categories for each Tenant in the Alarm settings feature. This setting feature requires Tenant users with the 'Manage' permission for the 'Alarm and event' role.
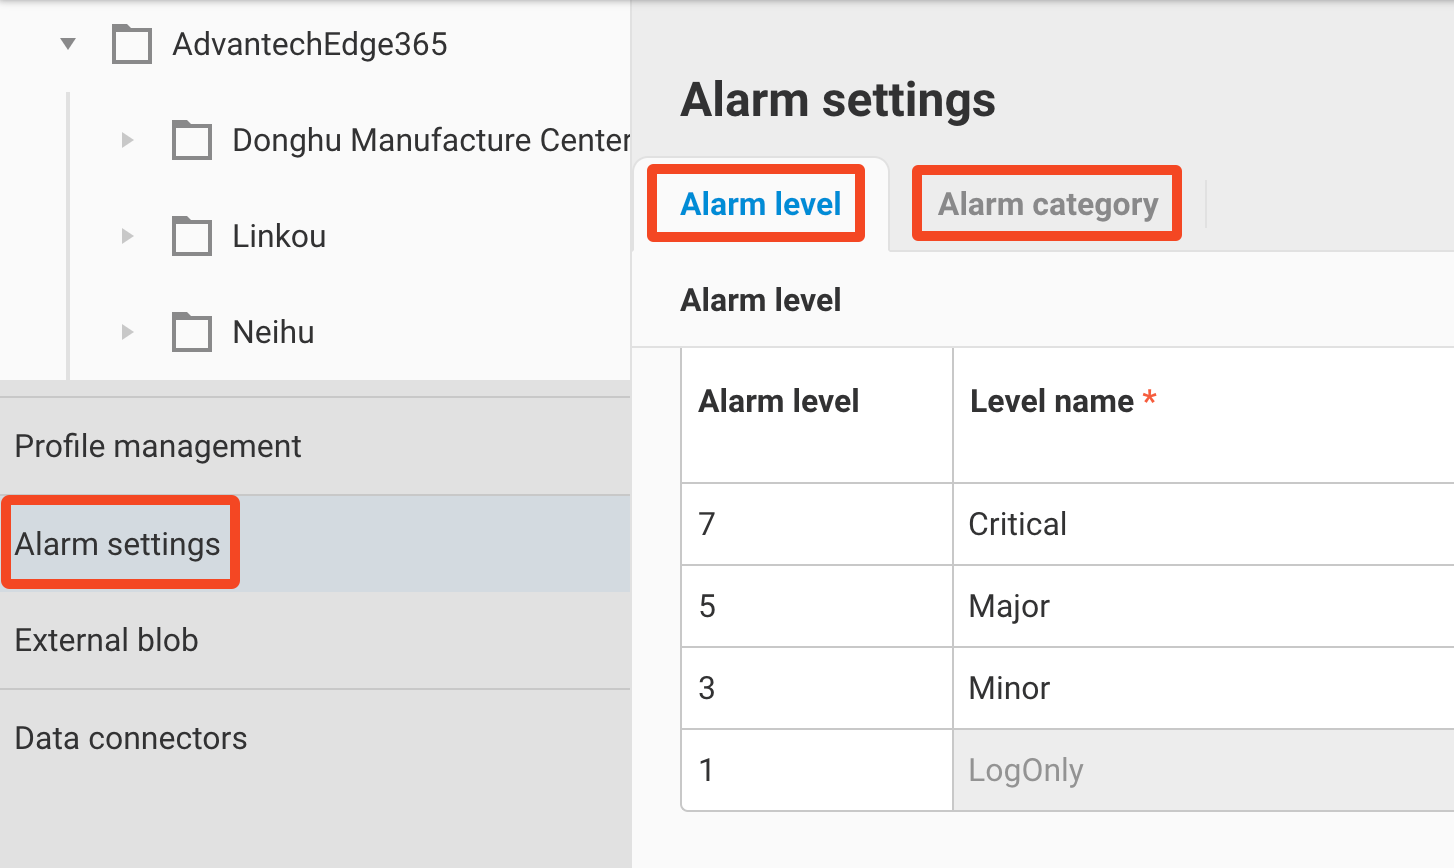
2. Alarm level
2.1 Alarm level list
In this settings interface, users can add new alarm levels. The default values are Level 1/3/5/7, and they cannot be deleted. Currently, the system allows a maximum of 8 levels (Level 1 ~ Level 8).
-
Click the
+symbol to add a new Alarm level.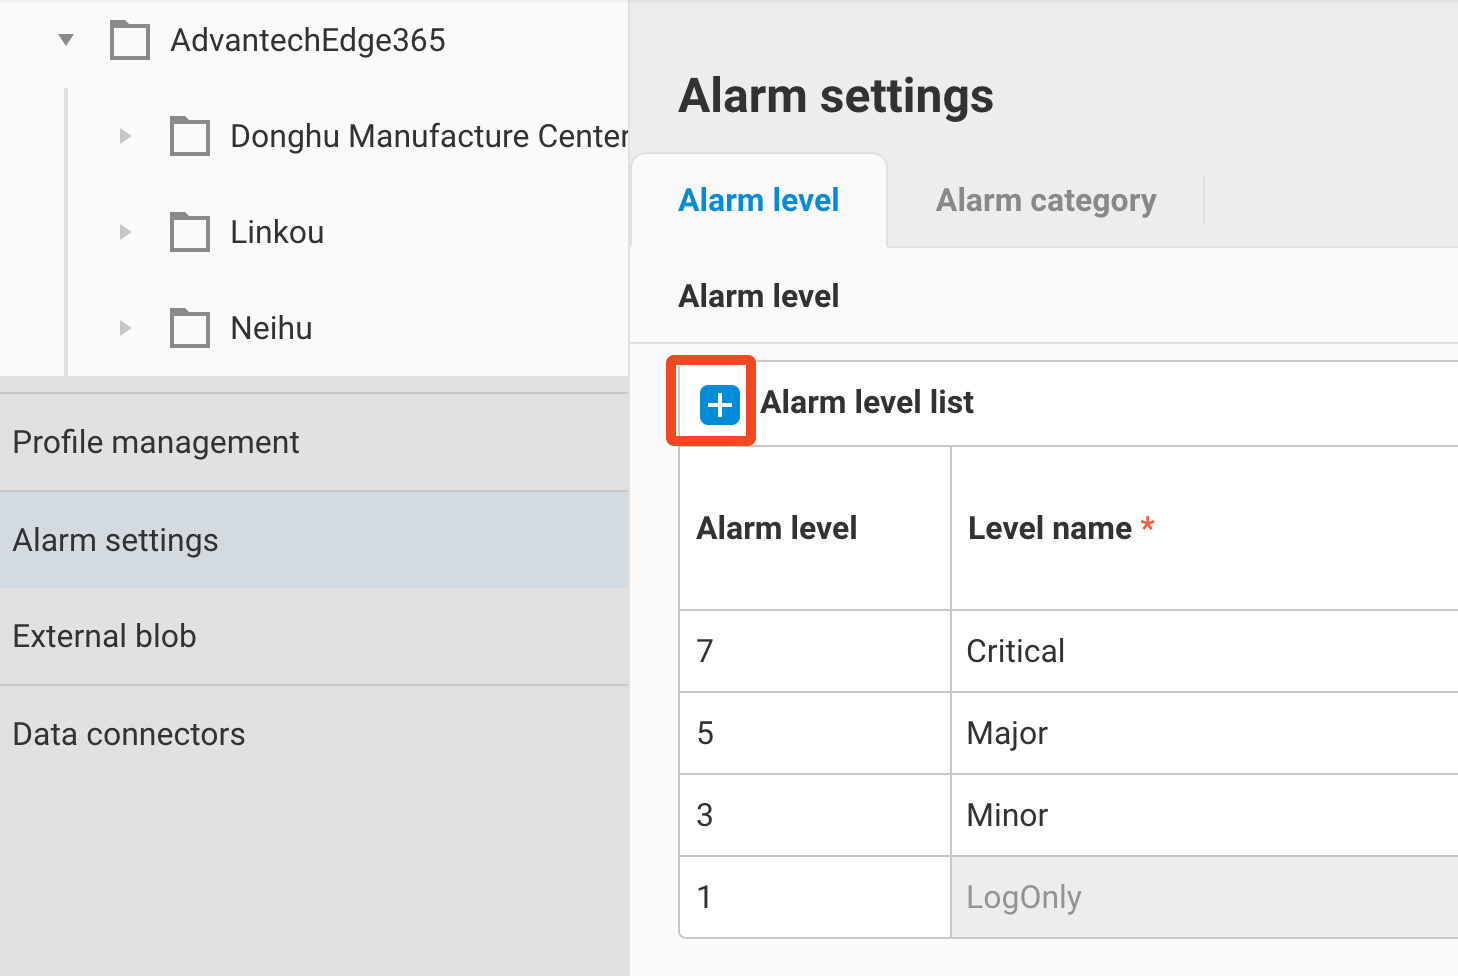
-
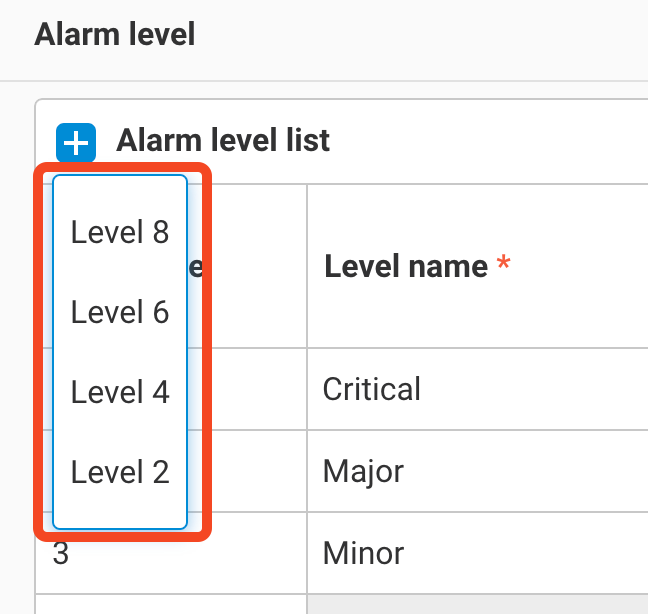
Select the Alarm level you want to add from the dropdown menu.
-
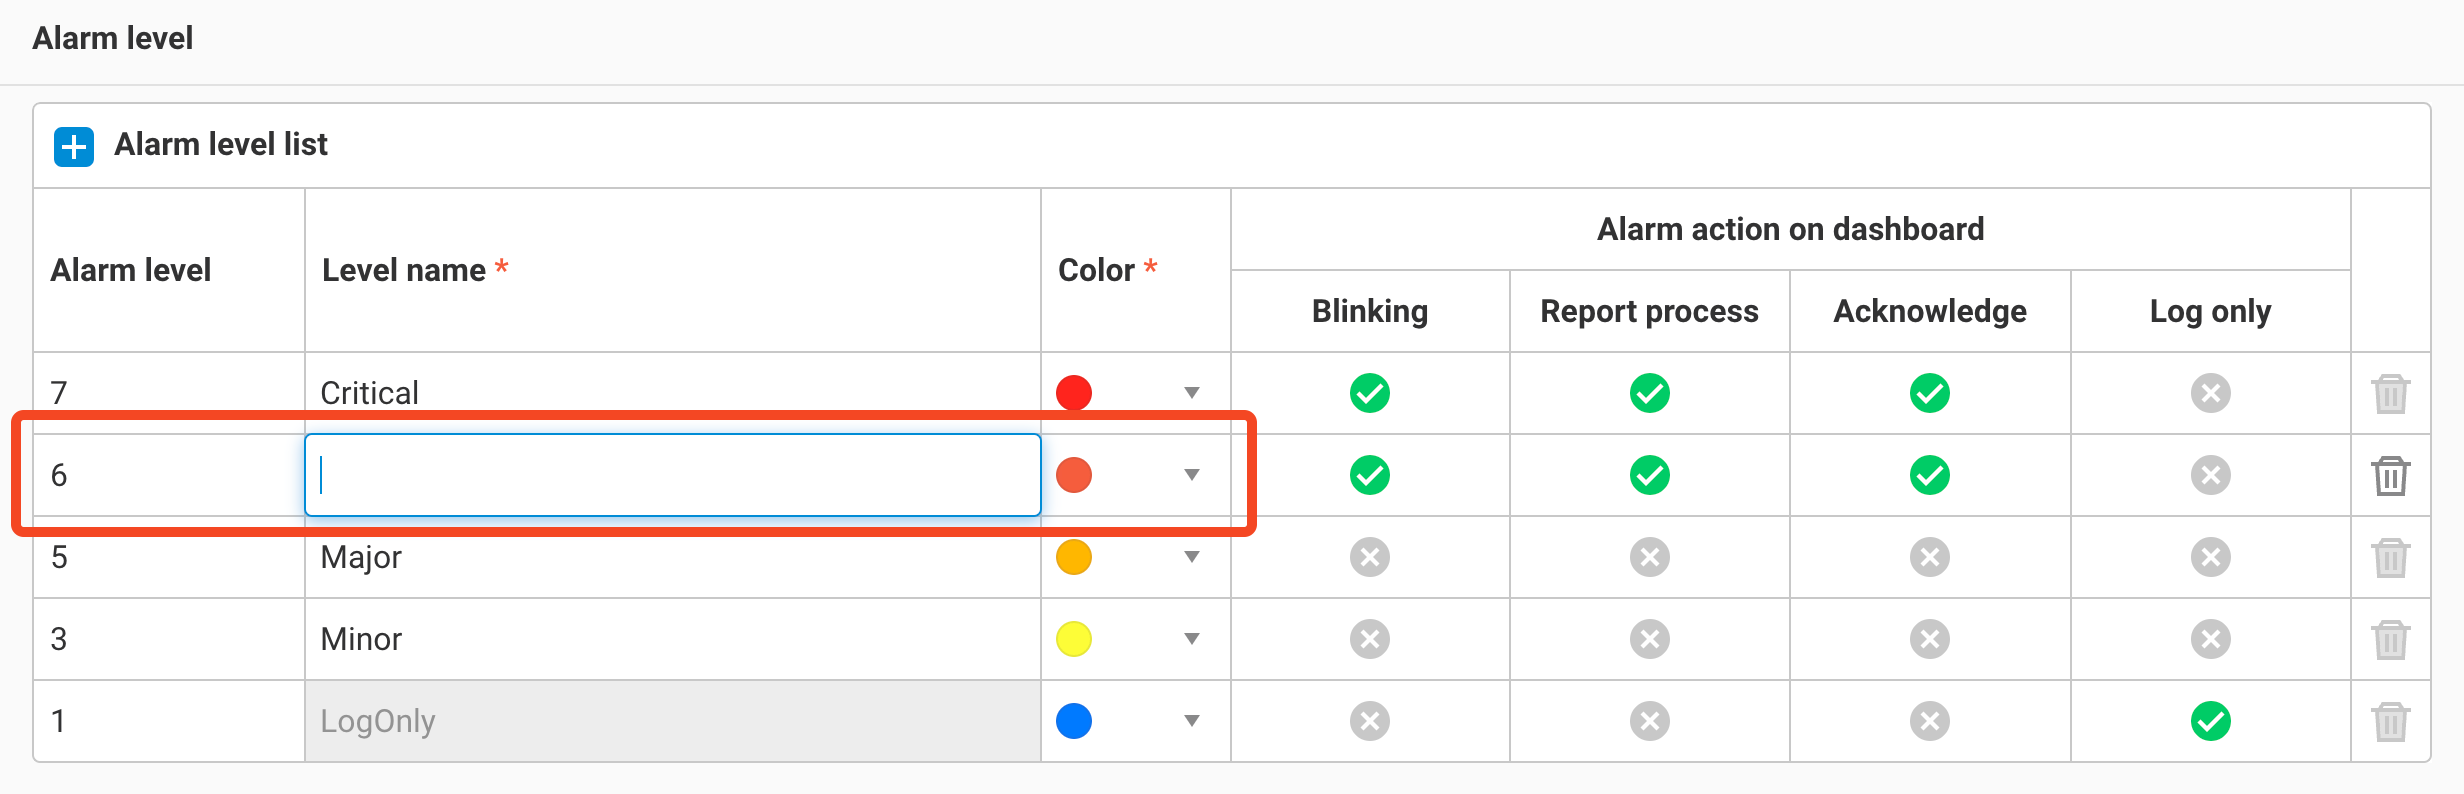
After selecting, you can input the Level name and the color to be displayed on the dashboard in the Alarm level list.
-
Click Submit to complete the addition.
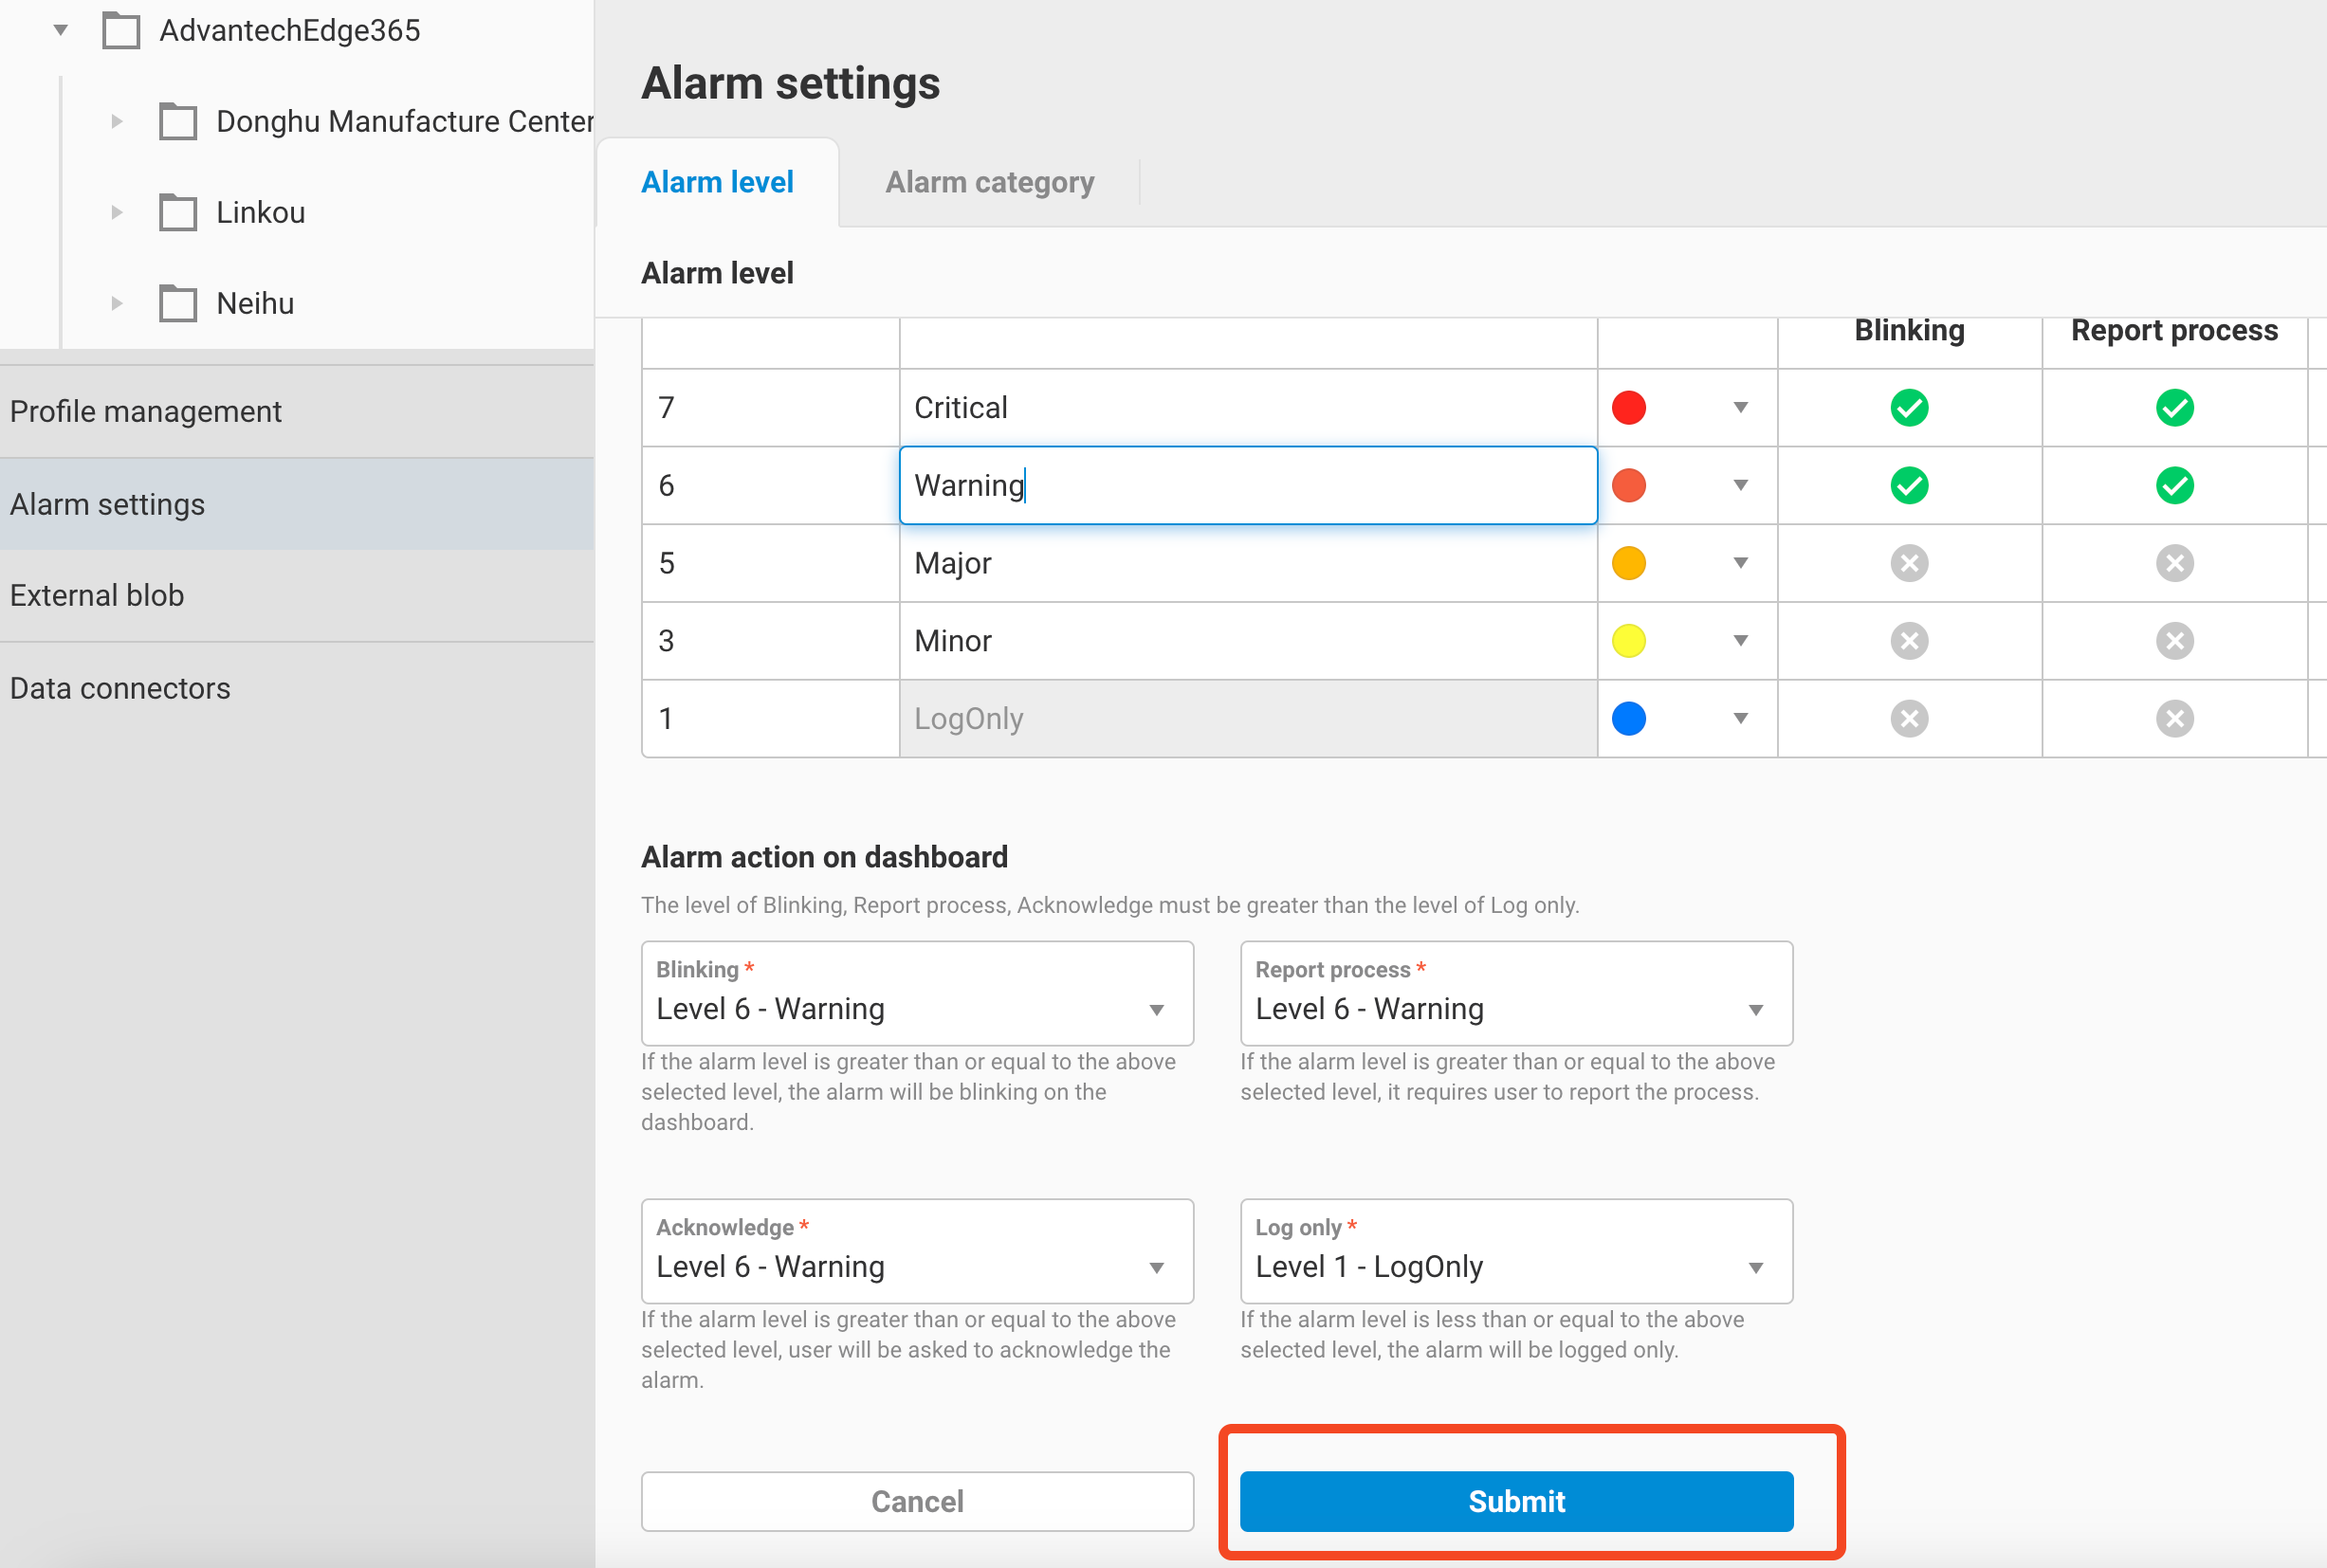
2.2 Alarm Action Settings
In this setting, you can configure the alarm levels for handling the following actions:
-
Blinking (using the Dashboard’s EnE Alarm panel):
- When the alarm level that triggers the alarm is greater than or equal to the set alarm level, the alarm in the EnE Alarm panel will blink. For configuration details, refer to section 4.3.3.
-
Report process (related to the Alarm Closing Process in 4.2):
- When the alarm level that triggers the alarm is greater than or equal to the set alarm level, the alarm in the EnE Alarm panel will enter the “Report process” state. The alarm will only be closed after the operator completes the Report process in the EnE Alarm panel.
-
Acknowledge (related to the Alarm Closing Process in 4.2):
- When the alarm level that triggers the alarm is greater than or equal to the set alarm level, an ACK button will appear for the alarm in the EnE Alarm panel. The alarm can only be closed after the operator acknowledges it in the EnE Alarm panel.
-
Log only:
- When the alarm level that triggers the alarm is less than or equal to the set alarm level, the alarm is logged directly into the alarm history and will not appear in the real-time alarm list.
The system also allows for none of these actions to be handled. Simply set all actions to “None,” which means that once the alarm condition returns to normal, the real-time alarm will be closed and recorded in the alarm history.
Once the configuration is completed, the Dashboard will update the alarm statuses based on the set alarm levels. For detailed processes, please refer to Chapter 4: Alarm Flow and Operations.

3. Alarm Category
3.1 Alarm category
In this settings interface, users can define alarm categories. Currently, the system provides three default categories (Alarm / Fault / Warning), and users can add up to a maximum of 10 categories.
-
Click the
+symbol to add a new Alarm category.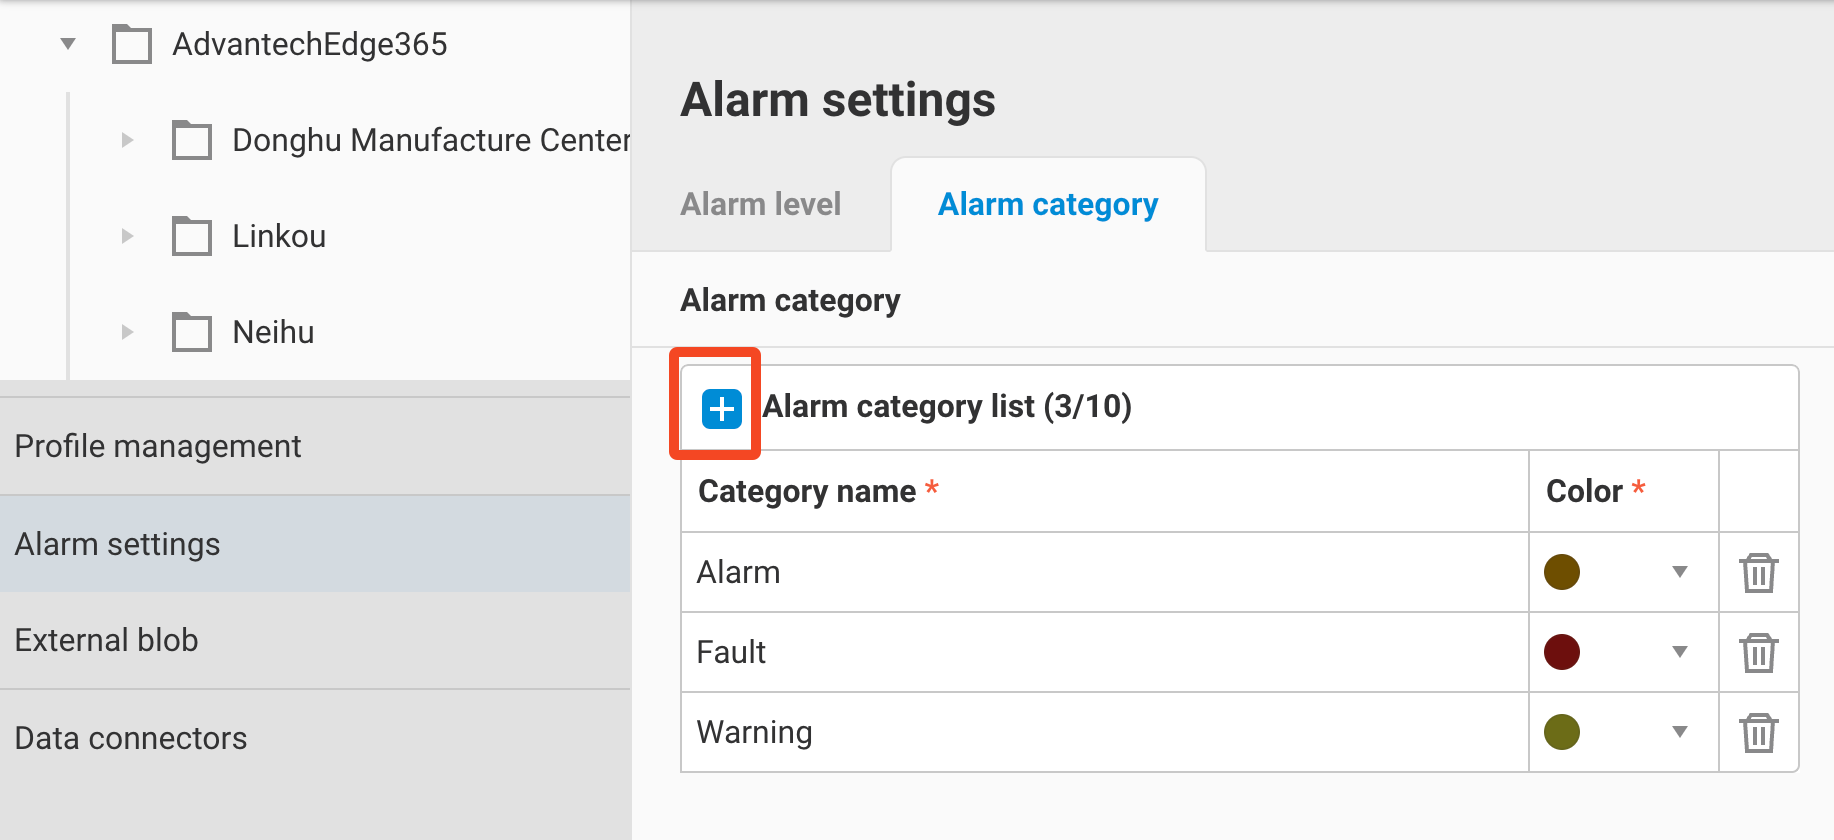
-
The system adds a new row; please enter the Category name and the color you want to display on the EnE alarm panel.
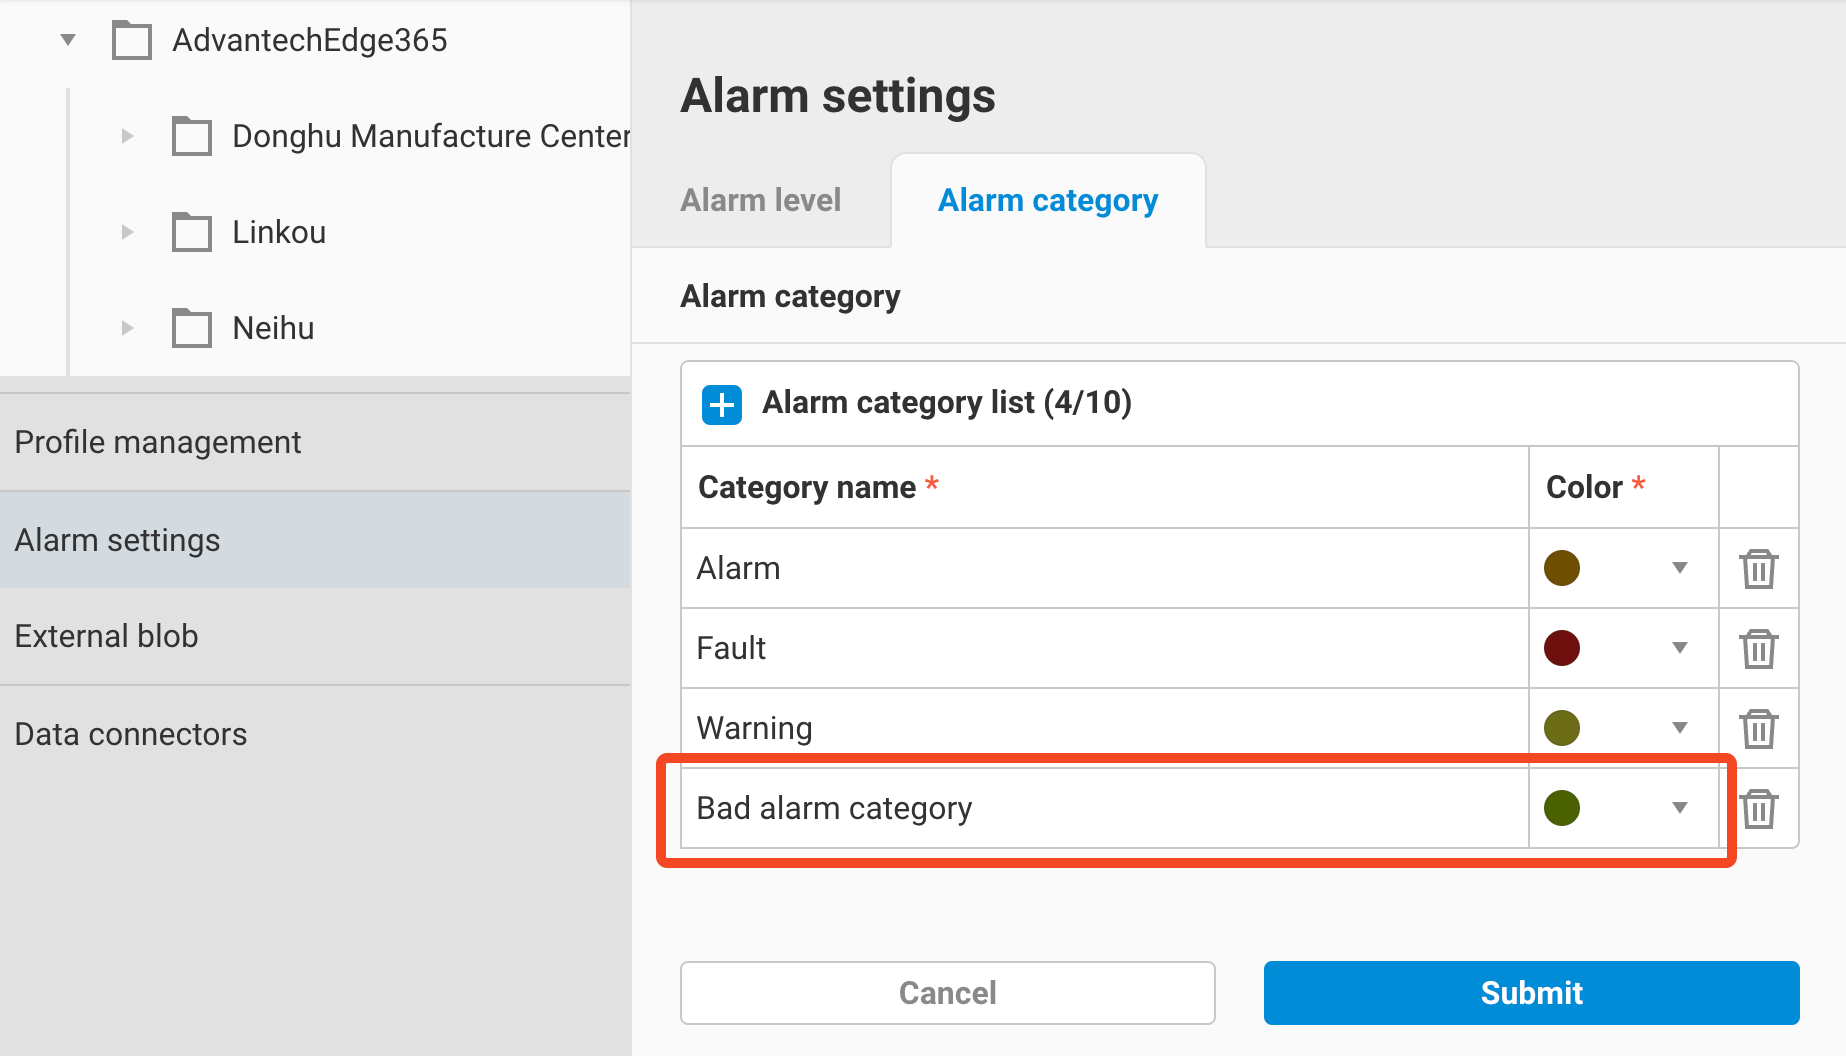
-
Click Submit to complete the addition.

4. Alarm Flow and Operations
4.1 Alarm Trigger Process
Once the user has configured a parameter alarm (please refer to Parameter - Alarm / Event), EdgeHub will begin monitoring the parameter’s data. When the data exceeds the configured alarm rules, an alarm will be triggered. The following details explain the process:
-
If there is no active real-time alarm for the parameter, a new alarm will be triggered, and an alarm notification will be sent.
-
If there is already an active real-time alarm for the parameter, but new data triggers a higher-level alarm rule, the content of the current real-time alarm will be updated, and an alarm notification will be sent again.
-
Example: Assume the following alarm rules are configured for the parameter:
Rule Value Level HH 100 7 H 50 5 -
Parameter value = 51 -> triggers Rule H, generating a new Level 5 alarm, and an alarm notification is sent.
-
Then, if the parameter value increases to 101 -> triggers Rule HH, which has an alarm level of 7, higher than the original Level 5. Therefore, the current real-time alarm will be updated to a Level 7 HH alarm, and another alarm notification will be sent.
-
-
If there is already an active real-time alarm for the parameter, but new data drops from a higher alarm level to a lower alarm level, EdgeHub will not change the content of the real-time alarm or send an alarm notification. However, it will log this change in the progress history of the real-time alarm.
- Example: Continuing with the above alarm rules
- Assume the parameter value then drops from 101 to 70 -> no longer triggers HH but still triggers H -> this change will be recorded in the progress history, but the content of the real-time alarm will not be updated, and no alarm notification will be sent.
4.2 Alarm Closing Process
For triggered alarms, EdgeHub will determine whether the alarm can be closed based on the following two conditions:
-
Whether the parameter value has returned to normal.
-
Whether the user has set the alarm status to the state just before "Close" according to the alarm status flowchart.
This status flow is related to the Report process / Acknowledge settings in section 2.2 and can be divided into the following four scenarios:
-
1 - The triggered alarm level does not require Acknowledge and does not require Report process.
- Open -> Value returns to normal -> Close
-
2 - The triggered alarm level requires Acknowledge but does not require Report process.
- Open -> Ack'ed -> Value returns to normal -> Close
-
3 - The triggered alarm level does not require Acknowledge but requires Report process.
- Open -> (In Process / Locked / Processed) can be modified multiple times according to the status flowchart -> Processed -> Value returns to normal -> Close
-
4 - The triggered alarm level requires both Acknowledge and Report process.
- Open -> Ack'ed -> (In Process / Locked / Processed) can be modified multiple times according to the status flowchart -> Processed -> Value returns to normal -> Close
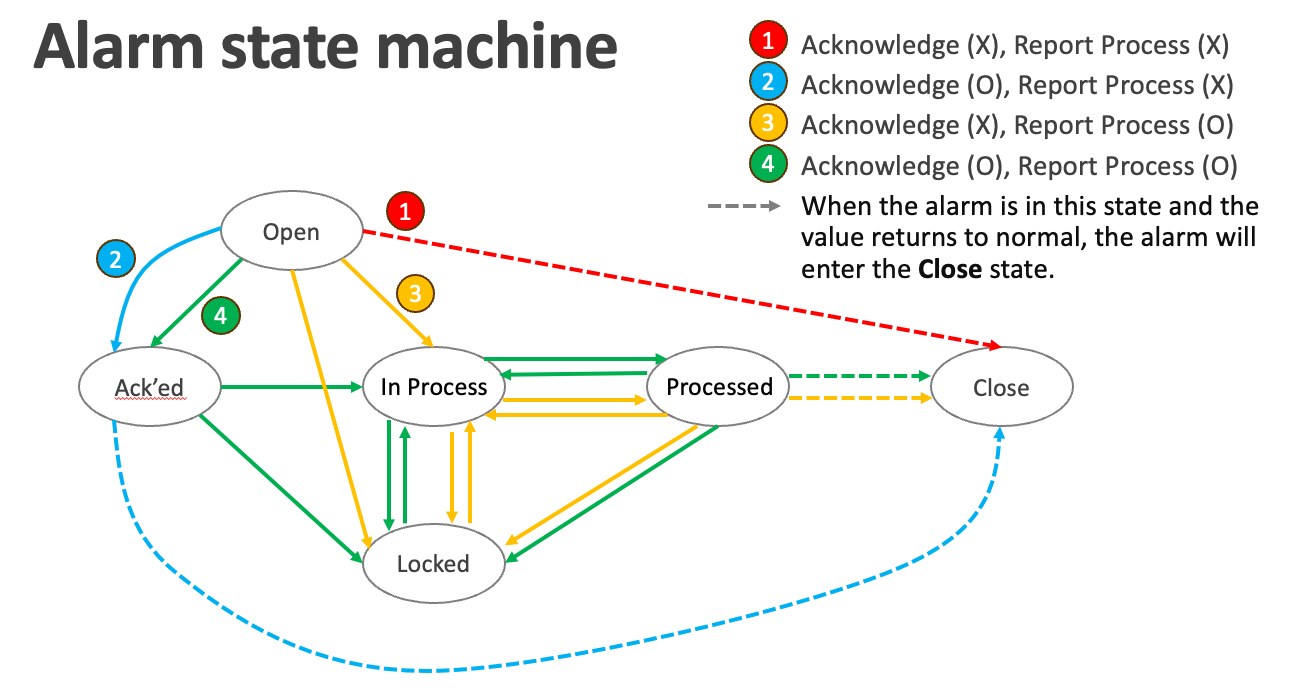
-
Please note that only when the value has returned to normal and the status flow has been completed, will the alarm be closed. In particular:
- If the status flow has not been completed, even if the value goes from abnormal -> normal -> abnormal again, it will still be treated as the same real-time alarm. According to section 4.1, these value changes will be recorded in the Progress History.
- If the status flow is completed but the value has not returned to normal, and the abnormal value triggers a change in alarm level, it will also be recorded in the Progress History, as mentioned in section 4.1.
Once the alarm is closed, it will become a historical alarm. The historical alarms can later be queried through the Dashboard.
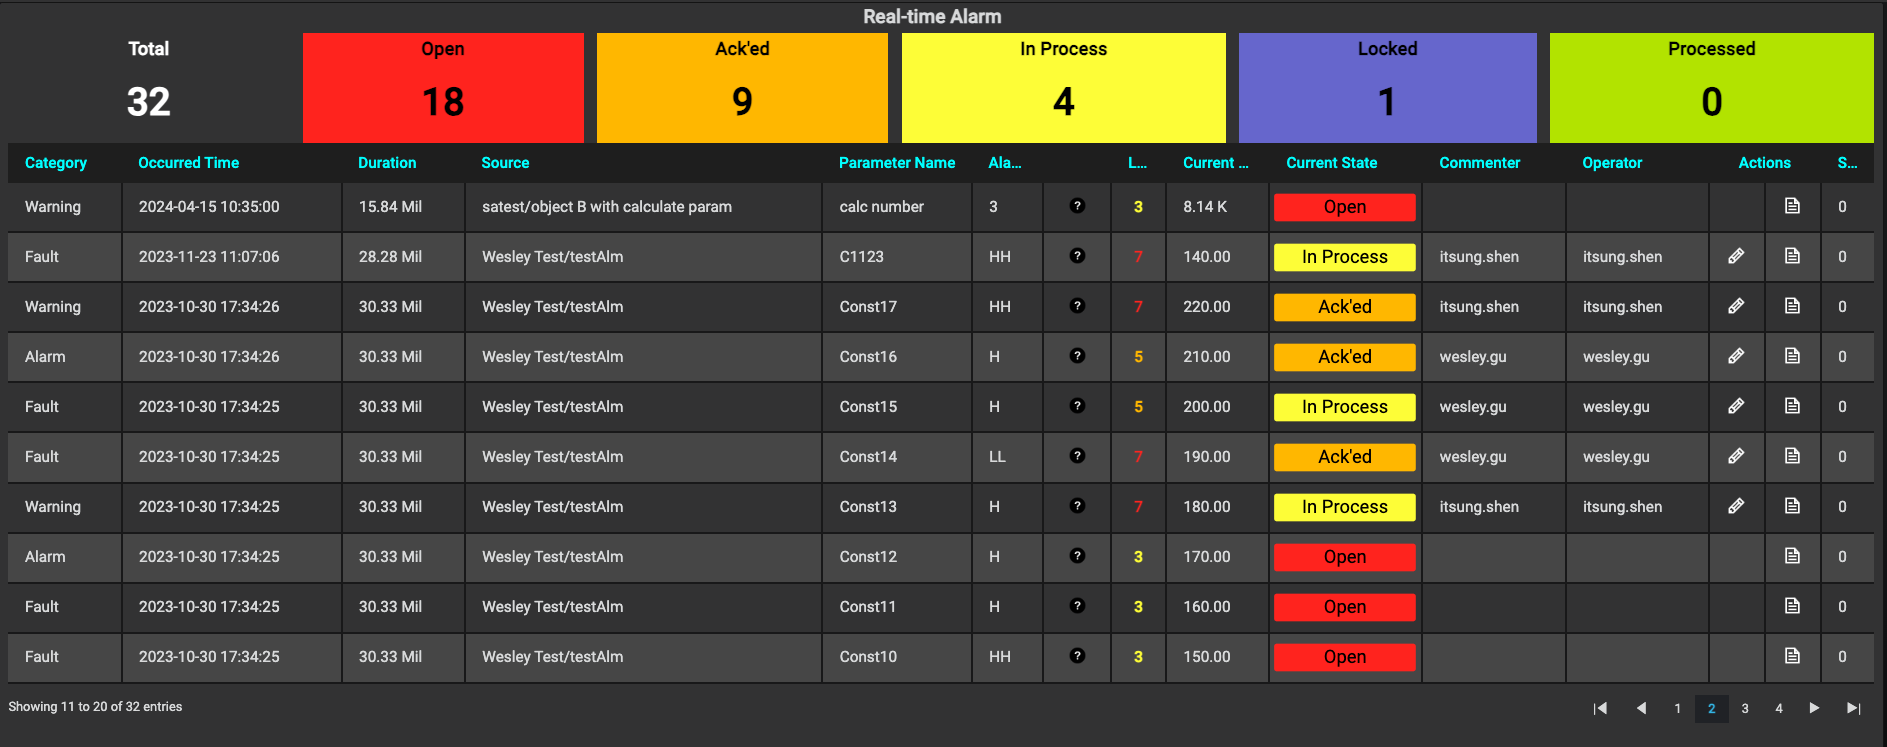
4.3 Ene Alarm Panel Configuration
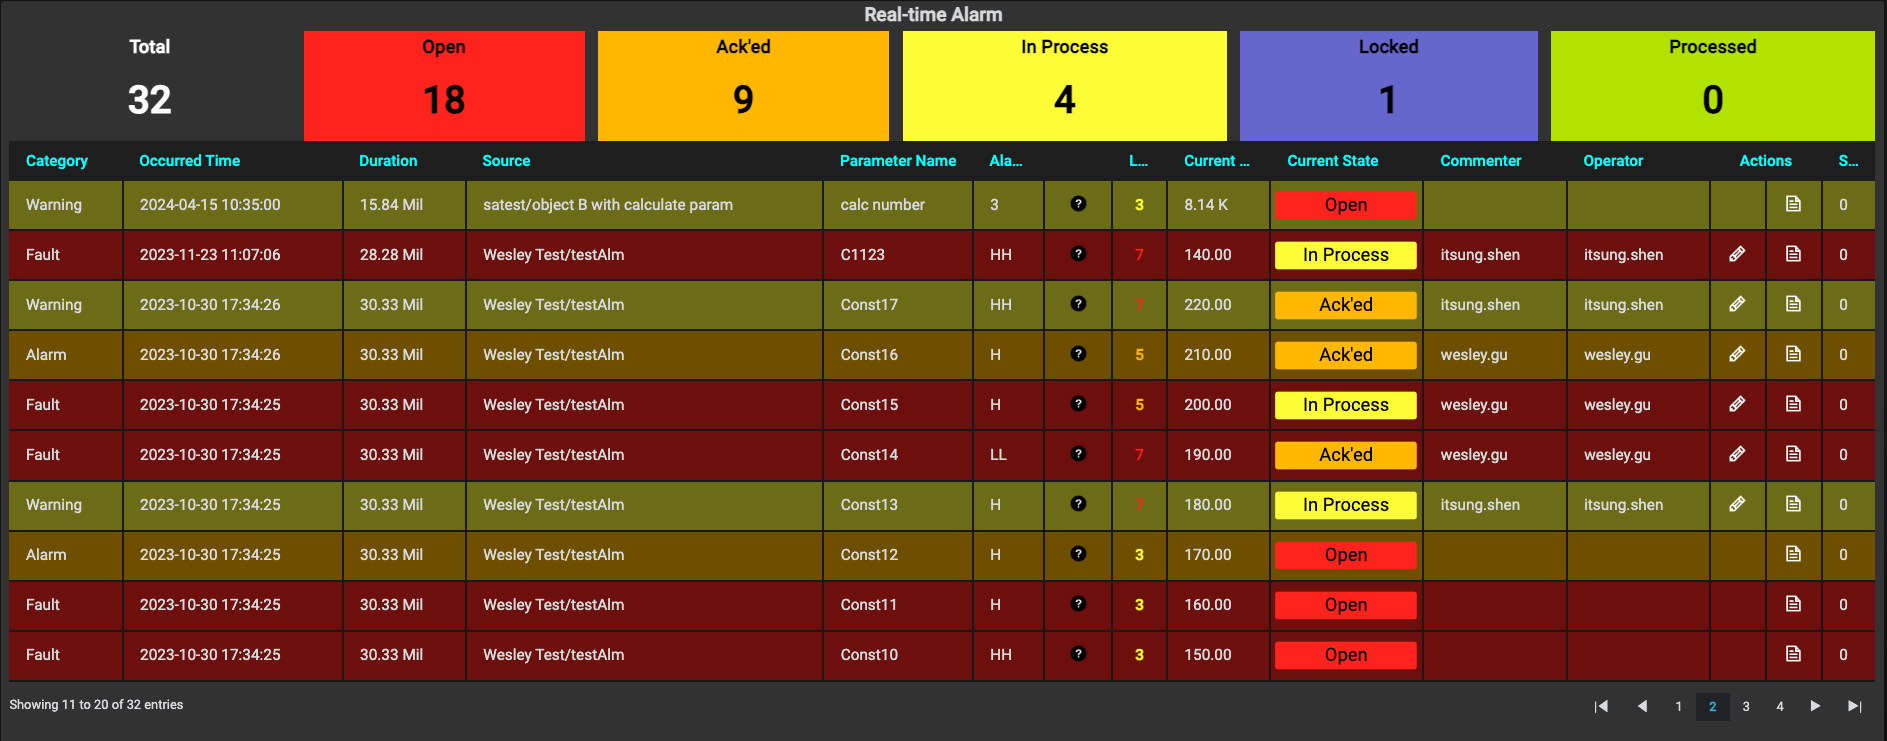
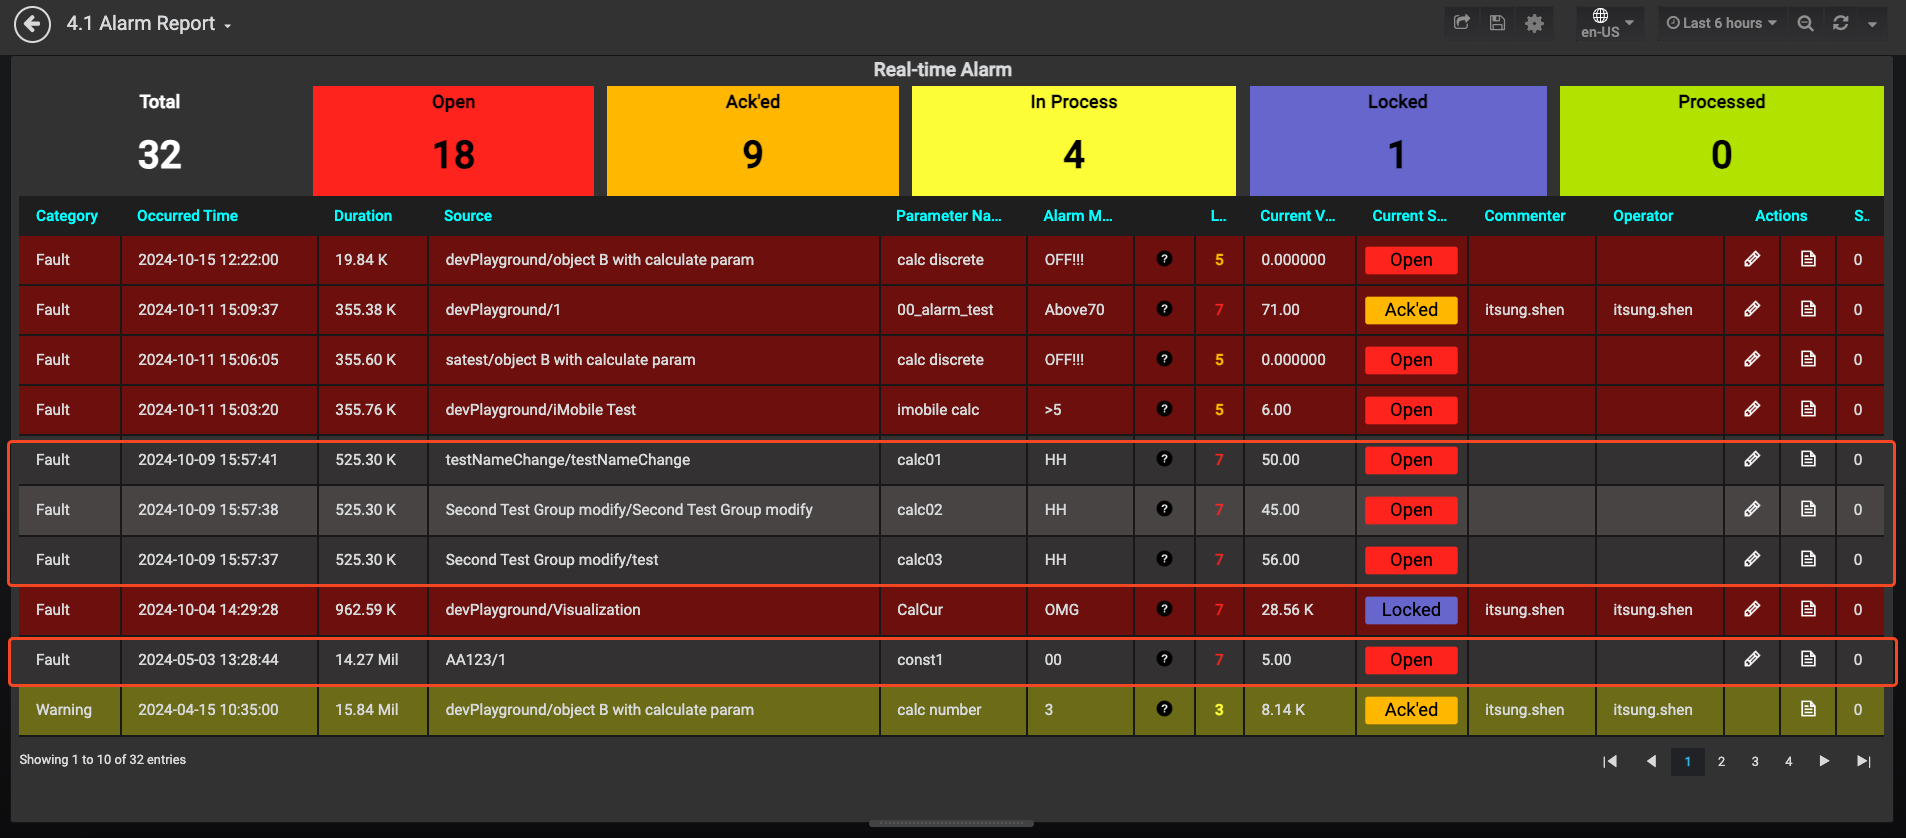
4.3.1 Real-Time Alarms
You can use the Dashboard Ene Alarm Panel to view real-time alarms from EdgeHub and update the alarm status as described in section 4.2.
-
When configuring the EdgeHub datasource, select:
- DataType: RT
- FunctionType: alarmlog_record
This will display the currently active real-time alarms.

-
To view and manage a real-time alarm, click the edit button next to the alarm record.
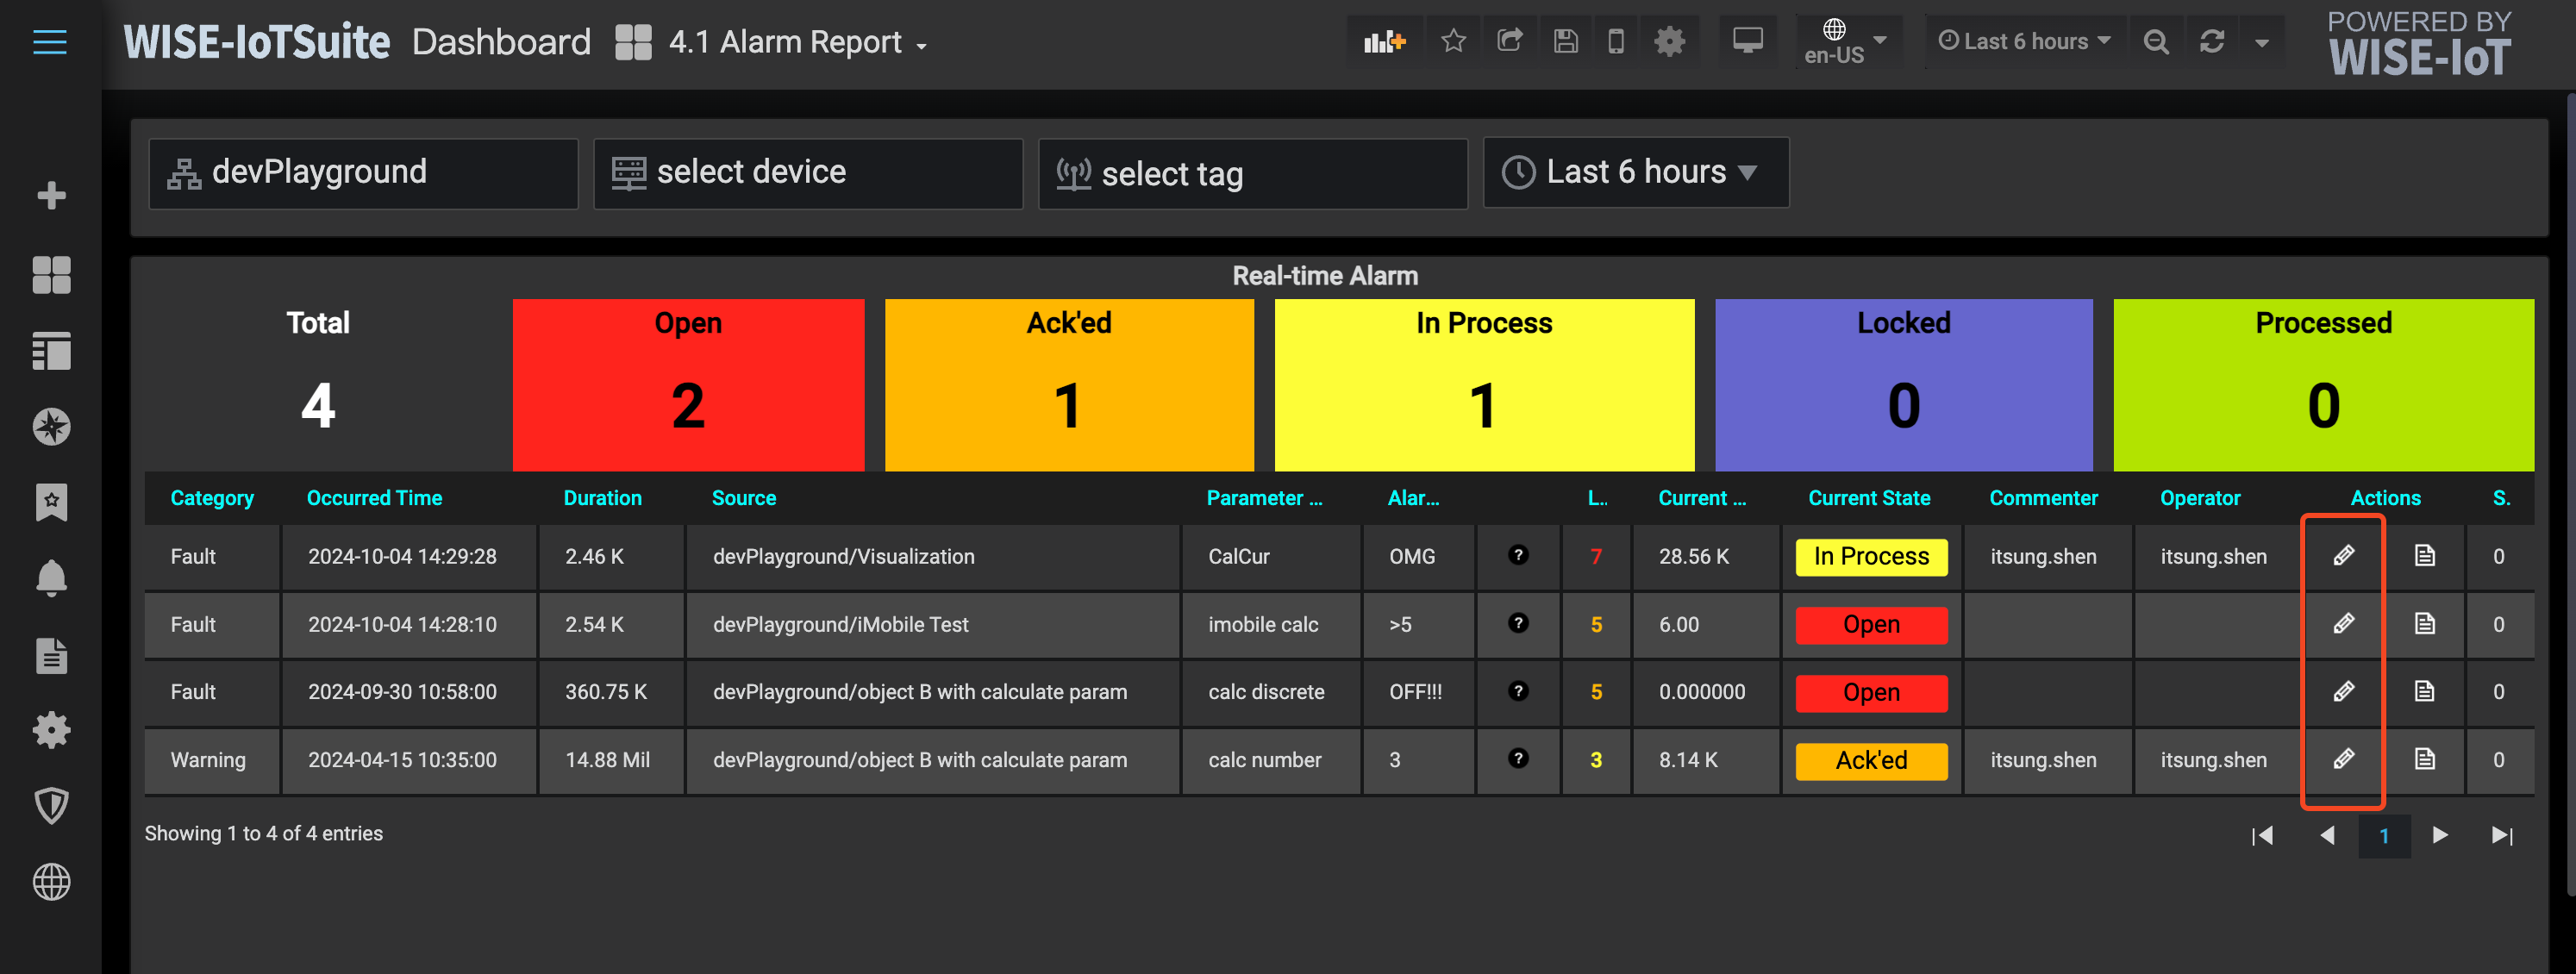
-
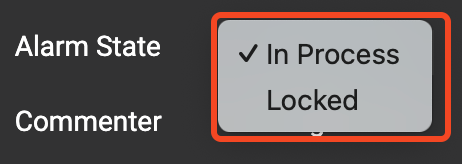
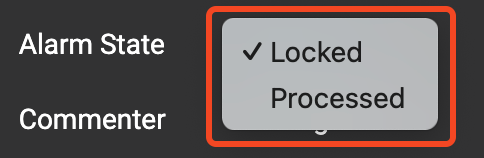
A dialog box will appear for changing the alarm status.

-
Follow the scenarios described in section 4.2 to update the alarm status based on the alarm level. Below are the actions available for each state:
-
Open
- Next state: None (Scenario 1)

- Next state: Acked (Scenario 2, 4)

- Next state: In Process or Locked (Scenario 3)
- Next state: None (Scenario 1)
-
Acked
- Next state: None (Scenario 2)
- Next state: In Process or Locked (Scenario 4)
- Next state: None (Scenario 2)
-
In Process
- Next state: Locked or Processed (Scenario 3, 4)
- Next state: Locked or Processed (Scenario 3, 4)
-
Locked
- Next state: In Process (Scenario 3, 4)

- Next state: In Process (Scenario 3, 4)
-
Processed
- Next state: Locked or Processed (Scenario 3, 4)
- Next state: Locked or Processed (Scenario 3, 4)
-
4.3.2 Other Settings
Several settings in the Ene Alarm Panel are related to sections 2.2 and 3.1. Below are instructions on how to configure them.
-
Display Alarm Category Colors
-
By default, the Ene Alarm Panel does not display the category colors configured in section 3.1. Instead, it uses a black background for the alarm list.
-
To display the category colors, go to the Ene Alarm Panel settings and find the option
Alarm Rows Background From Category. This is turned off by default. To enable the category colors, toggle this option on.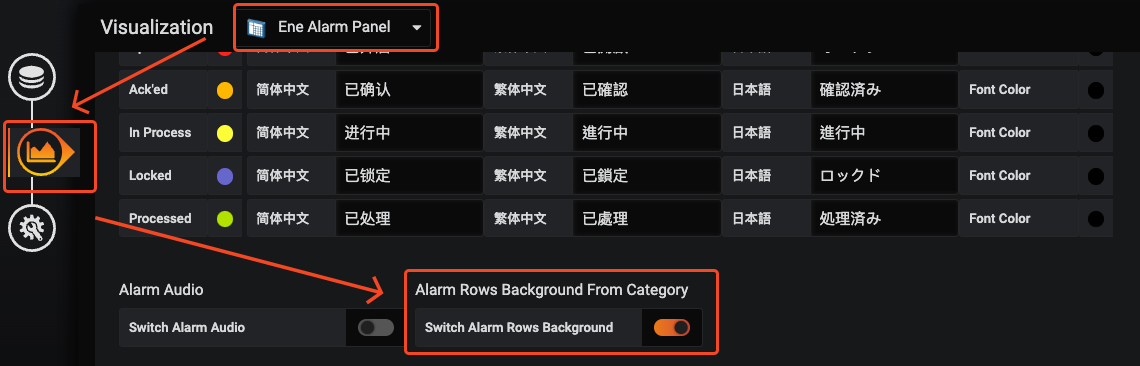
-
Once enabled, the alarm list will display alarms with background colors based on their respective categories.
-
-
Display Blinking
-
By default, the Ene Alarm Panel does not show the blinking effect configured in section 2.2.
-
To enable this effect, go to the Ene Alarm Panel settings and find the option
Alarm Blinking, then toggle it on.
-
Additionally, you need to turn on the category colors as described above.
-
After enabling these settings, alarms that reach the blinking level will show a blinking effect (alternating between the category background color and black).
-
-
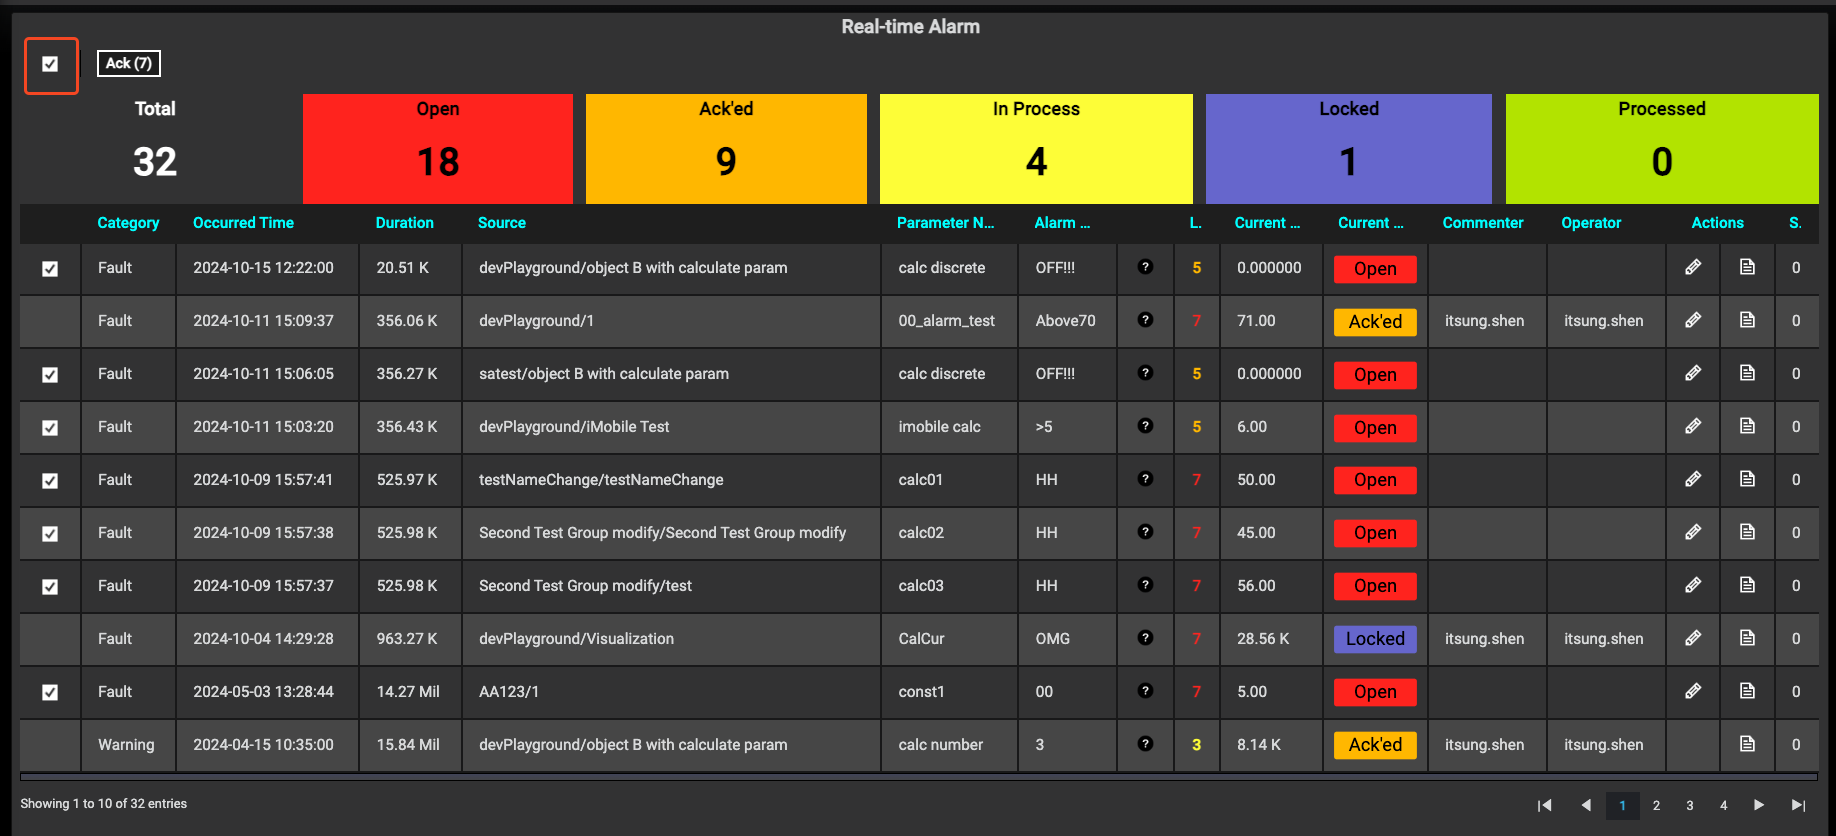
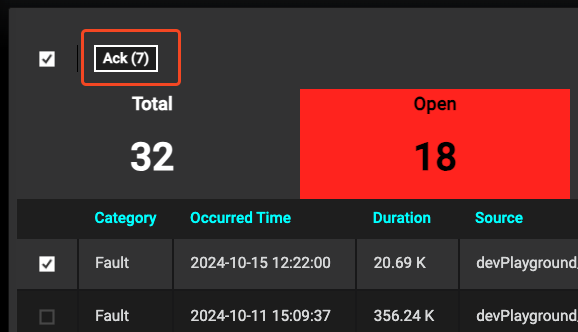
Display Multiple ACK Control
-
The Ene Alarm Panel supports an option to enable acknowledging multiple alarms at once, but this is disabled by default.
-
To activate this feature, go to the Ene Alarm Panel settings and find the
Multi Ackoption, then toggle it on.
-
Once enabled, you will see a checkbox control in the first column of the alarm list. This allows you to select multiple alarms for acknowledgment. Only alarms that require acknowledgment (based on the settings in section 2.2) will display this option.
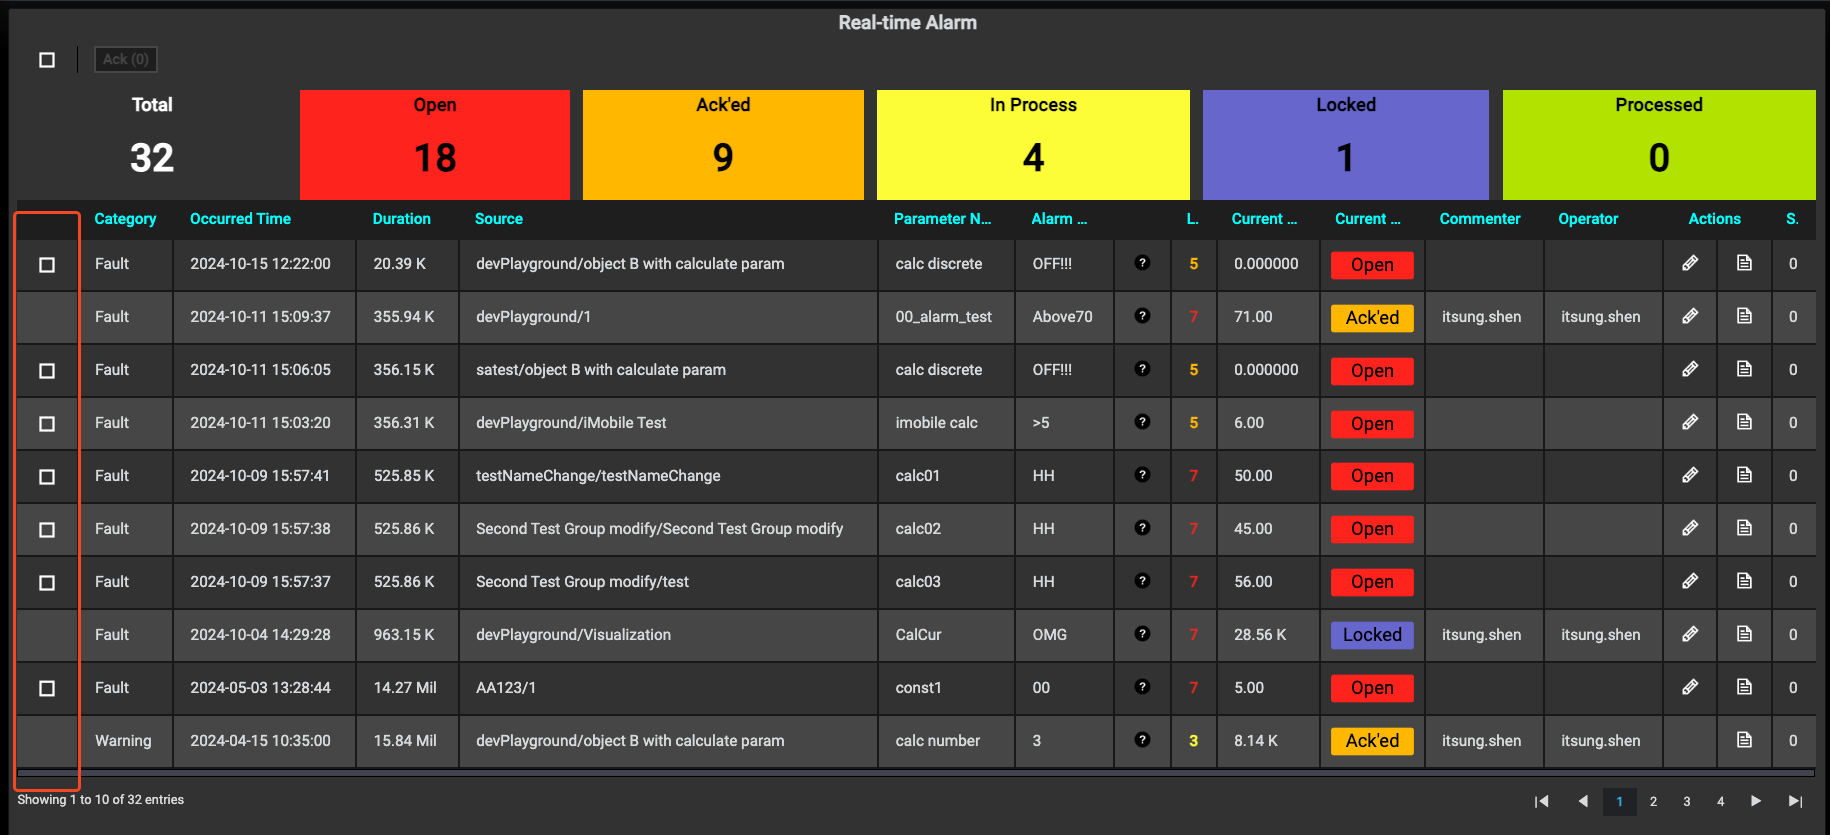
-
You can select individual alarms or use the "Select All" checkbox to select all alarms on the current page.
-
Once selected, click the ACK button to acknowledge multiple alarms at once.
-
After acknowledgment, the alarm status will change to "Acked" and the controls will be disabled (you cannot acknowledge the same alarm twice).
-
#EdgeHub