Investigation Data Retention Policy
The Investigation Data Retention Policy allows users to set a custom retention period for investigation data. This feature enables organizations to define how long data should be stored before it is automatically deleted, ensuring efficient data management and compliance with internal and regulatory policies. By configuring retention periods based on business needs, users can prevent unnecessary data accumulation while maintaining essential records for audits and reviews.
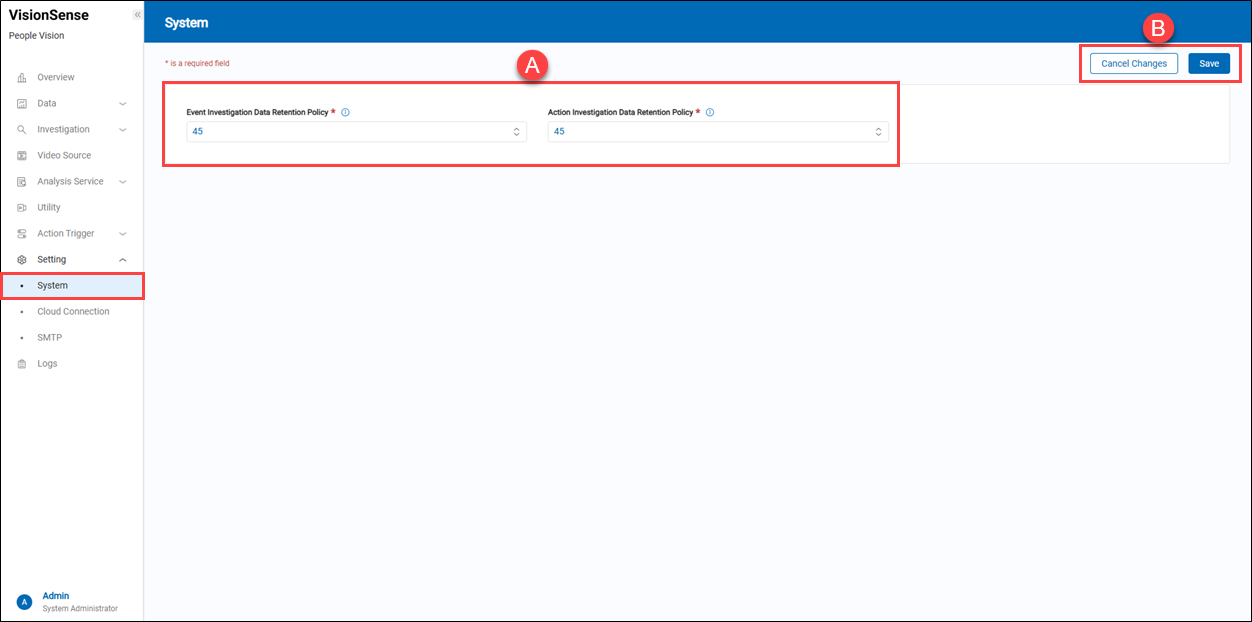 A.【Investigation data retention policy】⇒ When the time limit is exceeded, historical data will be cleared starting from the oldest records. (Unit: days)
- Event Investigation Data Retention Policy: When the time limit is exceeded, the historical data of occurred events will be cleared starting from the oldest records.
- Action Investigation Data Retention Policy: When the time limit is exceeded, the historical data of trigger actions will be cleared starting from the oldest records.
B.【Operation】⇒ Click the ‘Save’ to apply all settings or the ‘Cancel’ to cancel this operation and go back to the previous page.
> Remark
Hover over the ![]() 'Information' to view the setting period. It can range from 1 ~ 999 days.
'Information' to view the setting period. It can range from 1 ~ 999 days.
Cloud Connection
The system provides a function for uploading counting data to the 'Counting BI' service, which is a public cloud platform from Advantech. It is responsible for aggregating the people counting data and queuing data, and providing a variety of reporting features.
Items You Will Need:
If users are going to upload statistical data to the WISE-iService 'CountingBI' service, they need to prepare the following items.
- A valid user account for the WISE-iService platform.
- A valid license for the WISE-iService ‘CountingBI’ service.
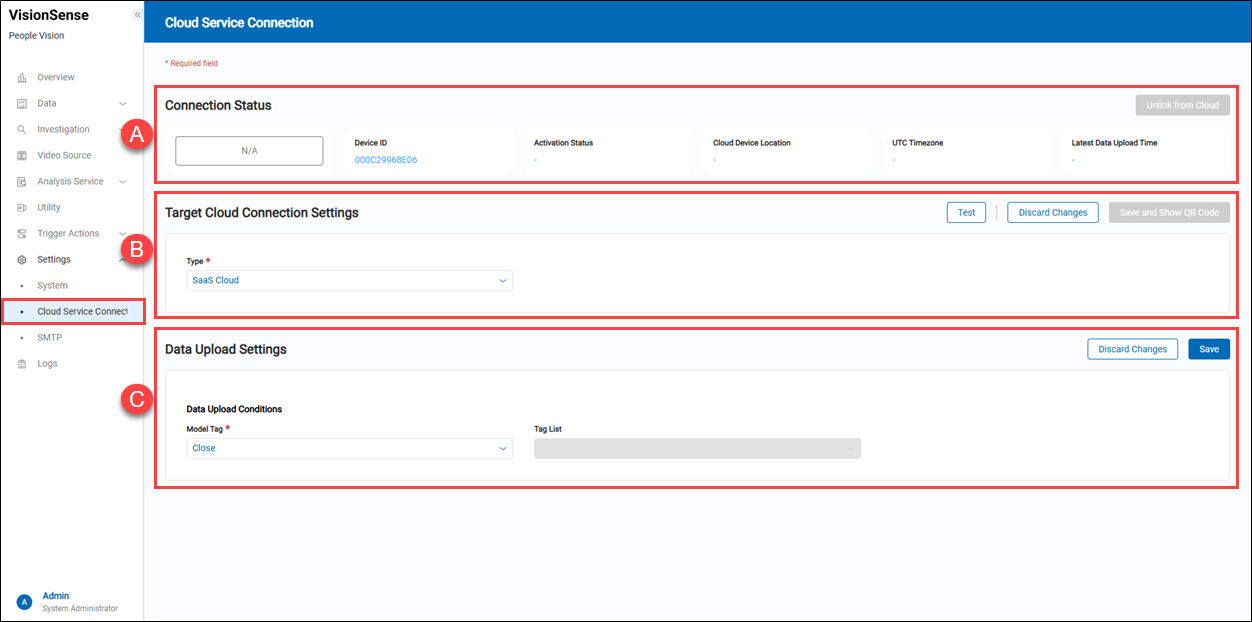 A.【Connection Status】 ⇒ Displays the cloud connection status of the device, including:
- Connection Status: It displays the current connection status with Advantech's WISE-iService Public Cloud platform. The state is shown below. N/A: The device has never been connected to the cloud platform. Connected: The device is currently connected to the cloud platform and can upload or receive data. Disconnected: The device was previously connected to the cloud but is now offline or unable to communicate with the platform. Inactivated: The device is registered but has not been activated for cloud services. It requires activation before it can function properly. Activated: The device has been successfully activated and is ready to communicate with the cloud platform.
- Device ID: A unique identifier for this device. It is usually the MAC address of the device.
- Activation Status: Indicates whether the device has been activated and connected to the cloud service.
- Cloud Device Location: Shows the site name (store name) associated with the device.
- UTC Timezone: Displays the timezone settings of the device.
- Latest Data Upload Time: Shows the last successful data upload time.
- Unlink from Cloud: Disconnects the device from the cloud platform.
B.【Target Cloud Connection Settings】 ⇒ Configures the cloud service the device will connect to:
- Type: Selects the type of cloud connection (e.g., SaaS Cloud or Private Cloud).
- Connection Address: Enter the connection address for a private cloud (only applicable when selecting Private Cloud).
- Enable SSL/TLS: Enables or disables SSL/TLS encryption to ensure secure data transmission. (only applicable when selecting Private Cloud)
- Operation: Test: Tests the connection to the cloud. Discard Change: Discards unsaved changes. Save and Show QR Code: Saves the settings and generates a corresponding QR code. Users can scan the QR code with their cell phone to register the device.
C.【Data Upload Settings】 ⇒ Configures how the device uploads data to the cloud:
- Model Tag: Selects tags to filter the types of data to be uploaded, such as 'Close.'
- Tag List: Displays available tags (this option is grayed out, possibly not yet enabled).
- Operation: Click the
 'Test' to send a test email to a recipient.
Save: Saves the current data upload settings. Discard Change: Discards unsaved changes.
'Test' to send a test email to a recipient.
Save: Saves the current data upload settings. Discard Change: Discards unsaved changes.
> Remark For instructions on scanning the QR code with a cell phone to register the device to the WISE-iService 'CountingBI' service, please refer to the link below. Please check this link
SMTP Management
Filling in the SMTP Host on the device is to configure the mail server. This setup allows the system to send notification emails or password change confirmation emails to users via the SMTP protocol.
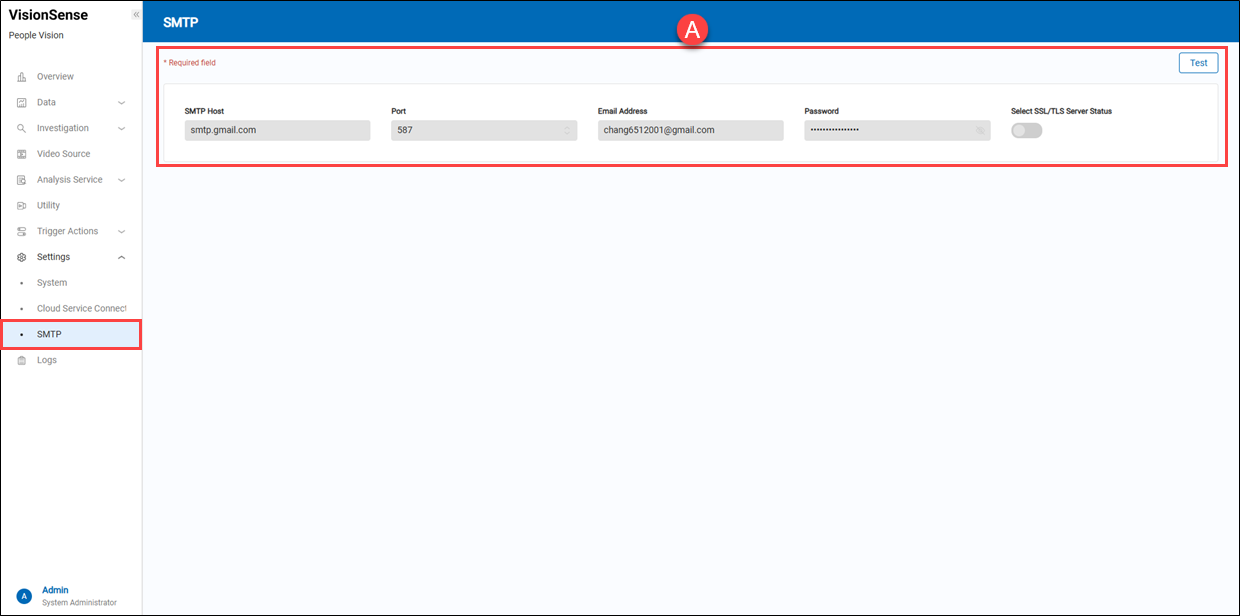 A.【SMTP Server】 ⇒ To configure an SMTP server for sending emails.
- SMTP Host: (Readonly) The host address of the SMTP server.
- Port: (Readonly) SMTP server's connection port.
- Email Address: (Readonly) Provide the sender's email account for sending notification letters.
- Password: (Readonly) Provide the sender's password for sending notification letters.
- Select SSL/TLS Server Status: (Readonly) Provide the security connection for sending notification letters.
- Test: Click the 'Test' to send a test email to a recipient.