Direct Access
Changelog
| Version | Author | Update date | Comment |
|---|---|---|---|
| 2.4.0 | ITsung.Shen | 2025/04/21 | First Version |
| 2.4.1 | ITsung.Shen | 2025/07/01 | Add chapter 2.1.3 / 2.2.3 / 2.2.4 / 2.3.4 / 2.3.5Update images with new UI interface |
| 2.5.0 | ITsung.Shen | 2025/09/03 | Add alarm rule sections: 2.1.4 / 2.2.5 / 2.3.6Add Chapter 3: Alarm SettingsUpdate UI screenshotsRemove Compression in 2.1.1Remove ENFRYPTION_SIZE_1024 in 2.1.1Add Current traffic description in 2.2.1 / 2.3.1Add remote connection statistics in Chapter 1 |
1. Introduction
Starting from version 2.4.0, EdgeHub supports the Direct Access feature, allowing users to manage various cross-subnet remote connection configurations supported by Advantech devices. After logging into EdgeHub, users can click the Direct Access button on the EdgeHub homepage to access this feature.
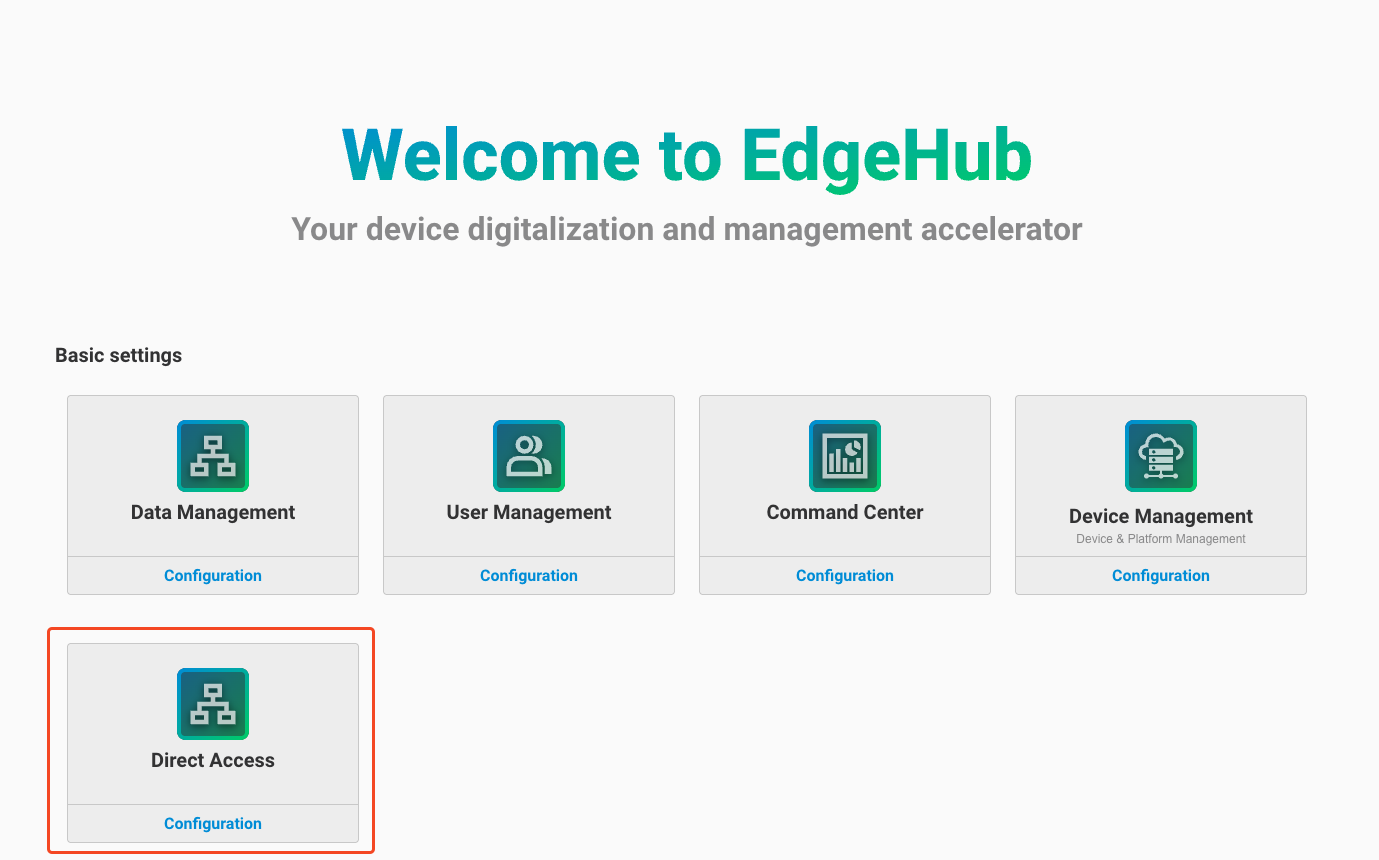
Direct Access provides four main function blocks:
- Connection management
- Usage insight (Not yet available)
- Alarm settings
- Activity log (Not yet available)
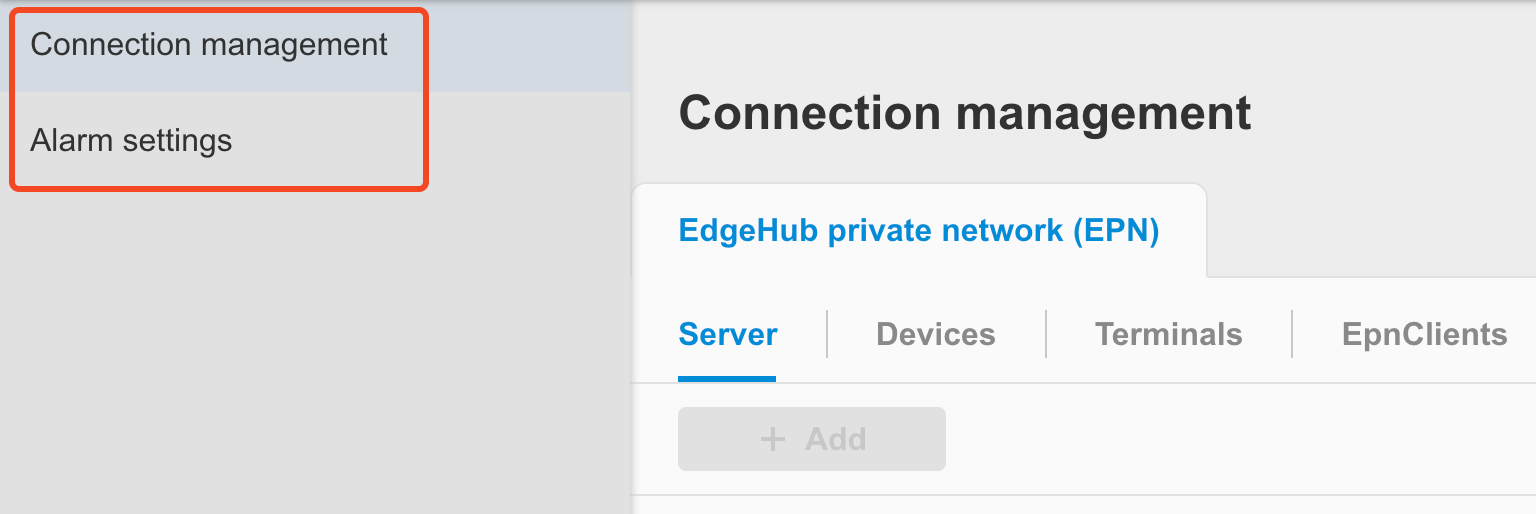
Currently, the first remote connection management function supported by Direct Access is the configuration of components related to EdgeHub Private Network (EPN), which includes:
- EPN Server
- Add and edit EPN server configurations
- EPN Device
- Display a list of EPN devices and their channel connection statuses
- Edit EPN device settings
- EpnClient
- Display a list of EpnClients and their channel connection statuses
- Edit or delete EpnClients
- Terminal
- Display a list of terminals
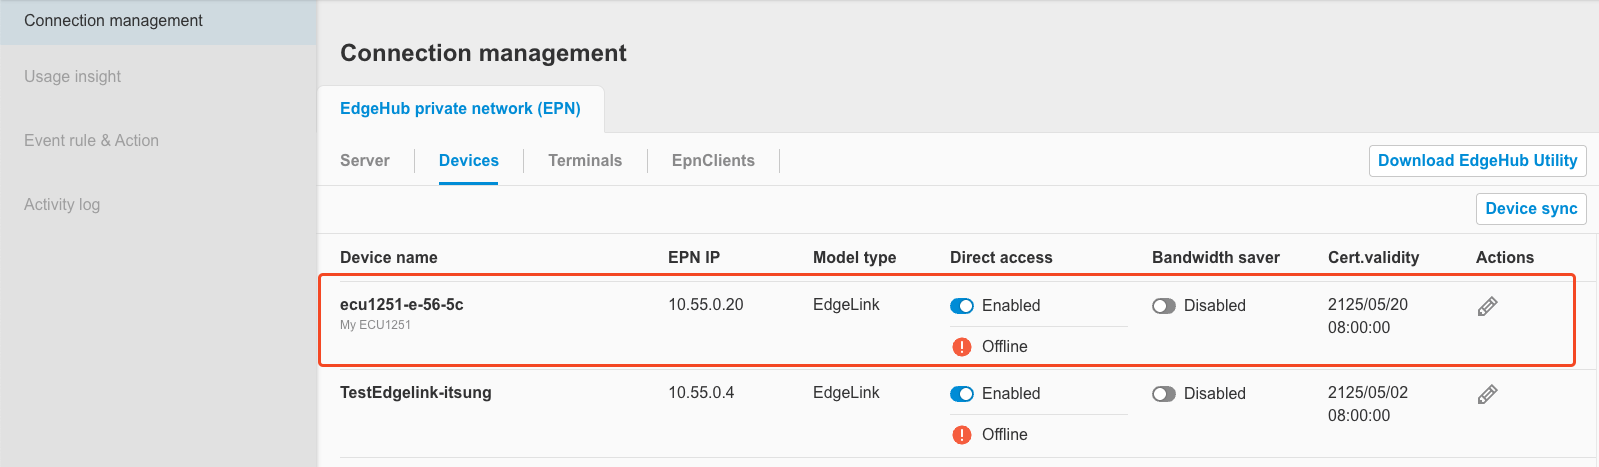
You can view remote connection statistics for the current tenant at the top-right corner of the Connect Management homepage. The statistics include:
-
Total client devices: The total number of devices and EpnClients under this tenant.
-
Online devices: The number of currently online devices, displayed as online / total.
-
Online EpnClients: The number of currently online EpnClients, displayed as online / total.
-
Current traffic: The accumulated traffic (including downloads and uploads) from all devices and EpnClients since their most recent EPN connection. If all devices and EpnClients are disconnected, this value is reset to 0.
-
Monthly traffic: The total monthly traffic from all devices and EpnClients under the tenant.
> Note: The monthly statistics are reset at 00:00:00 UTC on the 1st day of each month.

The following sections describe the detailed configuration settings.
2. Connection management - EdgeHub private network (EPN)
2.1 EPN Server
2.1.1 Add server
Follow the steps below to add an EPN Server:
-
Click the
Addbutton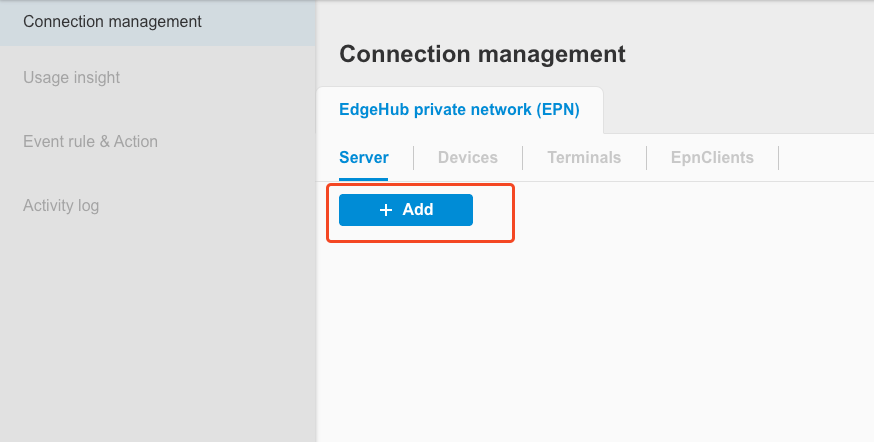
-
Adjust the following fields as needed. In general, it is recommended to keep the default values for all fields except the following two:
- EPN subnet address
- Terminal subnet address
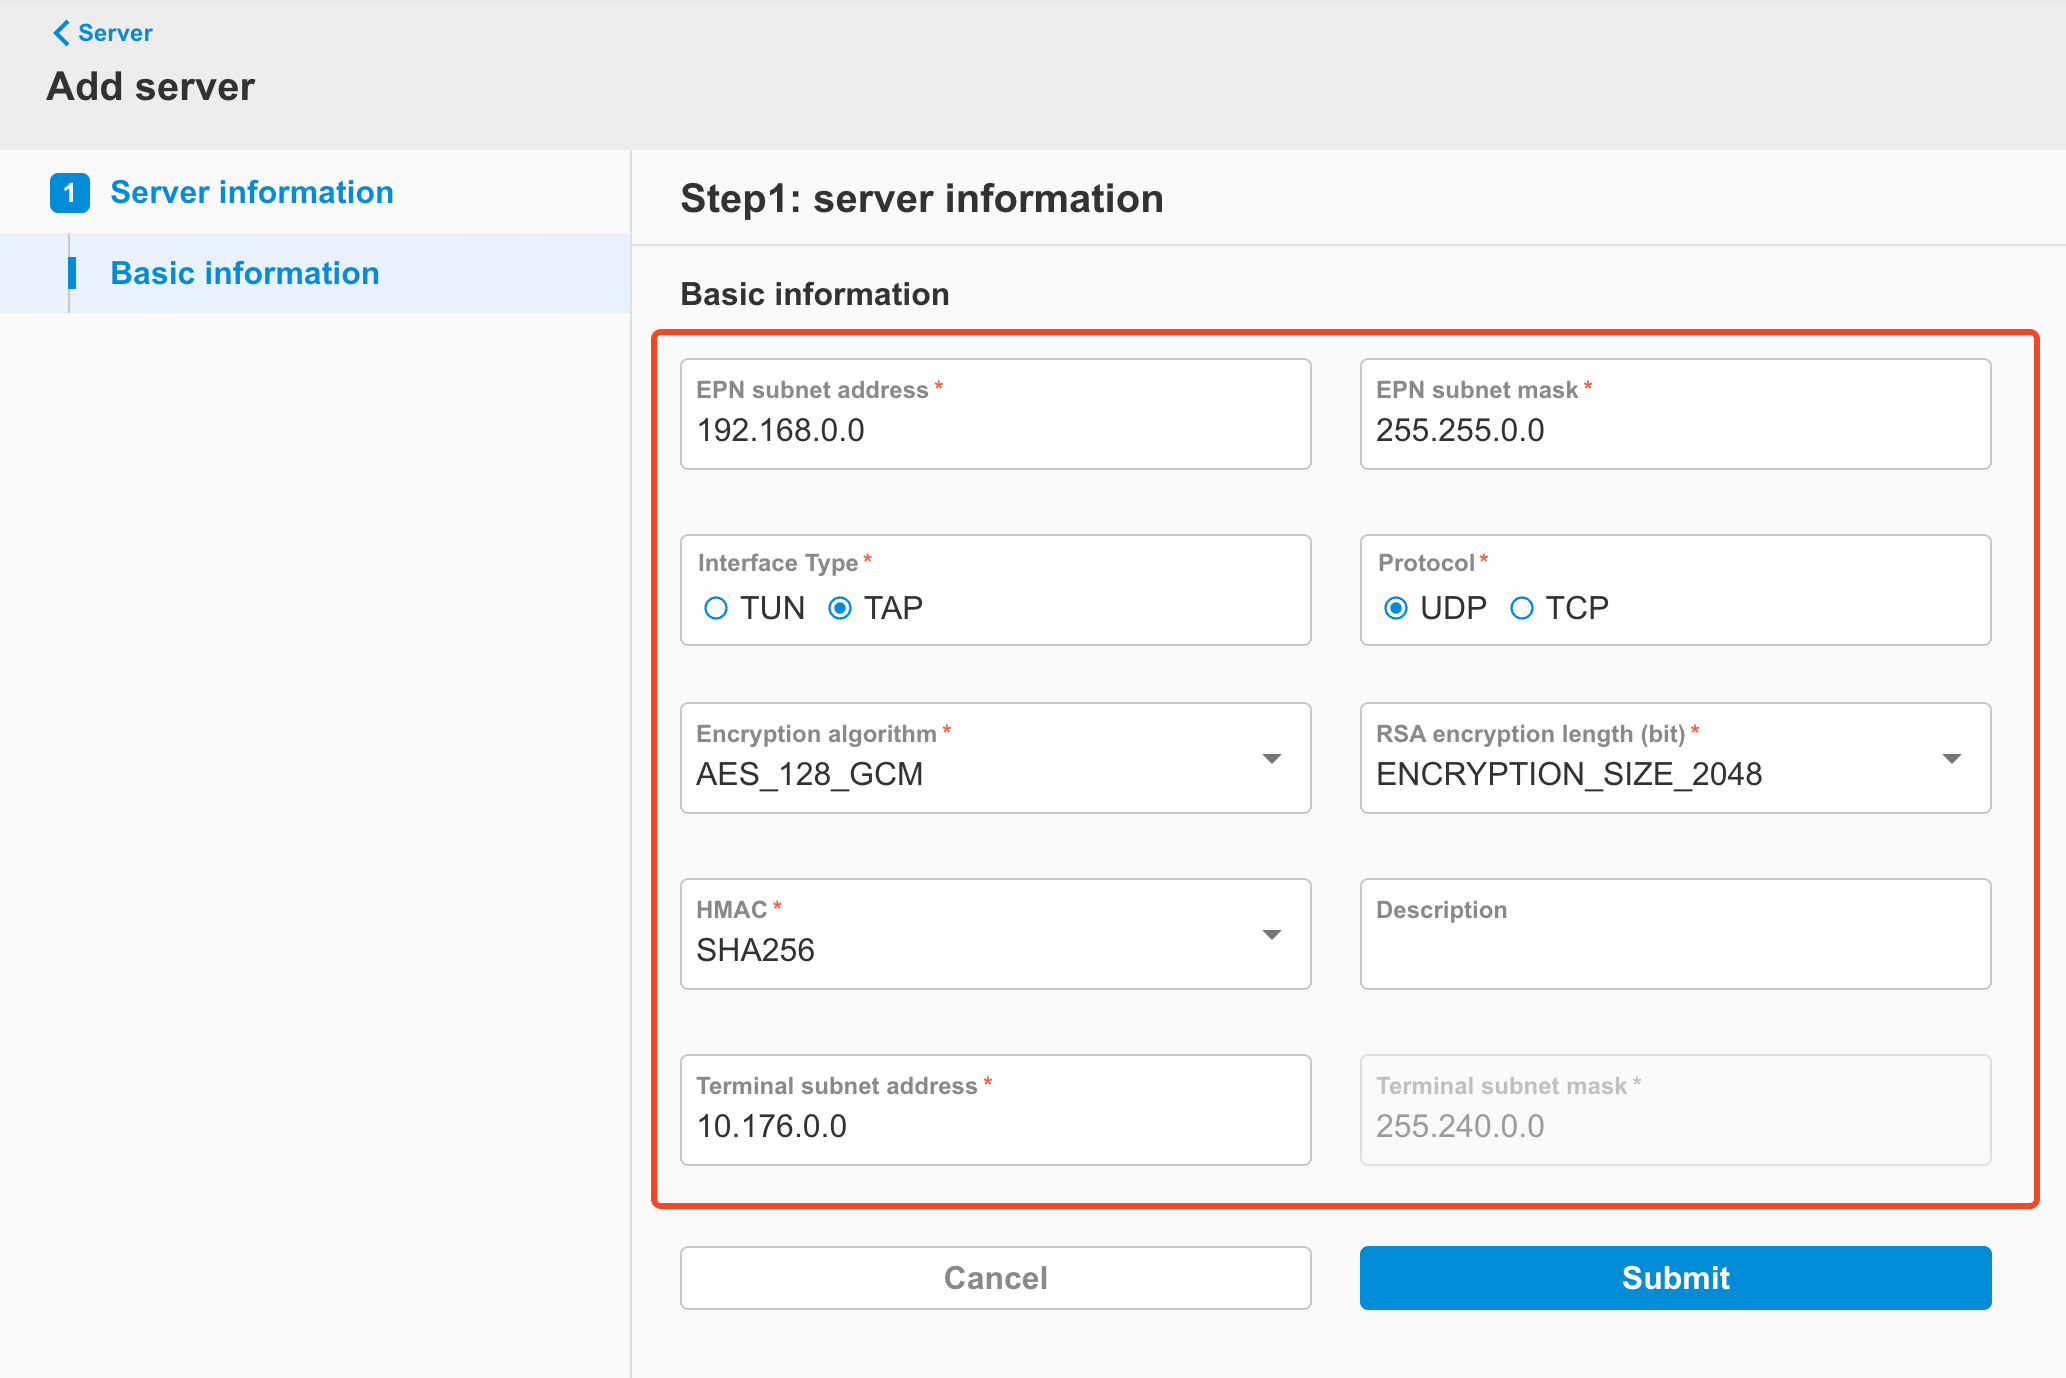
Field Description Options Default Value EPN Subnet address EPN subnet address, IP used to allocate addresses for EPN Devices and EpnClients String, IPv4 format 192.168.0.0 EPN Subnet mask Subnet mask for the EPN subnet String, IPv4 format 255.255.0.0 Interface Type EPN interface type**- TUN**: IP-layer tunnel (IP packets only)- TAP: Ethernet-level tunnel (supports broadcast/ARP) TUN / TAP TAP Protocol Protocol used for EPN tunneling TCP / UDP TCP Encryption algorithm Encryption algorithm for the EPN tunnel AES_128_CBCAES_128_GCMAES_256_CBCAES_256_GCM AES_128_GCM RSA encryption length (bit) RSA key length for key exchange (in bits) ENCRYPTION_SIZE_2048ENCRYPTION_SIZE_4096 ENCRYPTION_SIZE_2048 HMAC Hash-based Message Authentication Code for EPN packet integrity check SHA224SHA256SHA384SHA512 SHA256 Description Description of the server Any string None Terminal subnet address Terminal subnet addressIP used to allocate addresses for Terminals String, IPv4 format 10.176.0.0 Terminal subnet mask Terminal subnet mask String, IPv4 format (non-editable) 255.240.0.0 -
Notes:
-
When Interface Type is set to TUN, Terminal functionality is not supported, and related settings will be hidden or disabled.
-
When selecting TCP or UDP as the Protocol, the EPN Server will listen on different ports, which are dynamically assigned by EdgeHub and may range from Port 13000 ~ 14000.
-
-
After completing the input, click the
Submitbutton.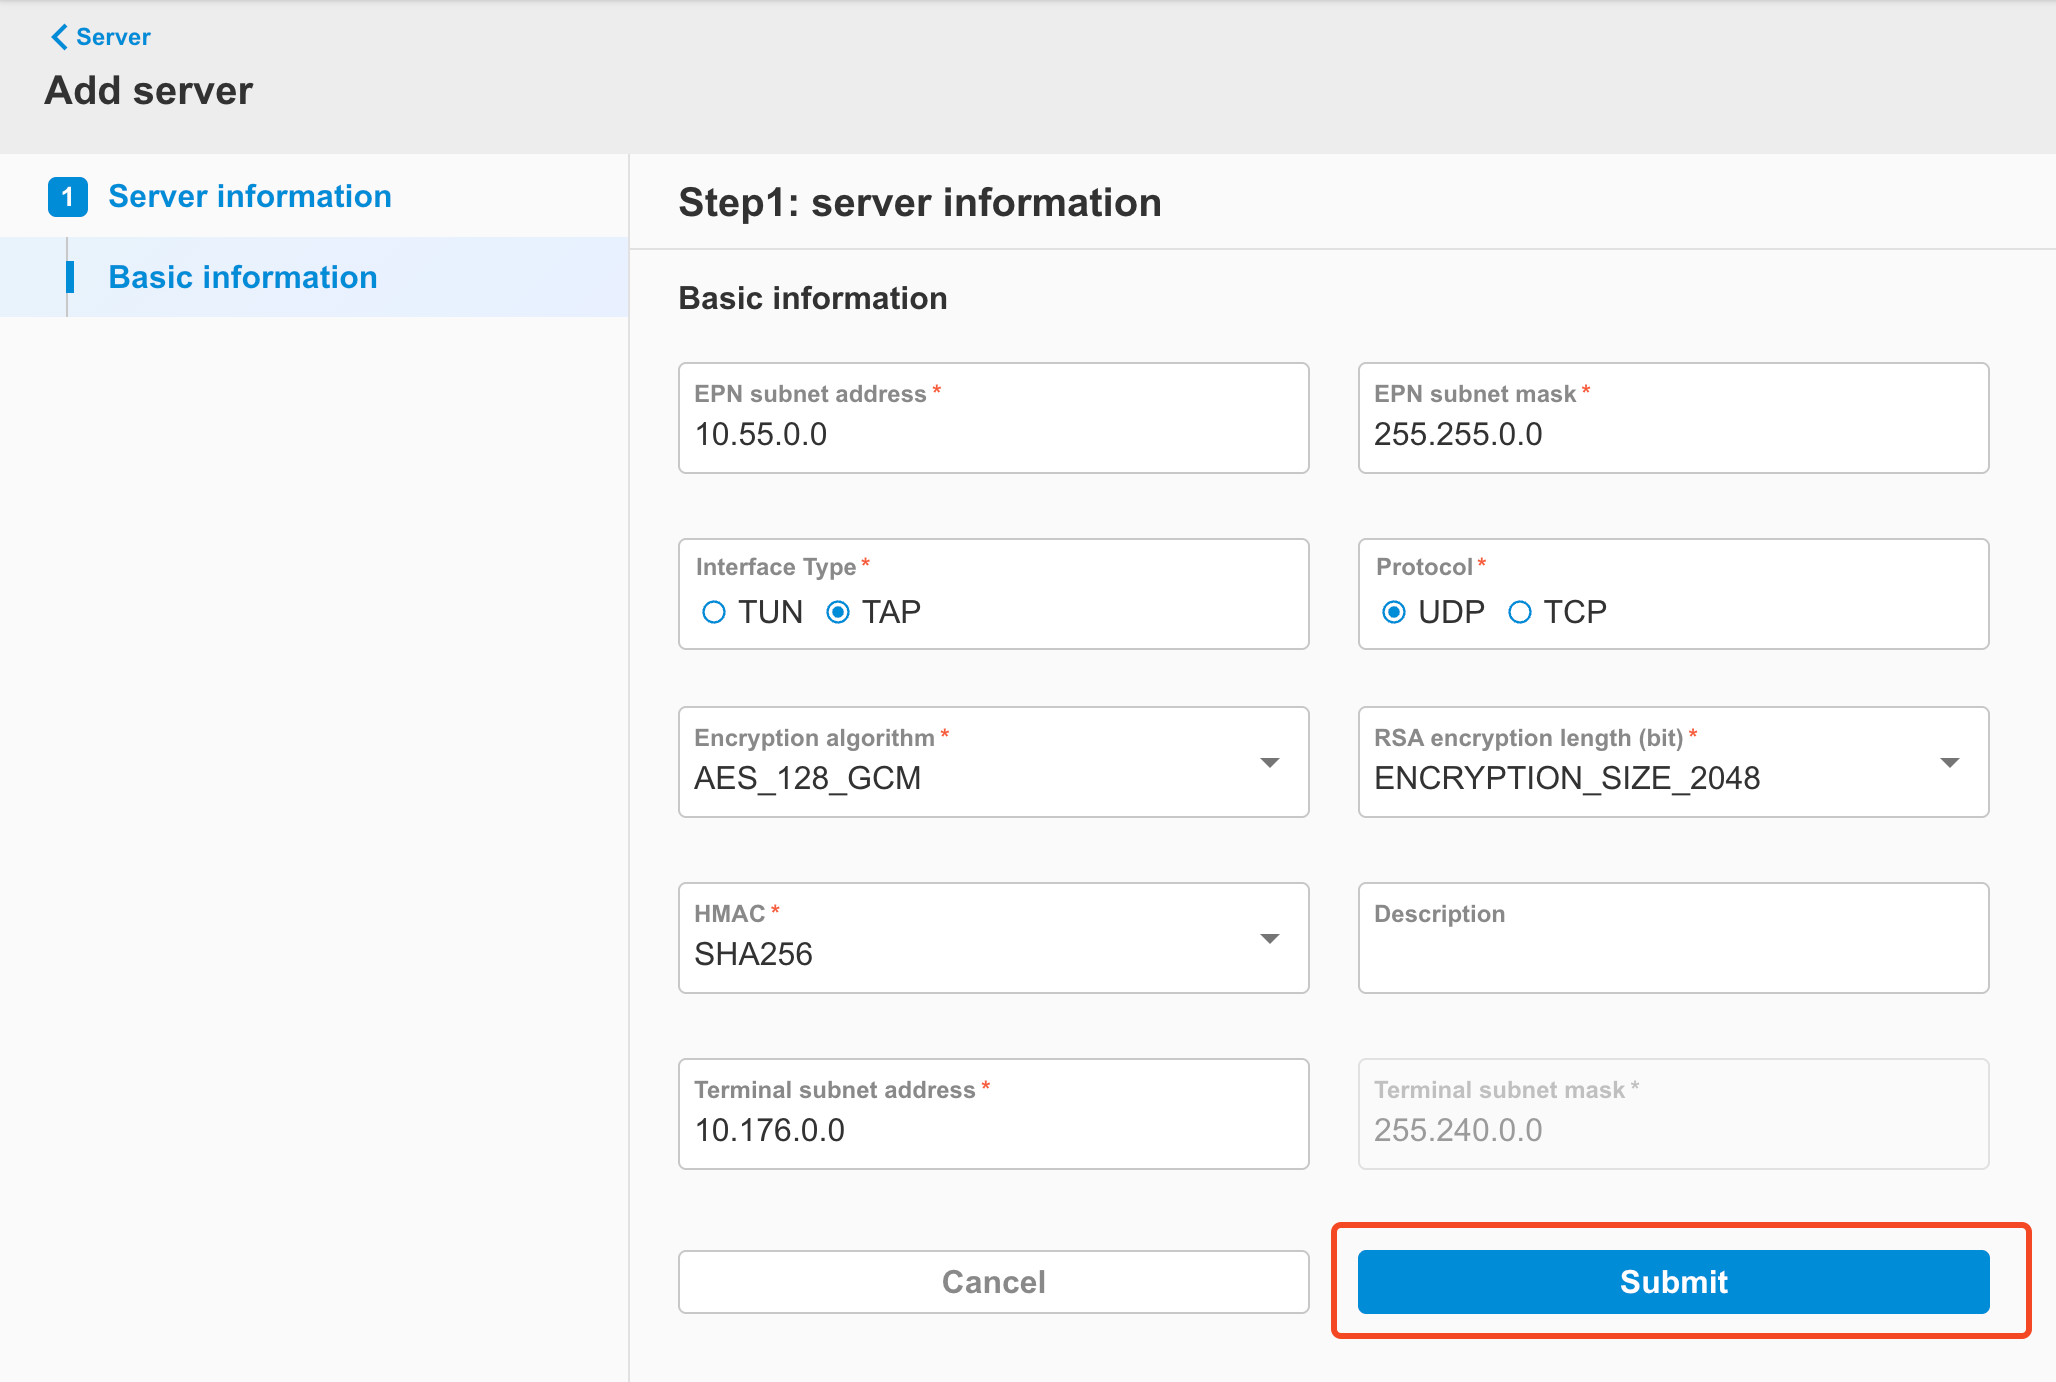
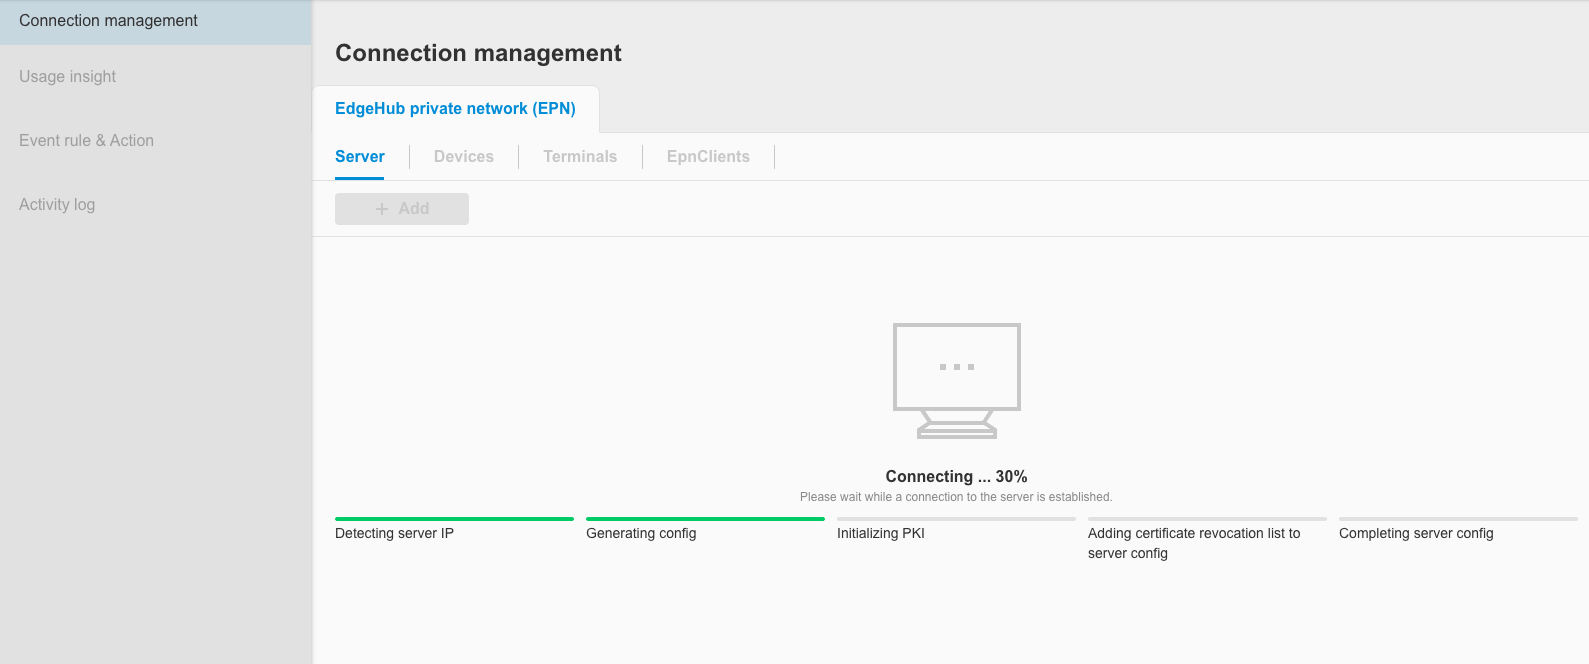
-
The screen will enter a progress interface. Please wait for the EPN Server to finish being created.
-
Once the creation is complete, click the
Continue to device syncbutton.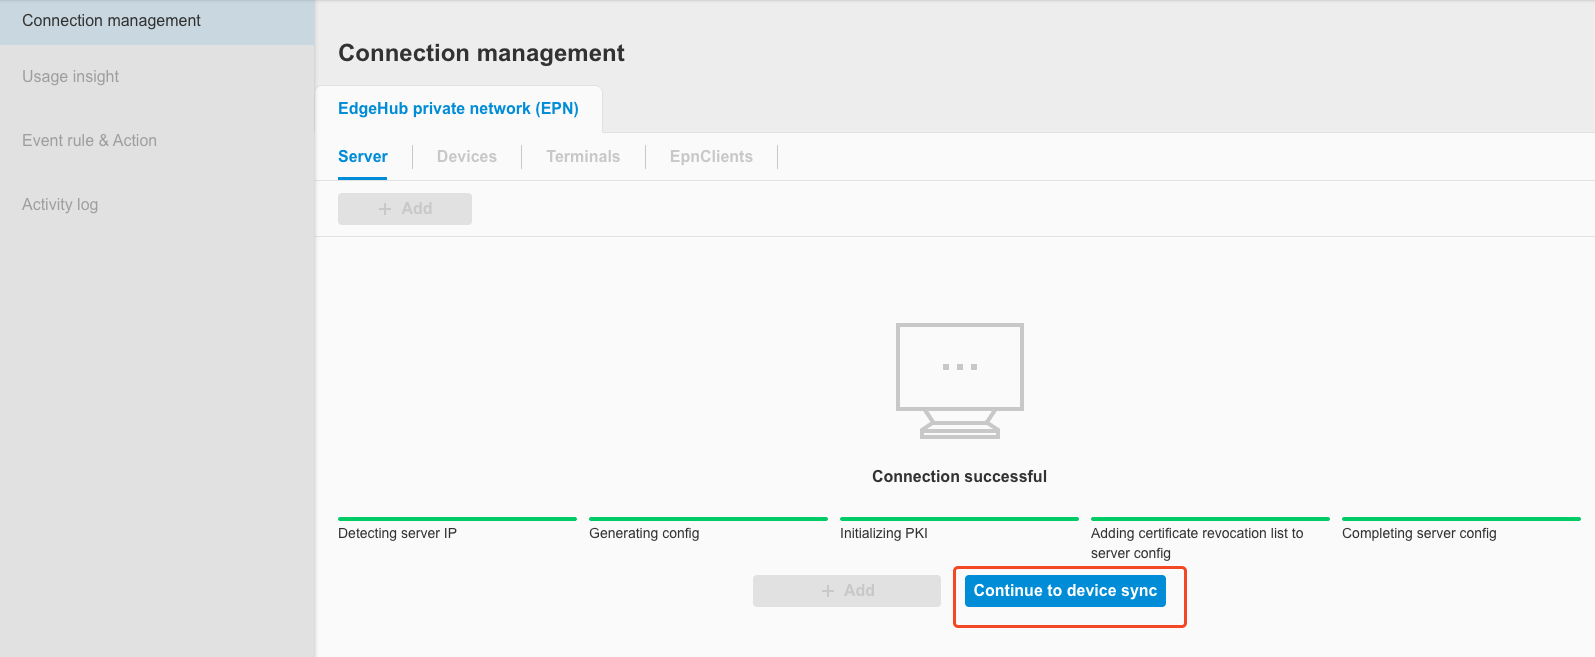
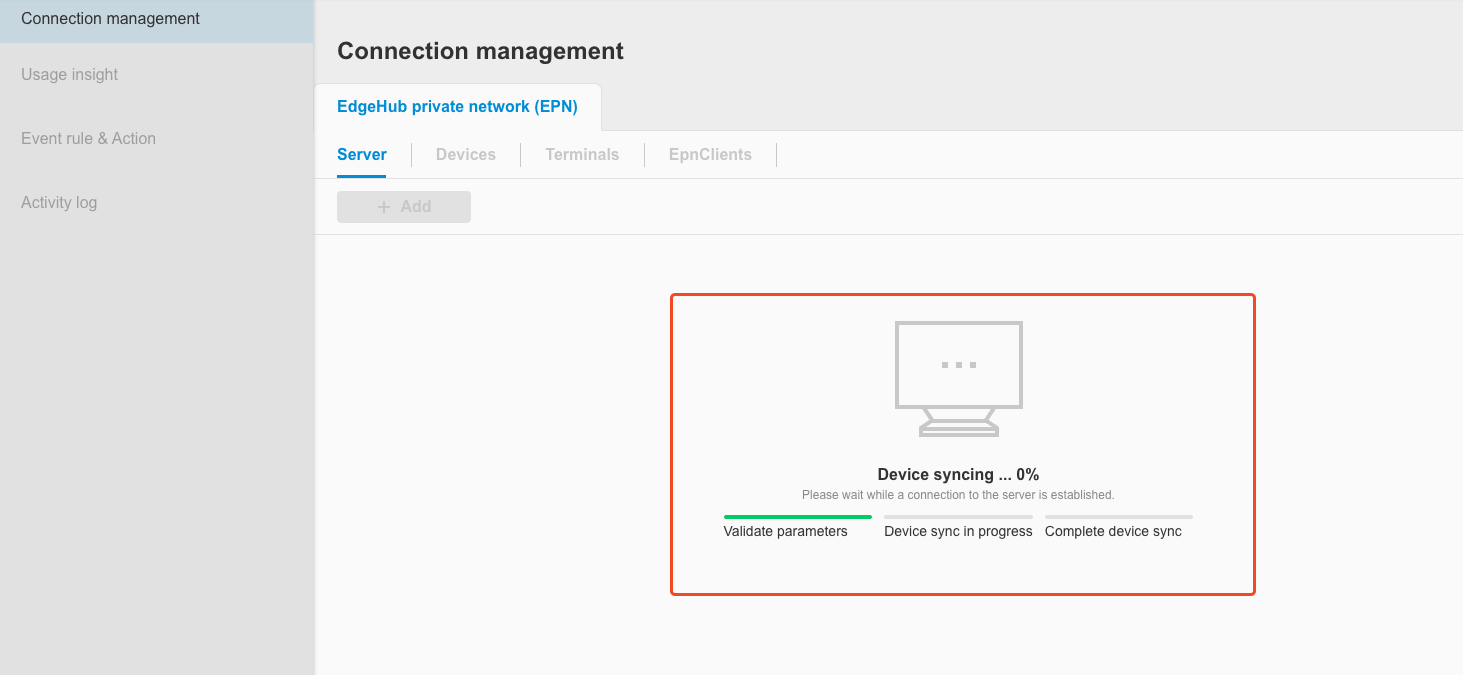
-
You will enter the device synchronization screen. At this point, it will sync with the device list from the Device Management feature and automatically add devices that support EPN into the EPN device list.
- Currently supported device type:
- EdgeLink
- Currently supported device type:
-
After device synchronization is complete, the screen will return to the server page. You can see that the server has been successfully created in the list.
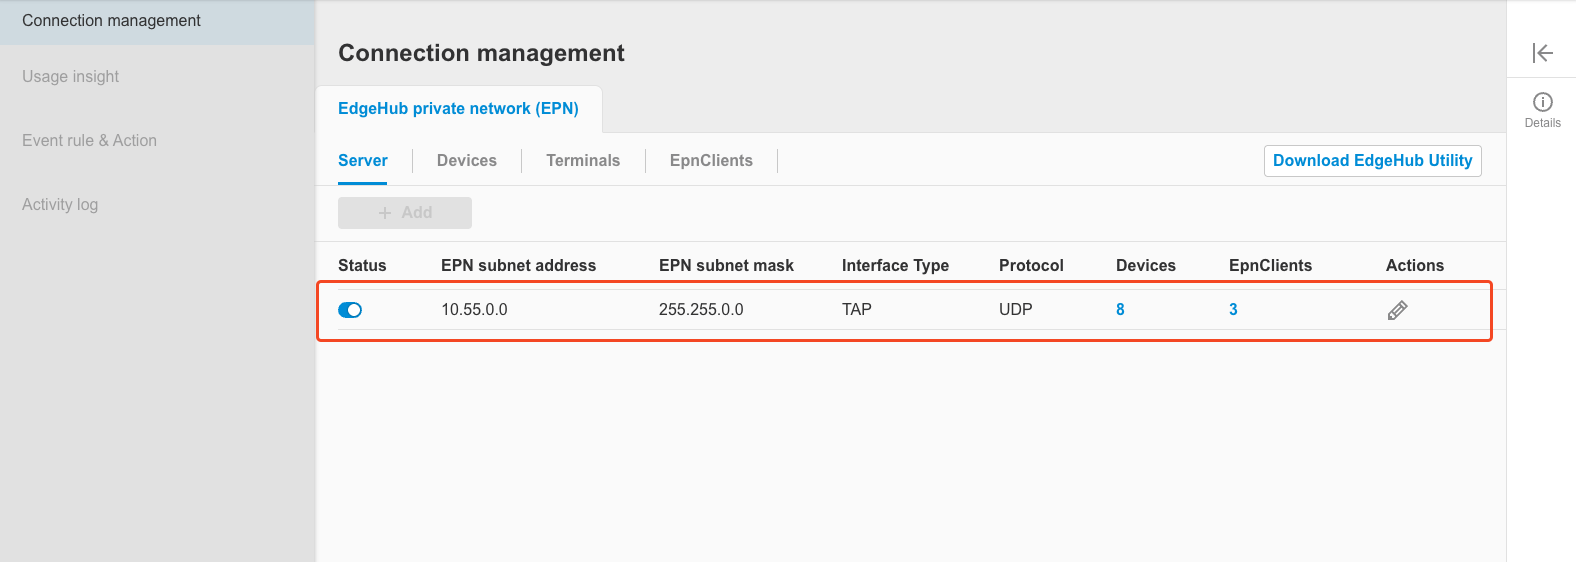
-
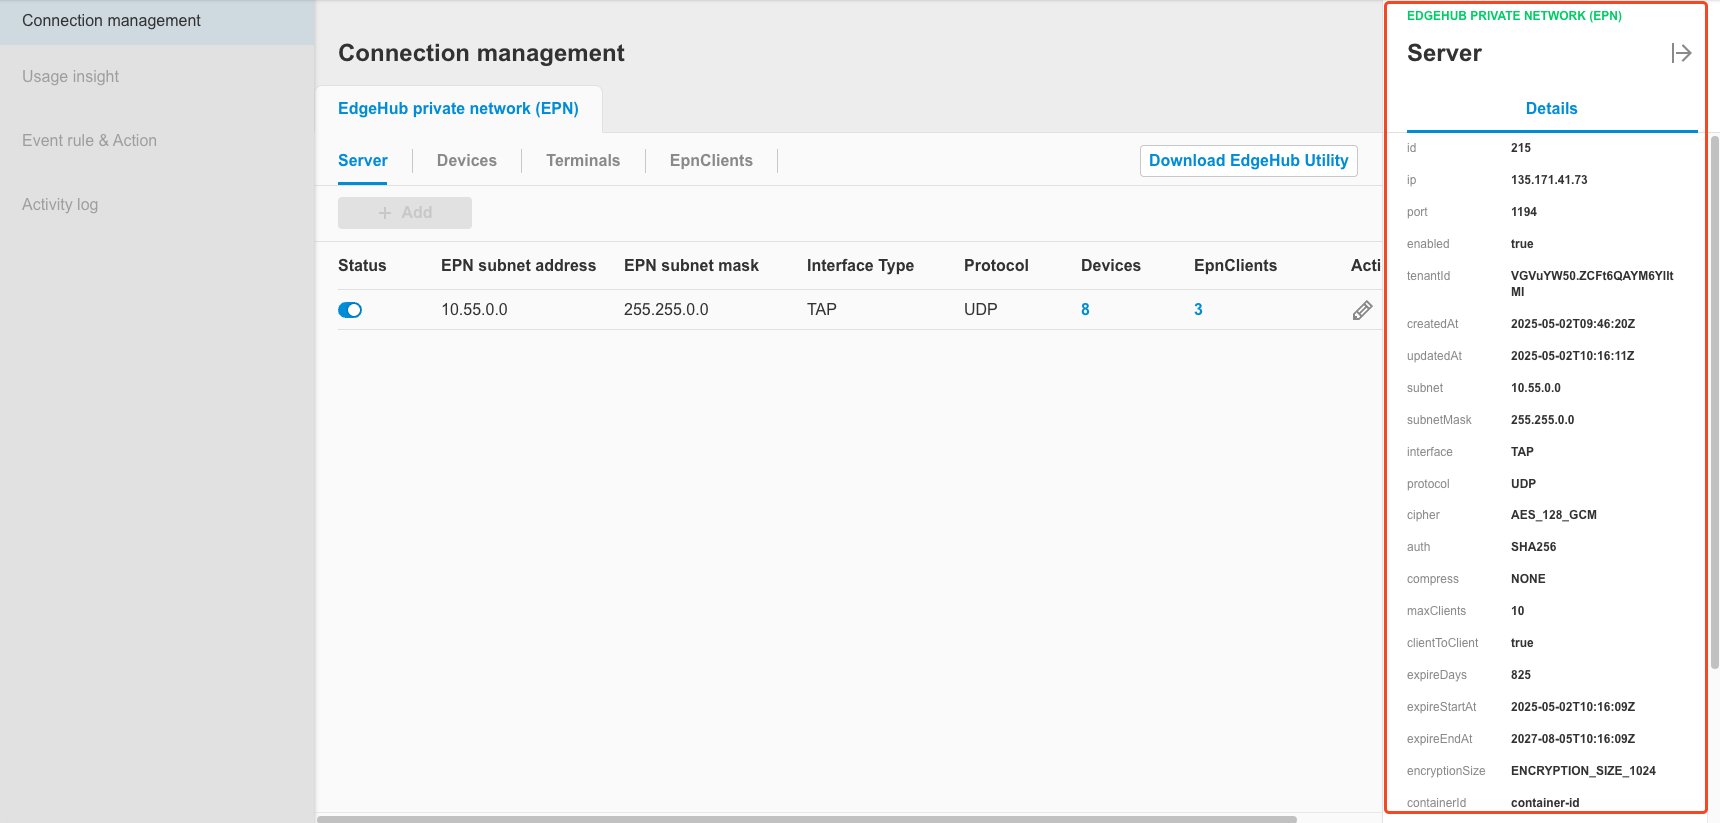
You can open the sidebar to view detailed information of the EPN Server.
- Note: If firewall configuration is required, please allow access to the target based on the selected protocol port and the IP information shown in the sidebar.
2.1.2 Edit server
Follow the steps below to edit an EPN Server:
-
Click the
Actionbutton.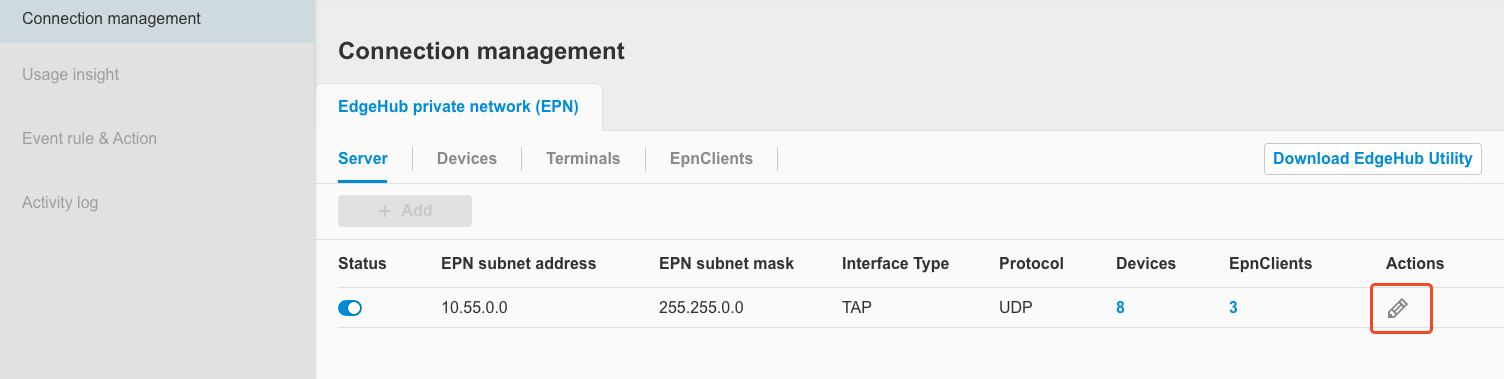
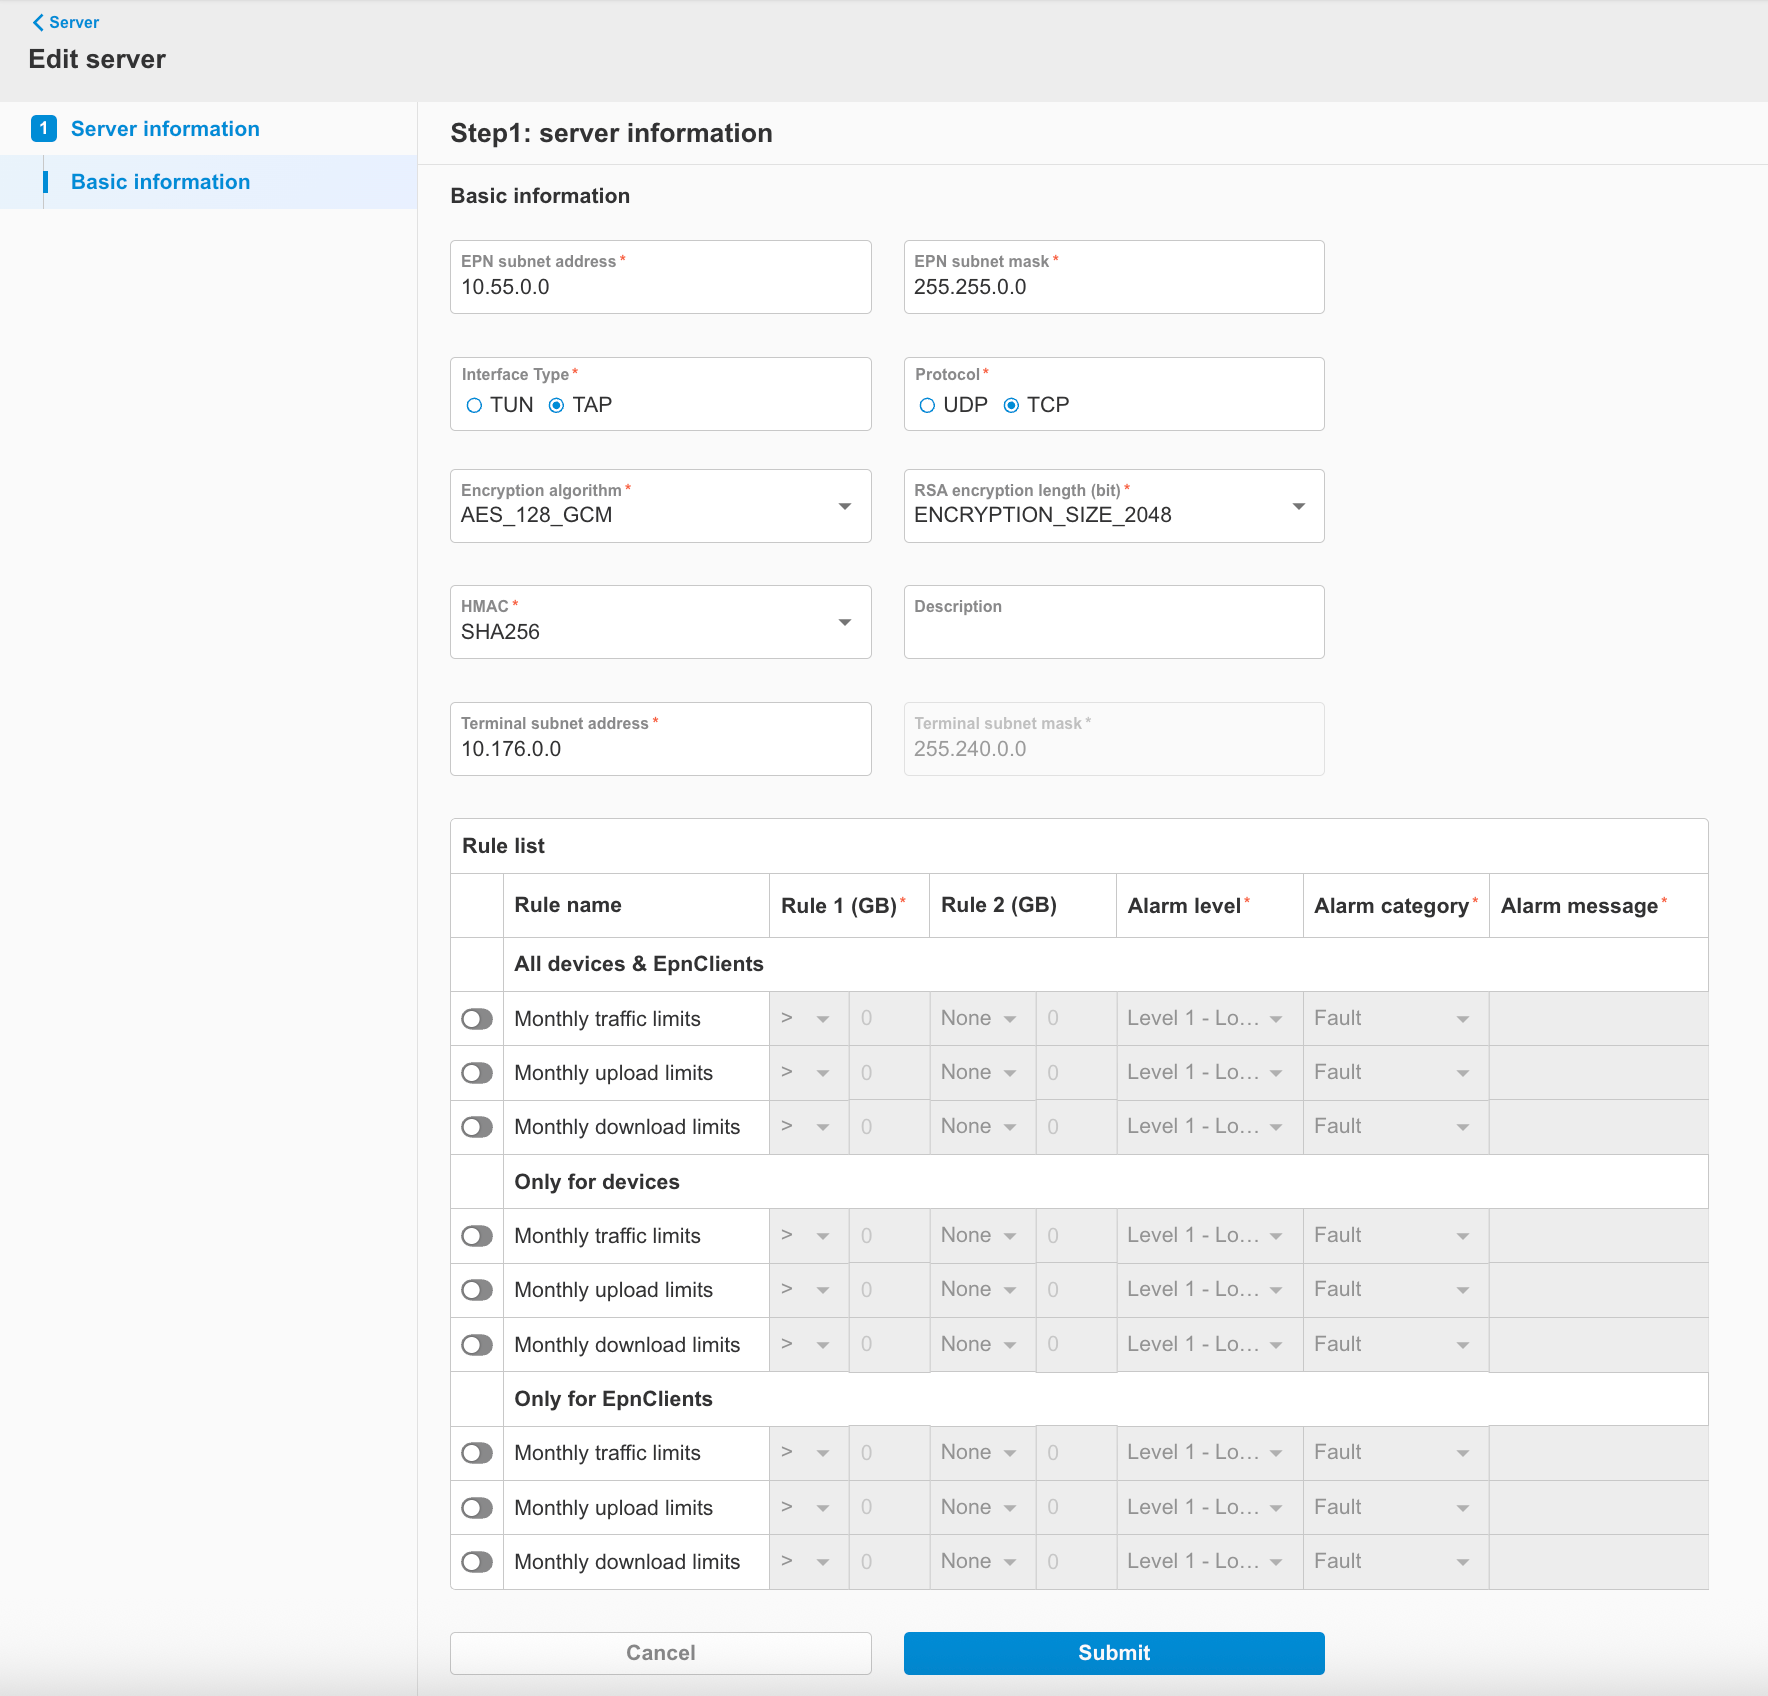
-
Modify the fields as needed. Field descriptions are the same as in section 2.1.1 Add server. Additionally, starting from version 2.5.0, configuration of the server’s alarm rules has been introduced. For detailed instructions, please refer to section 2.1.4.
-
After configuration, click
Submit. A prompt will appear informing you that changing the server settings will invalidate all existing certificates for connected EPN devices and EpnClients, causing them to immediately disconnect. Once the server update is complete, users will need to reconnect manually if needed. If everything is correct, clickSave.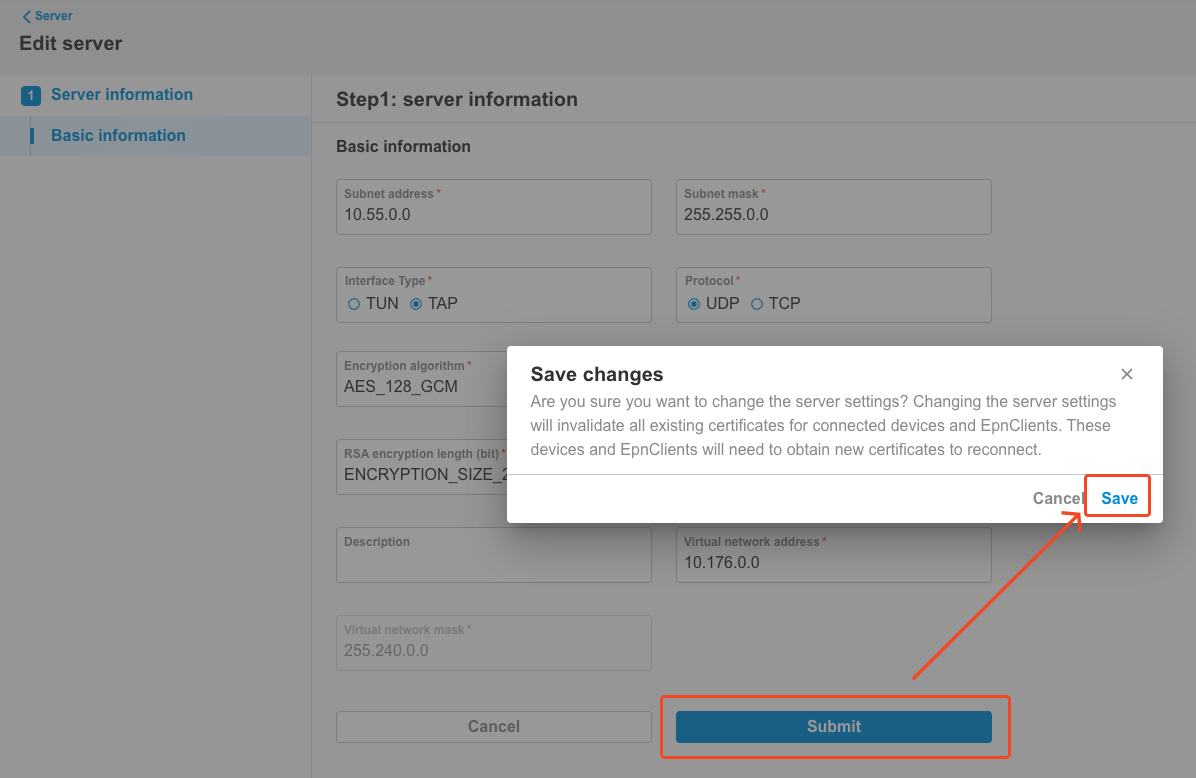
-
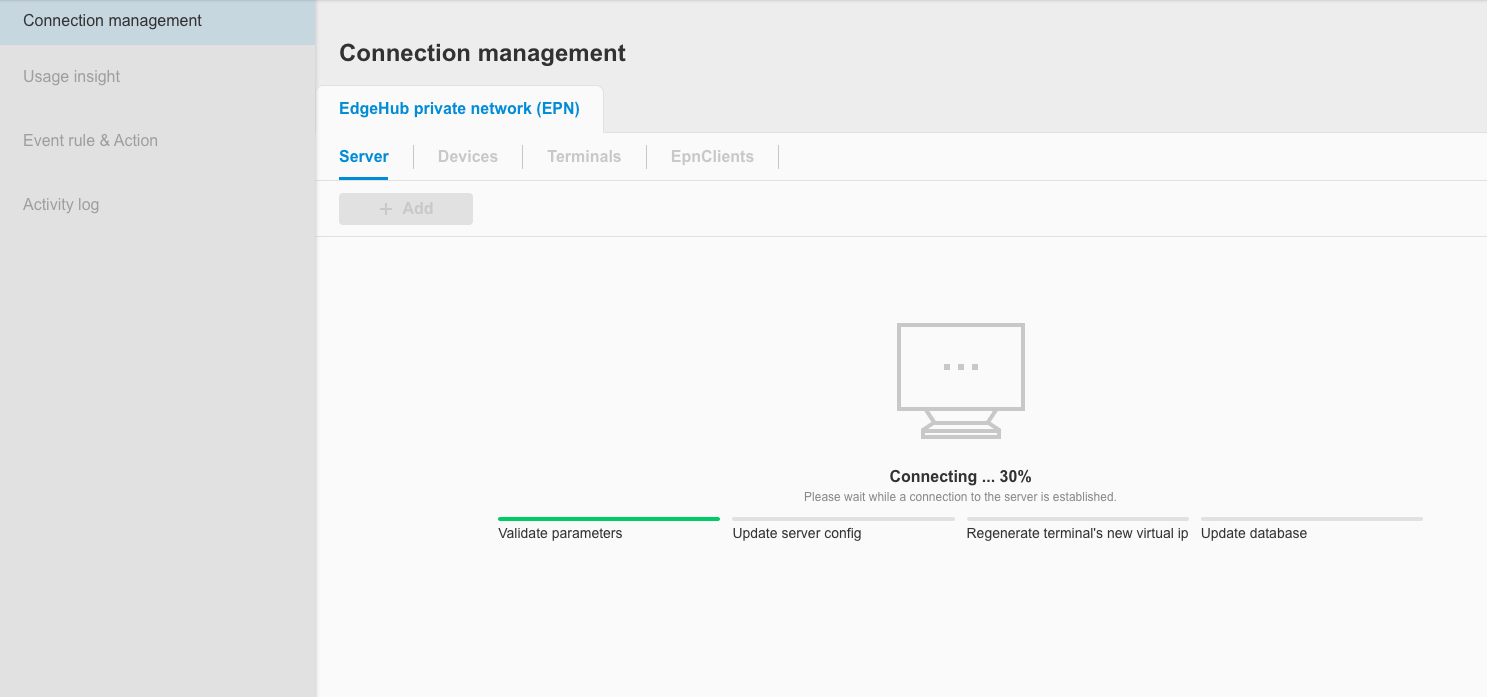
The screen will enter a progress interface. Please wait for the EPN Server edit process to complete.
-
Once editing is complete, the screen will return to the server list page where you can see that the server has been successfully updated.

2.1.3 Enable / Disable server
This section explains how to disable/enable the EPN server.
-
When the EPN server is enabled, users can disable the server. Click the switch component on the screen, and a dialog box will appear asking for confirmation to disable the server. Please click
Disable.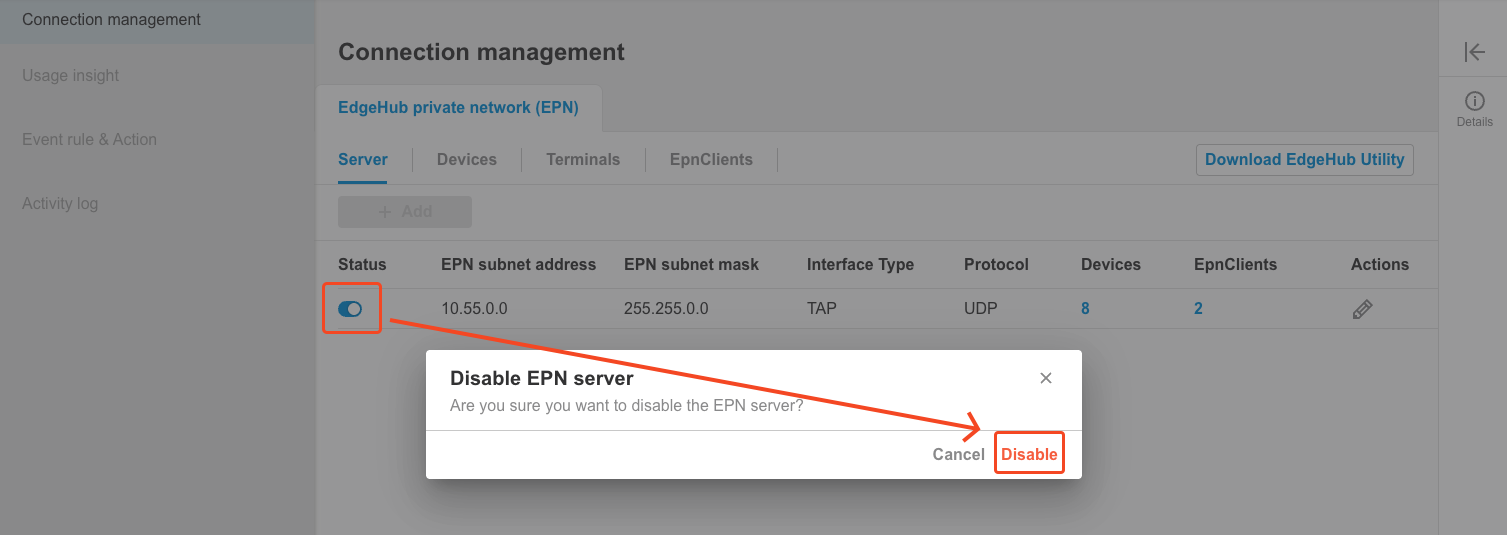
-
The system will proceed with the disabling process. After completion, the screen will return to the server list, where the status will show as disabled.
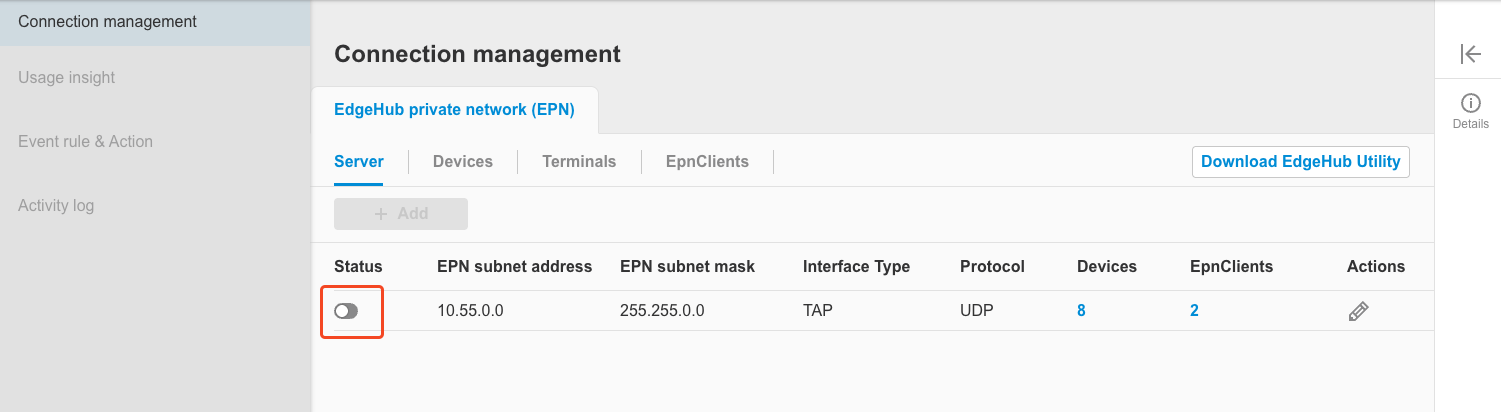
-
Please note that when the server is disabled, all related function settings (EPN server, EPN devices, EpnClients, terminals) will be unavailable.
-
When the EPN server is disabled, users can enable the server. Click the switch component on the screen, and a dialog box will appear asking for confirmation to enable the server. Please click
Enable.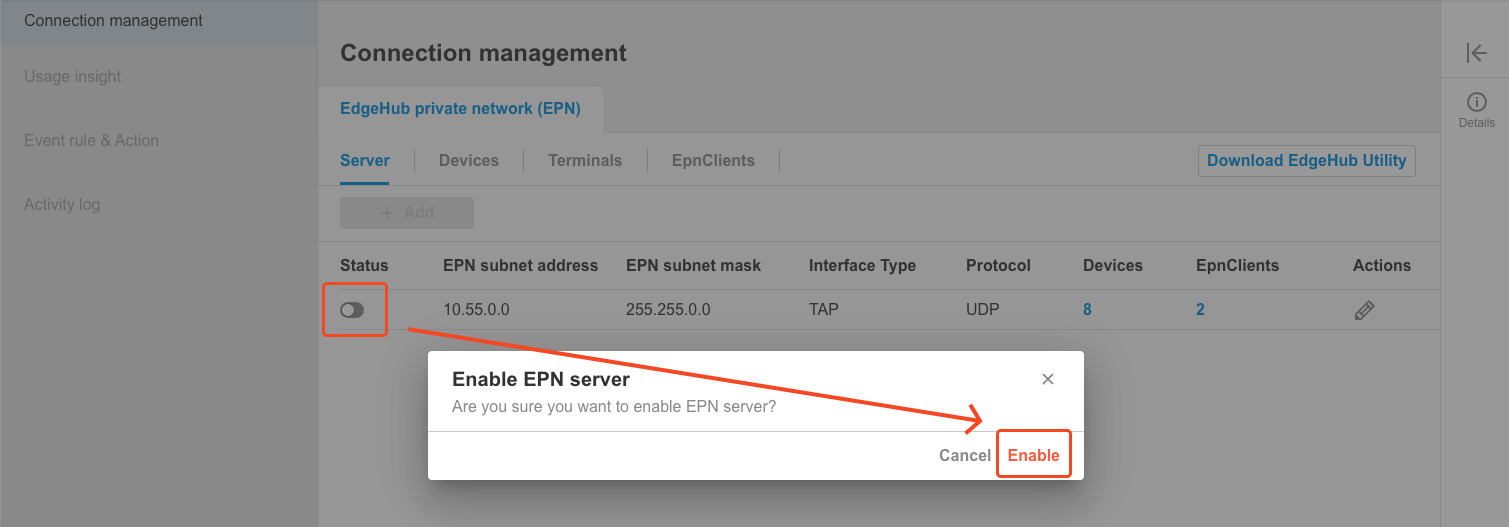
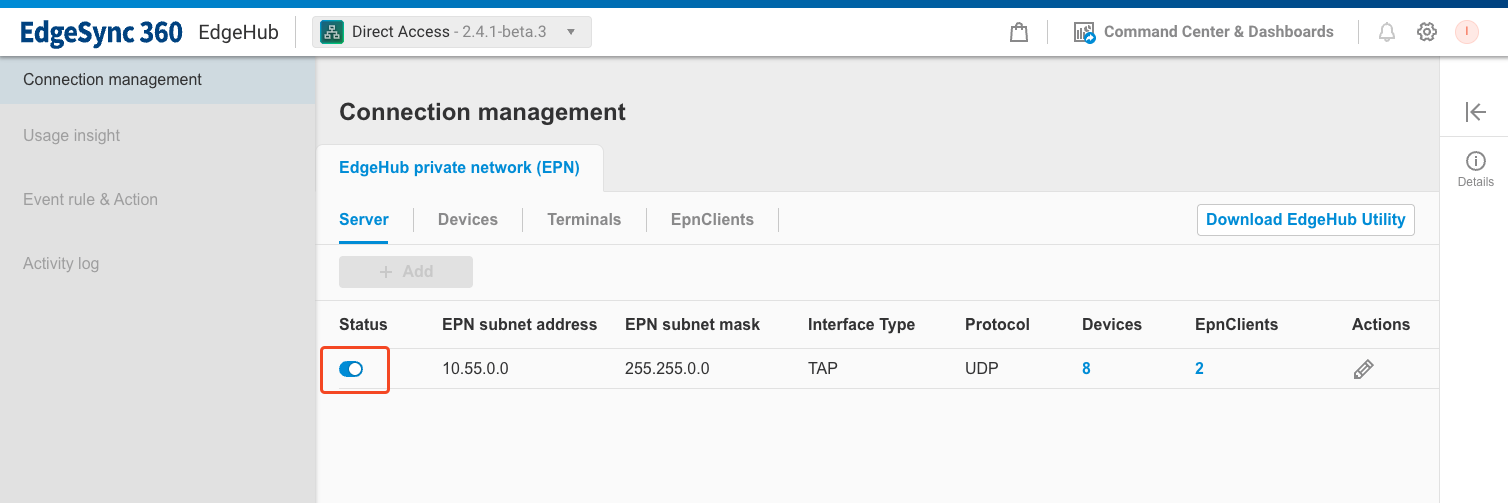
-
The system will execute the enabling process. After completion, the screen will return to the server list, where the status will show as enabled.
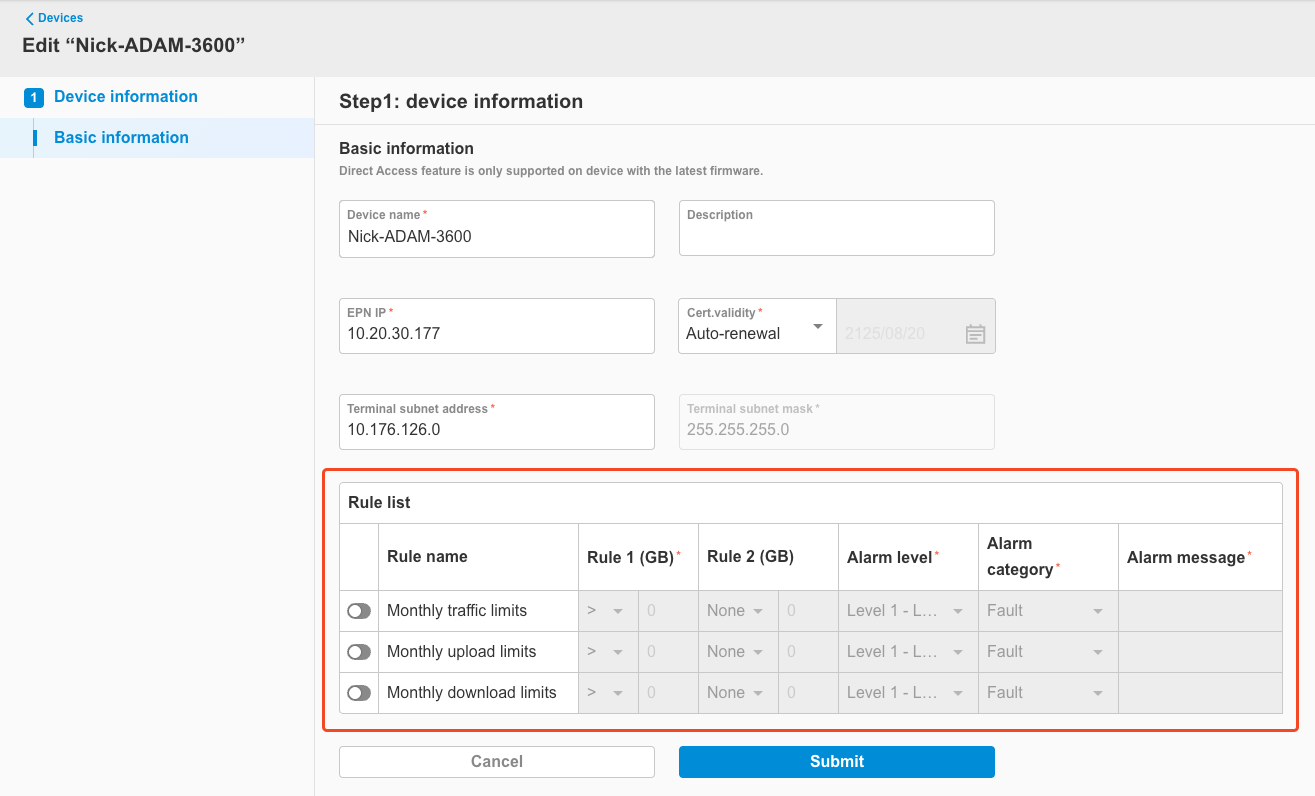
2.1.4 Edit server's alarm rule
Starting from EdgeHub version 2.5.0, the Edit Server screen now includes a configuration option for Server Alarm Rules.
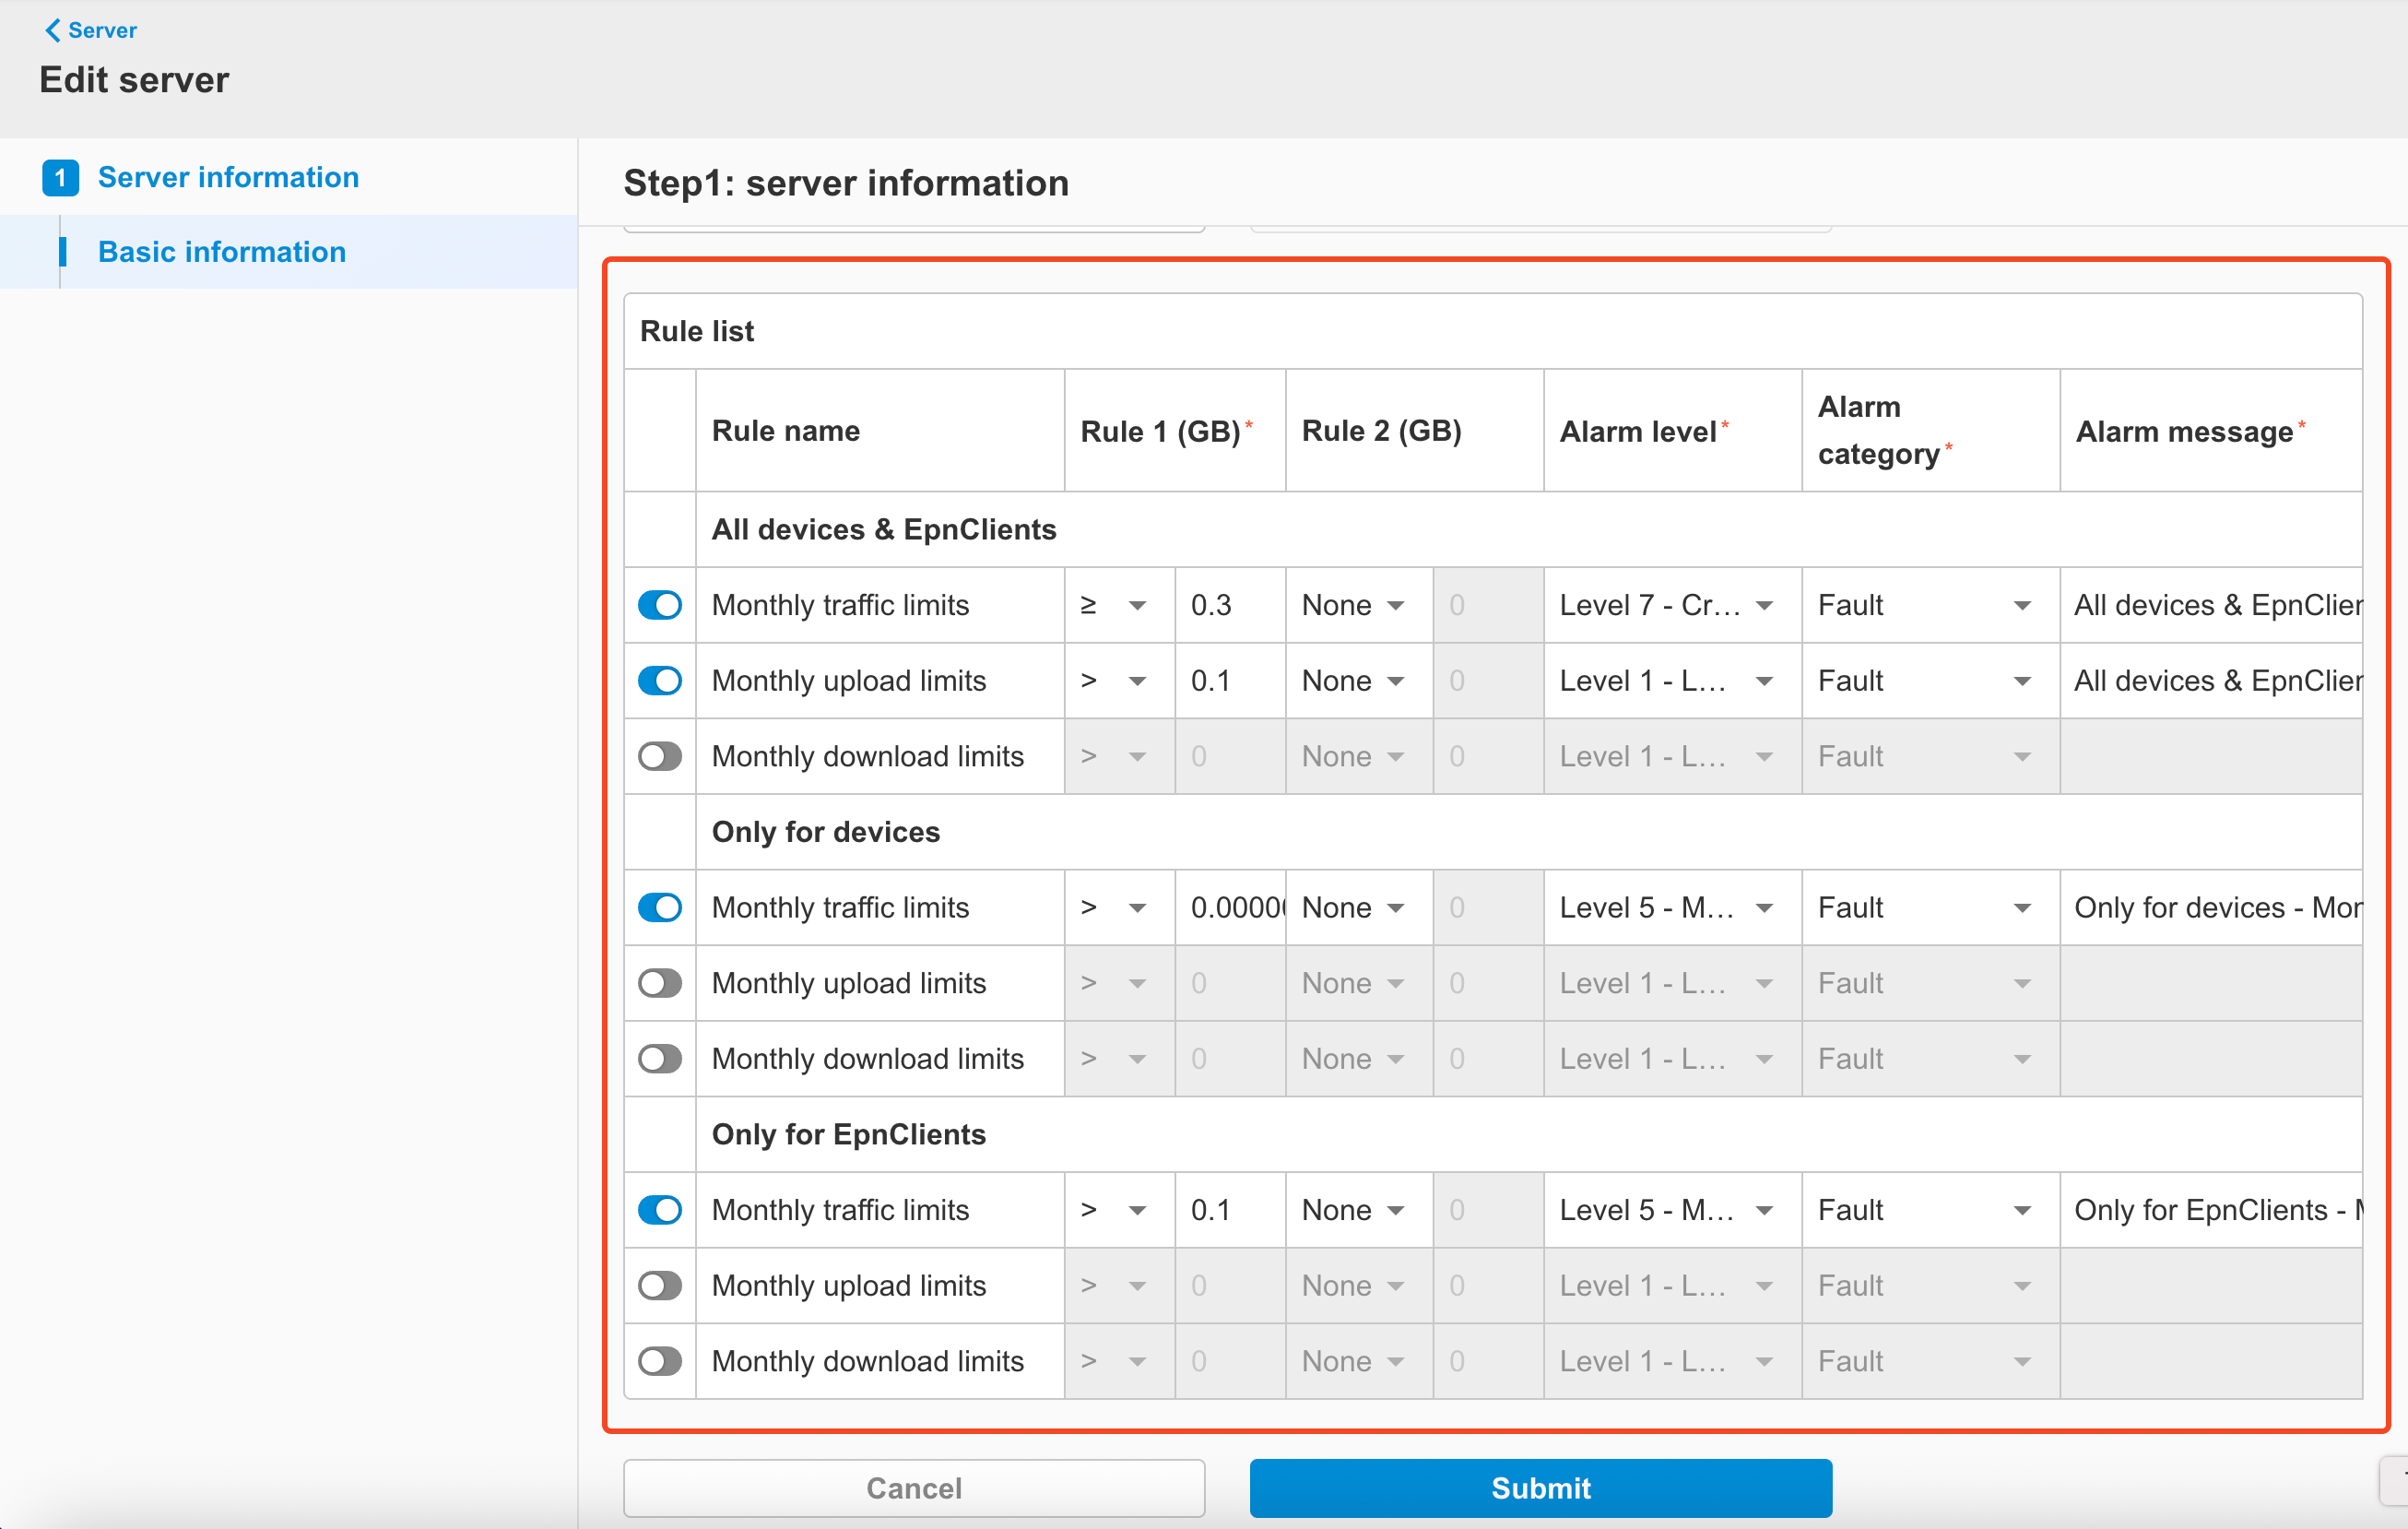
You can enable alarm rules and define the triggering conditions. Once the specified conditions are met, EdgeHub will raise an alarm, which can then be handled based on the alarm notification settings described in [Section 3: Alarm Settings].
Supported Alarm Rule Types
All rules below apply to devices and EpnClients within your Tenant only.
“Monthly” statistics are reset at 00:00:00 (UTC) on the 1st day of each calendar month.
You can configure alarm rules for the following categories:
-
All Devices & EpnClients
These rules apply to the combined total traffic of all devices and EpnClients in your Tenant.
- Monthly traffic limits: Total monthly network traffic (upload + download), in GB
- Monthly upload limits: Total monthly upload traffic, in GB
- Monthly download limits: Total monthly download traffic, in GB
-
Only Devices
These rules apply only to devices within your Tenant.
- Monthly traffic limits: Total monthly upload + download traffic, in GB
- Monthly upload limits: Total monthly upload traffic, in GB
- Monthly download limits: Total monthly download traffic, in GB
-
Only EpnClients
These rules apply only to EpnClients within your Tenant.
- Monthly traffic limits: Total monthly upload + download traffic, in GB
- Monthly upload limits: Total monthly upload traffic, in GB
- Monthly download limits: Total monthly download traffic, in GB
Rule Configuration Fields
Each rule can be configured with the following fields:
-
Rule toggle: Enable/disable this rule
-
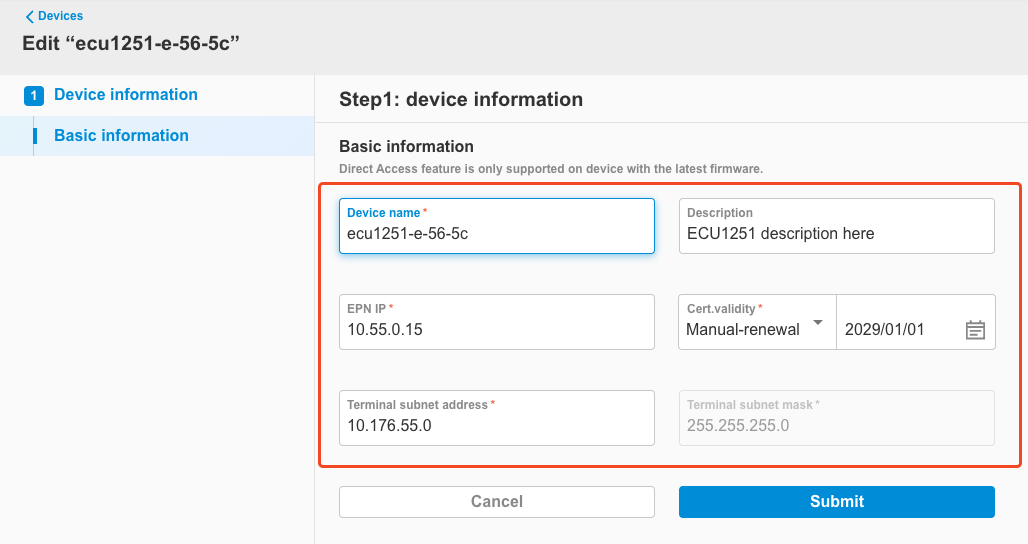
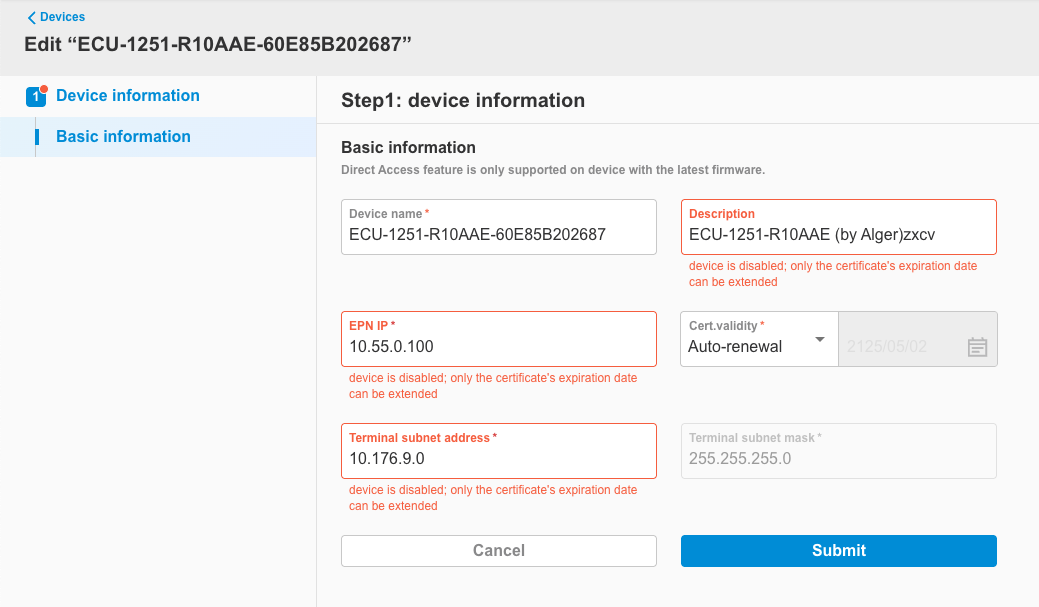
Rule 1 (GB): Required. Specify a condition using >, ≥, =, ≤, or Certificate is automatically renewed by the EPN server, no expiration dateManual Renewal:Expiration date set by the user | Auto Renewal | | Terminal subnet address | Terminal subnet address assigned to the deviceUsed to allocate virtual IPs to TerminalsNote: Not configurable in TUN mode | String, IPv4 format | Assigned virtual IP address | | Terminal subnet mask | Terminal subnet maskUnder default settings, the subnet can assign up to 254 addresses to TerminalsNote: Not configurable in TUN mode | String, IPv4 format, not editable | 255.255.255.0 |
-
After editing, click the
Submitbutton.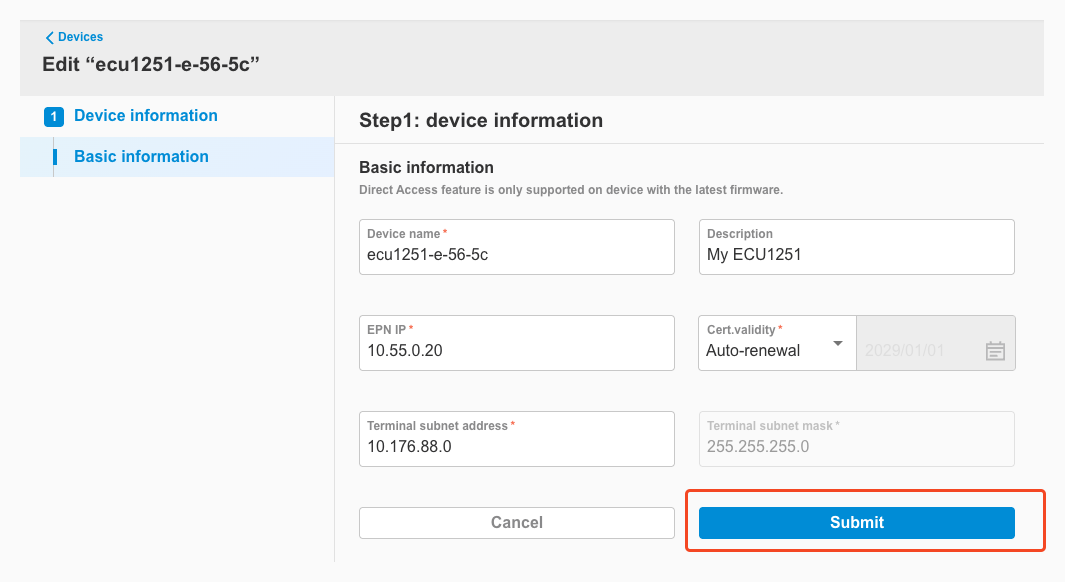
-
You will be redirected back to the device list, where the updated information will be visible.
2.2.3 Enable / Disable EPN Device
-
When the EPN device is enabled, users can disable the EPN device. Click the switch component on the screen, and a dialog box will appear asking for confirmation to disable. Please click
Disable.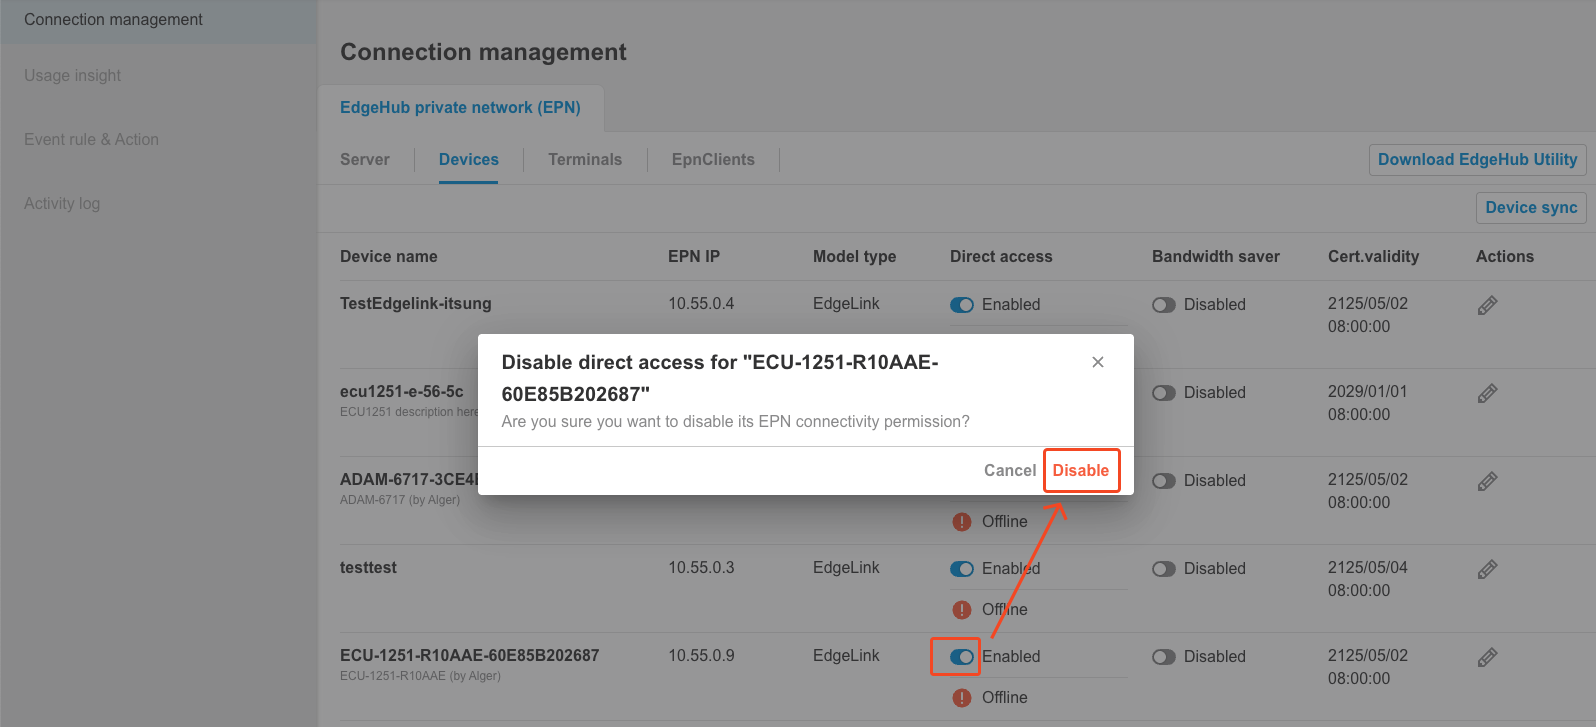
-
The system will proceed with the disabling process. After completion, the screen will return to the EPN device list, where the status will show as disabled.
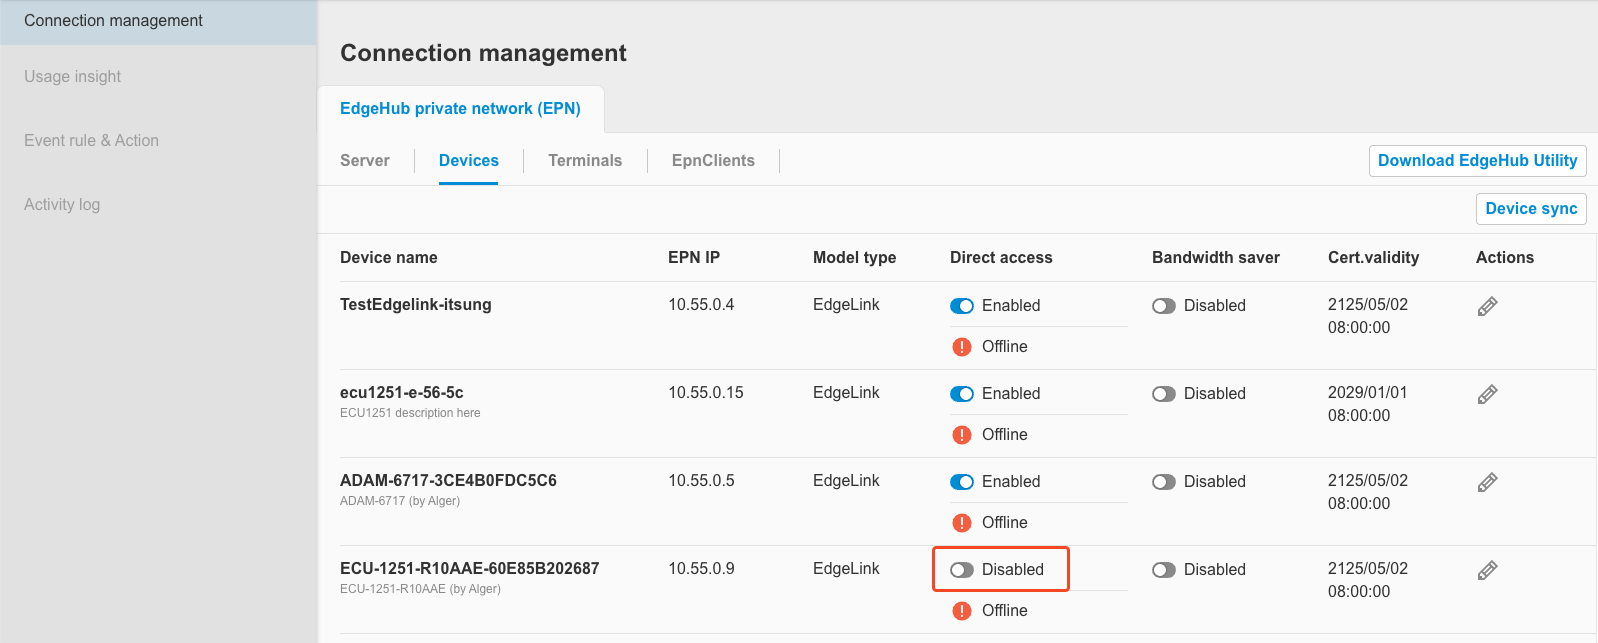
-
When the EPN device is disabled, only Cert. validity can be edited; other fields are not editable.
-
When the EPN device is disabled, users can enable the EPN device. Click the switch component on the screen, and a dialog box will appear asking for confirmation to enable. Please click
Enable.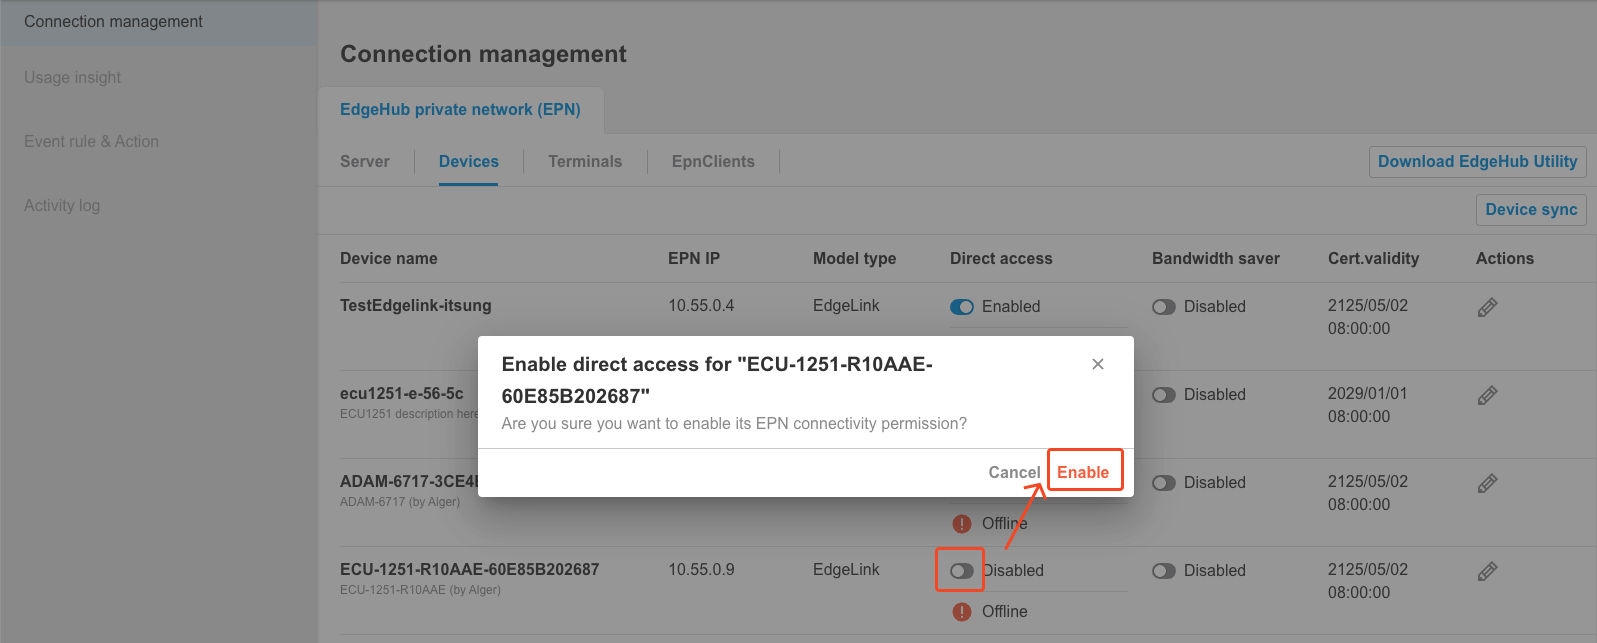
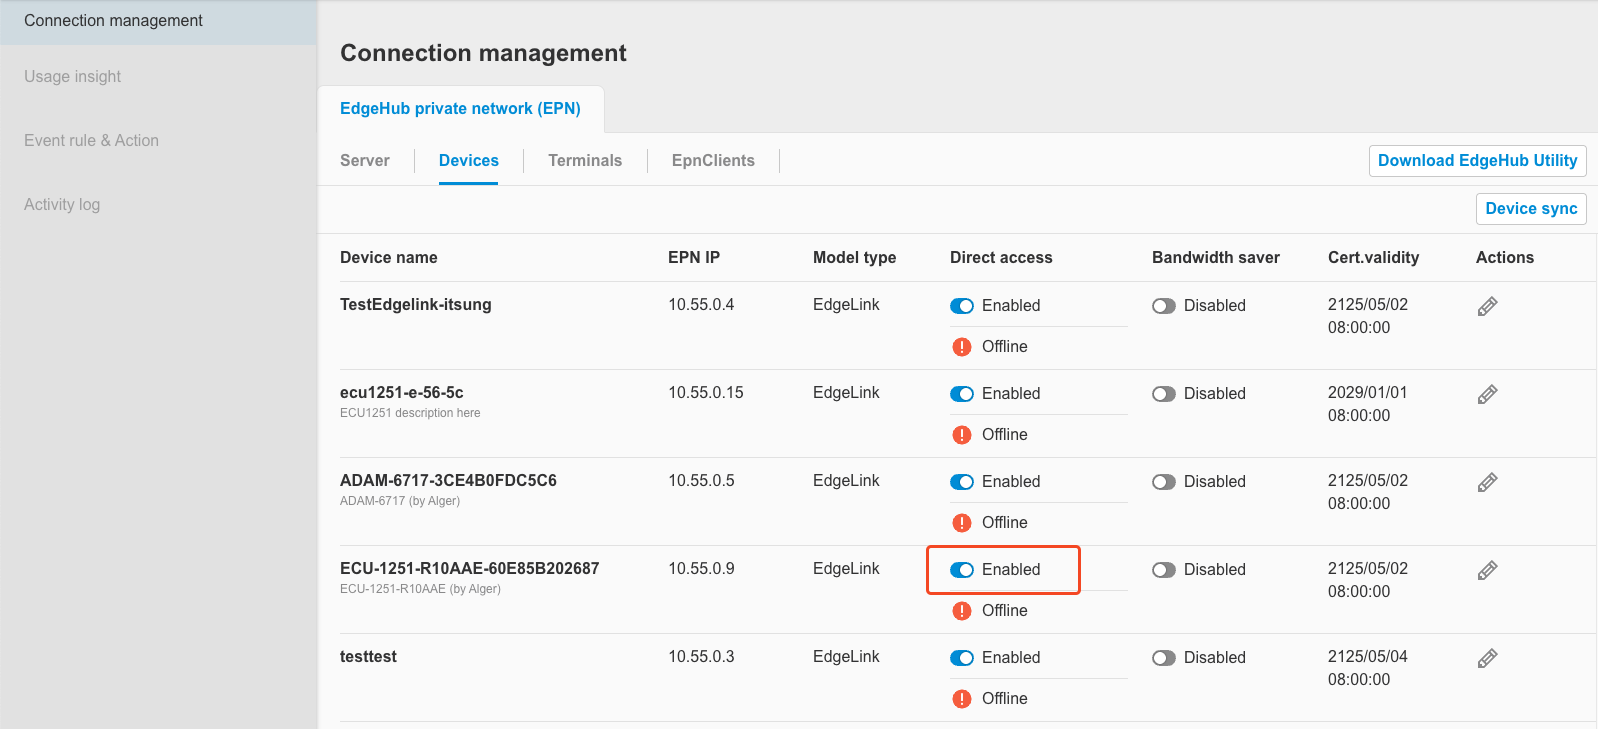
-
The system will execute the enabling process. After completion, the screen will return to the EPN device list, where the status will show as enabled.
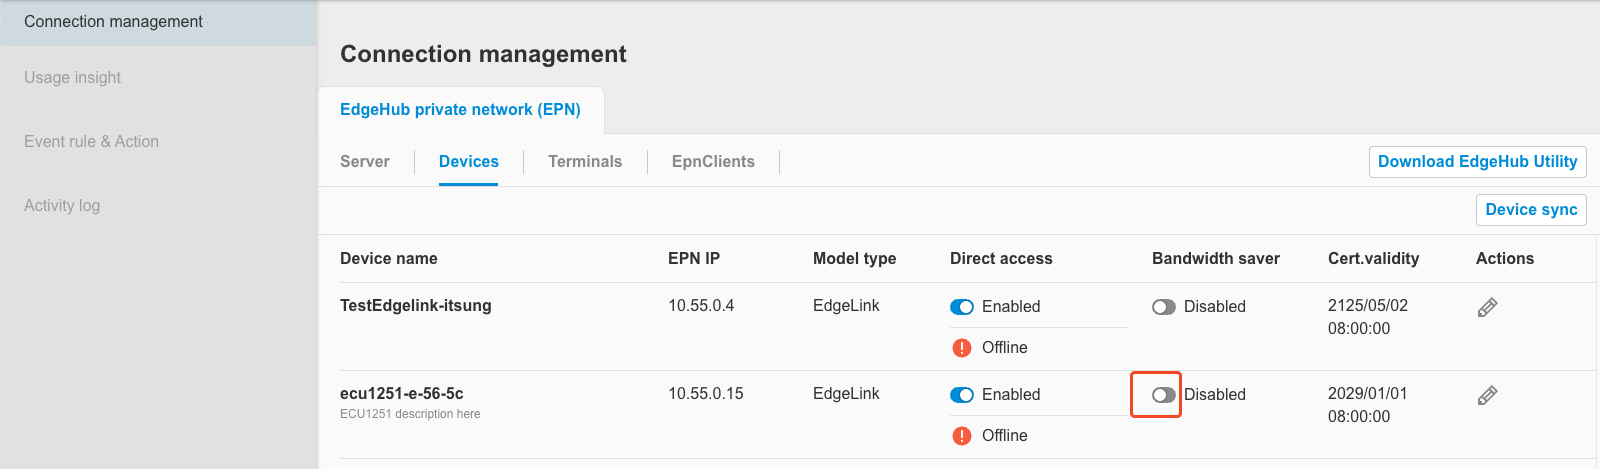
2.2.4 Enable / Disable Bandwidth saver
Users can control whether to enable or disable the bandwidth saver for each EPN device via the interface (disabled by default). If enabled, the EPN connection will automatically disconnect if no traffic is detected for 30 minutes.
-
Please click the bandwidth saver switch component on the screen to control enable/disable.
2.2.5 Edit device's alarm rule
Starting from EdgeHub version 2.5.0, a new Device Alarm Rule configuration feature has been added to the Edit Device page. You can now enable alarm rules and define specific triggering conditions. Once the conditions are met, EdgeHub will automatically trigger an alarm, which can then be linked to the notification settings described in Chapter 3: Alarm Settings.
Supported Device Alarm Rules
- Monthly traffic limits: The total monthly network traffic (upload + download) for the device, measured in GB.
- Monthly upload limits: The total monthly upload traffic for the device, measured in GB.
- Monthly download limits: The total monthly download traffic for the device, measured in GB.
> 📌 Note: “Monthly” statistics are reset at 00:00:00 (UTC) on the 1st day of each calendar month.
The configuration fields for each rule are the same as those described in Section 2.1.4. For details on how to configure rule thresholds, alarm levels, alarm categories, and messages, please refer to that section.
2.3 EpnClient
To perform remote access to EPN devices or terminals, users must first register an EpnClient using the EdgeHub Utility. For detailed instructions, please refer to the EdgeHub Utility documentation.
Once registration is complete, users can view the details of EpnClients within the tenant in the EpnClient list.
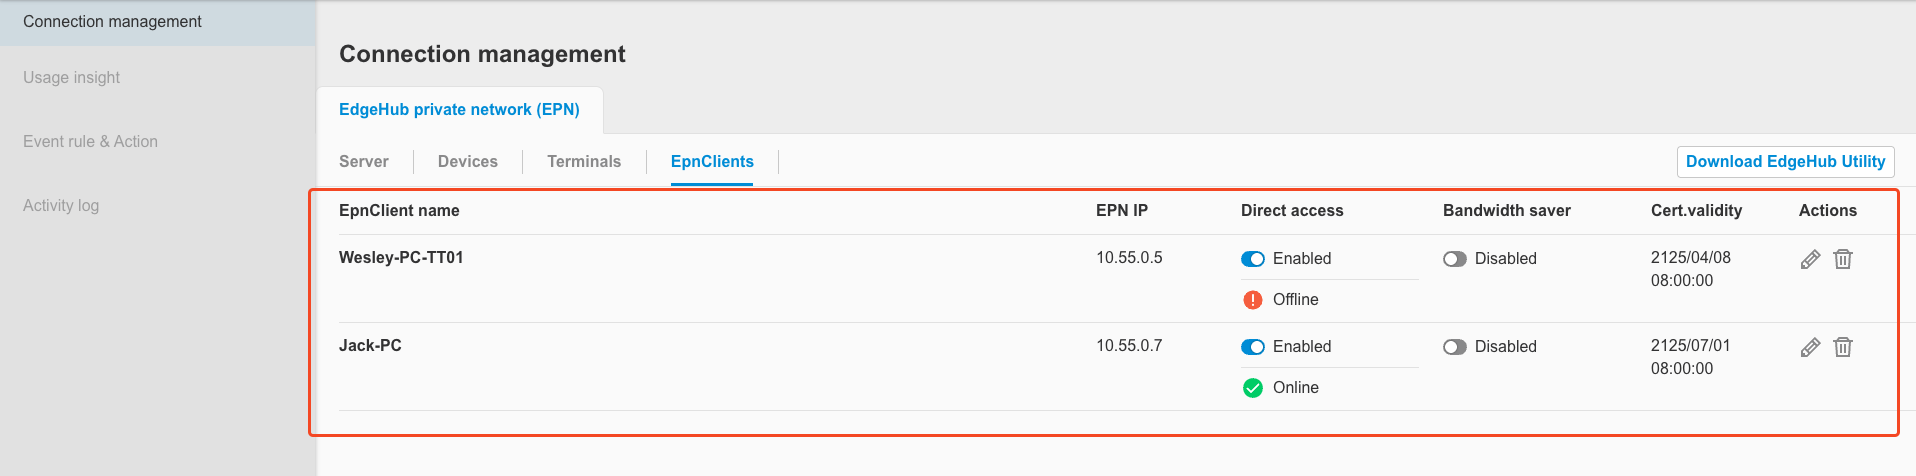
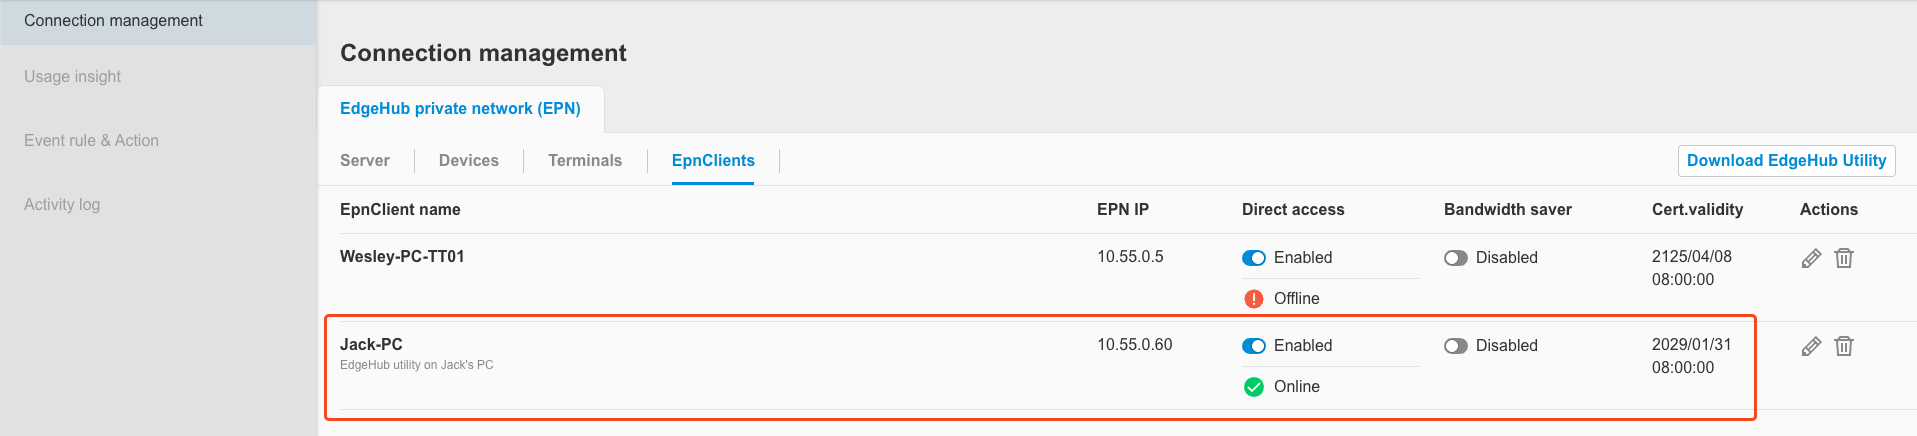
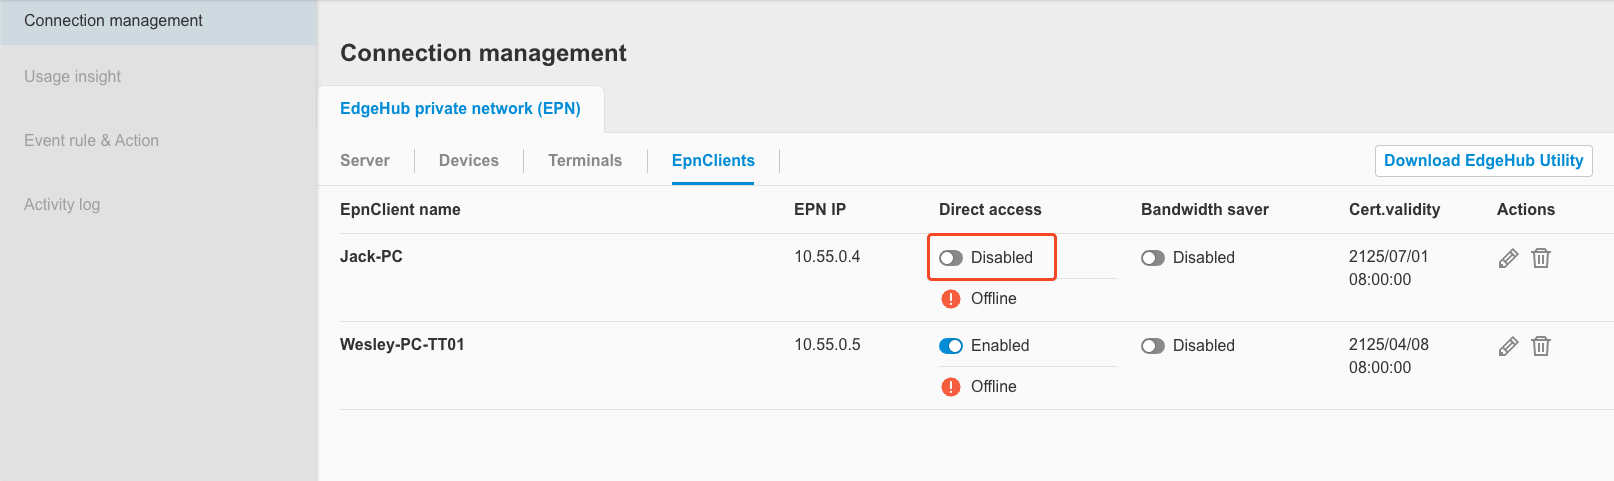
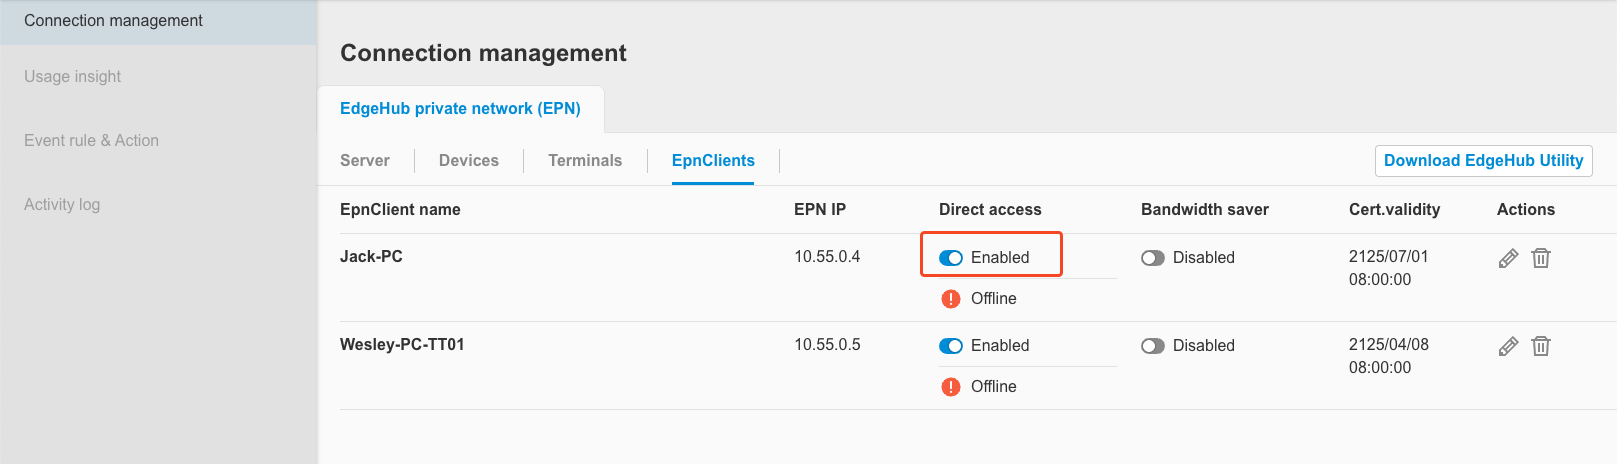
2.3.1 EpnClient List
Click the EpnClients tab to view the list of registered EpnClients. The list includes the following columns:
- EpnClient name: Displays the name of the EpnClient and its channel connection status (Connected: green indicator / Not connected: red indicator)
- EPN IP: Shows the EPN subnet address assigned to the EpnClient
- Direct access: Indicates whether Direct Access is enabled (enabled by default) / Displays EPN connection status
- Bandwidth saver: Indicates whether Bandwidth Saver is enabled (disabled by default)
- If enabled, the connection will automatically disconnect if no traffic is detected for 30 minutes.
- Current Traffic: Displays the accumulated traffic (including both downloads and uploads) for this device since the most recent EPN connection was established. Note: If the device is currently disconnected, the traffic value is reset to 0.
- Cert. validity: Displays the certificate validity period assigned by the EPN Server
- If the certificate expires, the EpnClient’s Direct Access feature will automatically be disabled.
- Actions: Allows the following operations:
- Edit EpnClient
- Delete EpnClient
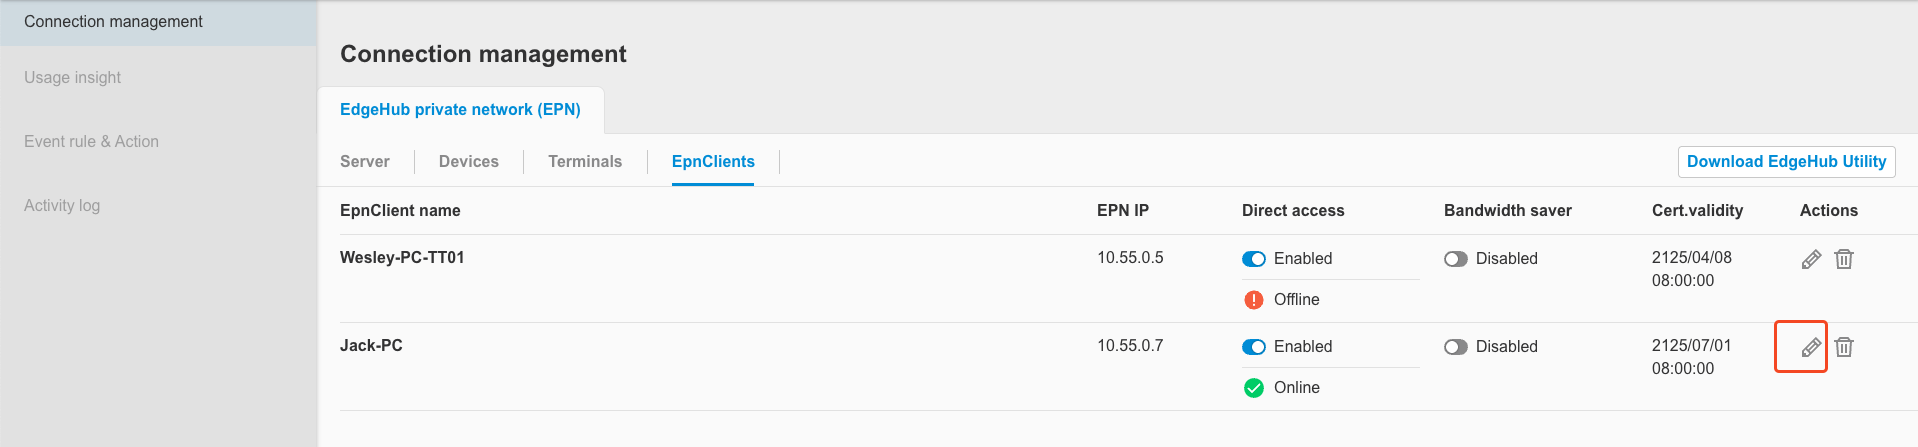
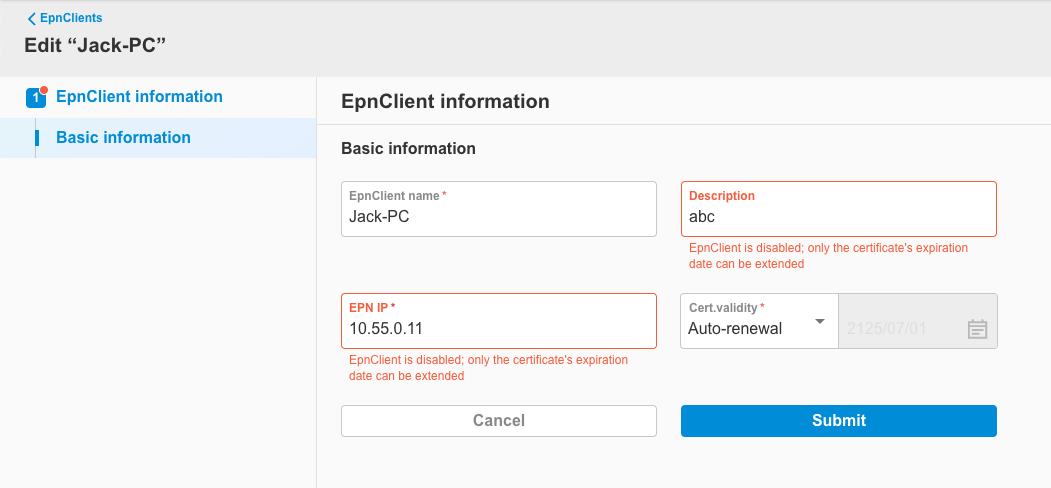
2.3.2 Edit EpnClient
-
Users can click the edit button to modify an EpnClient.
-
On the Edit EpnClient page, the field descriptions are as follows: (Note: Starting from EdgeHub version 2.5.0, the Edit EpnClient page includes configuration options for EpnClient alarm rules. For details, please refer to Section 2.3.6.)
Field Description Options Default Value EpnClient name Name of the EpnClient String, not editable Description Description of the EpnClient Any string None EPN IP EPN IP address assigned to the EpnClient String, IPv4 format Assigned IP address Cert. validity Certificate validity assigned by the EPN Server **Auto Renewal:**Certificate is automatically renewed by the EPN server, no expiration.**Manual Renewal:**User-defined expiration date Auto Renewal 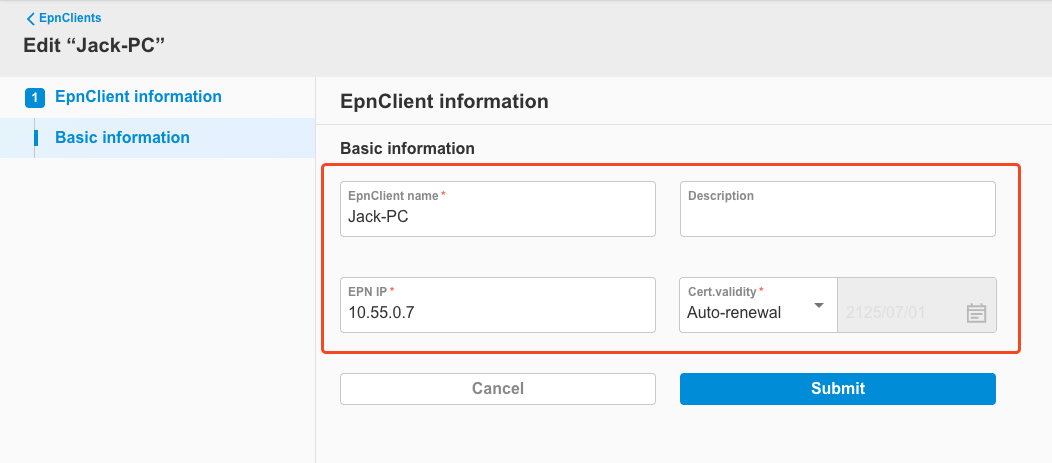
-
After editing, click the
Submitbutton.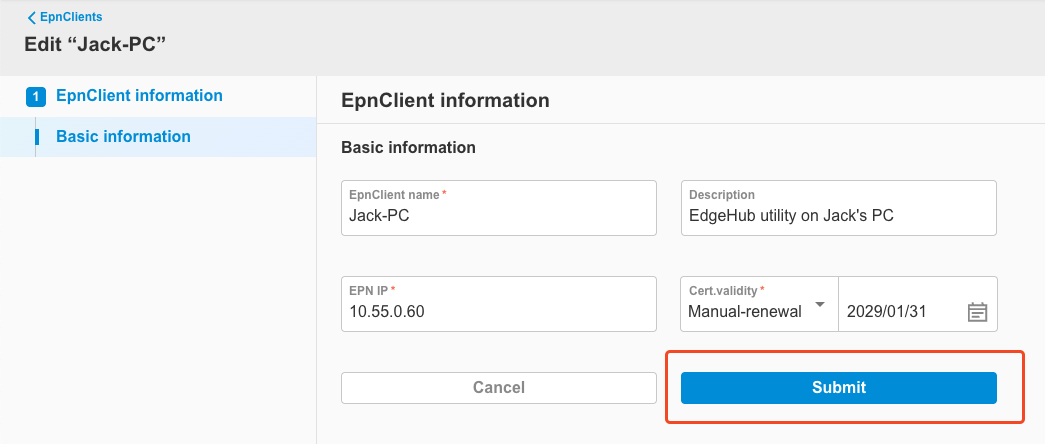
-
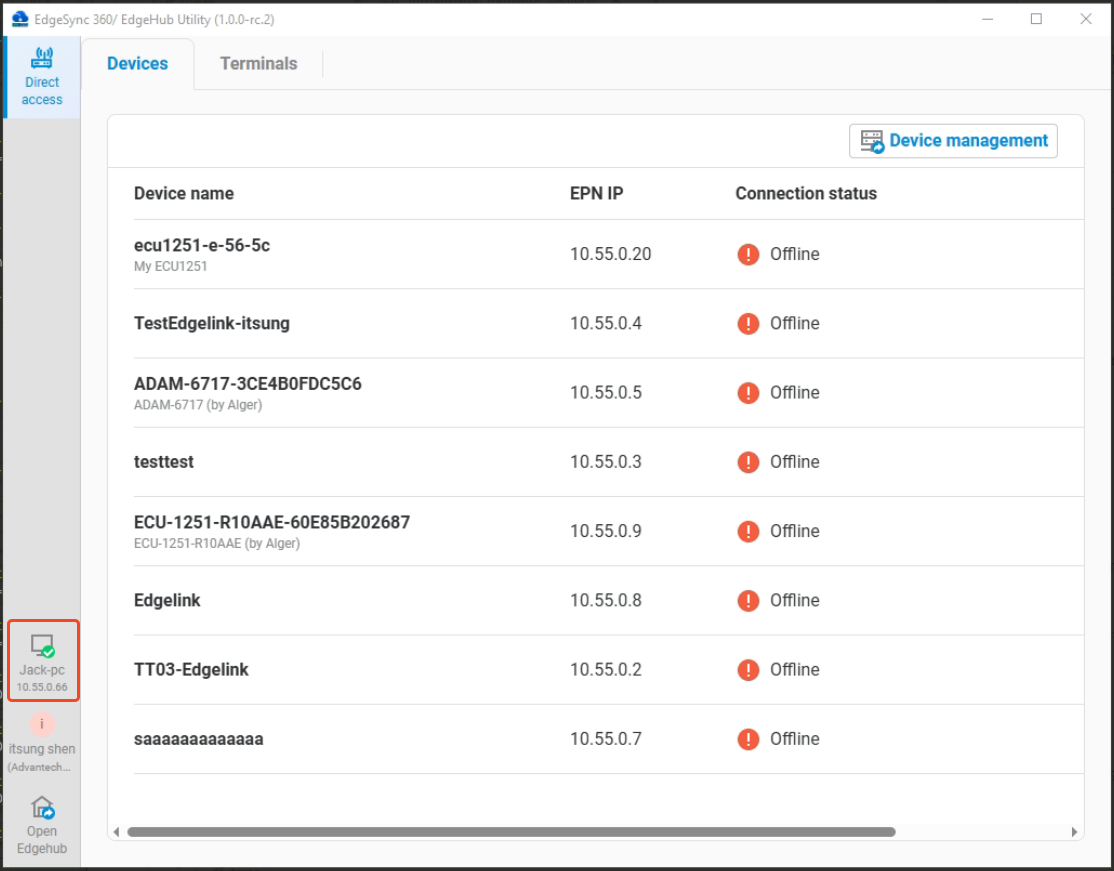
You will be returned to the EpnClient list, where the updated content is visible.
-
In the EdgeHub utility, you can also see that the EpnClient's IP address has changed accordingly.
2.3.3 Delete EpnClient
-
Users can click the
Deletebutton to remove an EpnClient.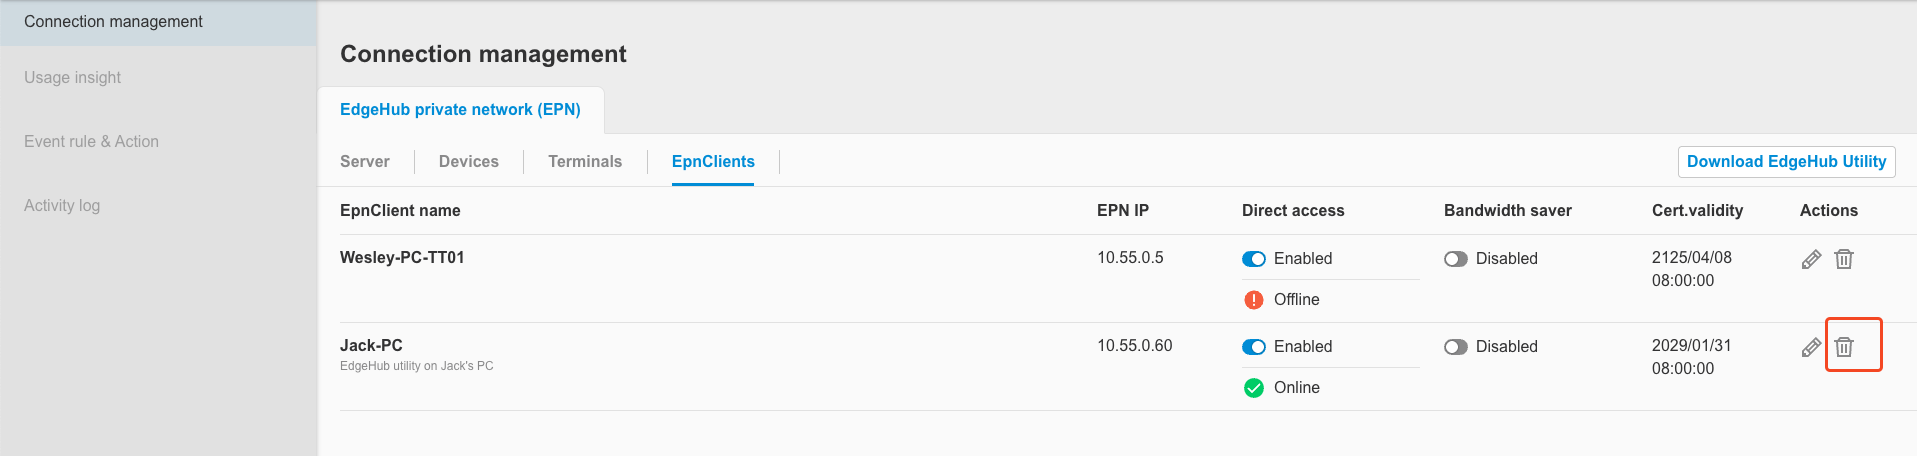
-
A confirmation dialog will appear. Please review carefully and click the
Deletebutton to confirm.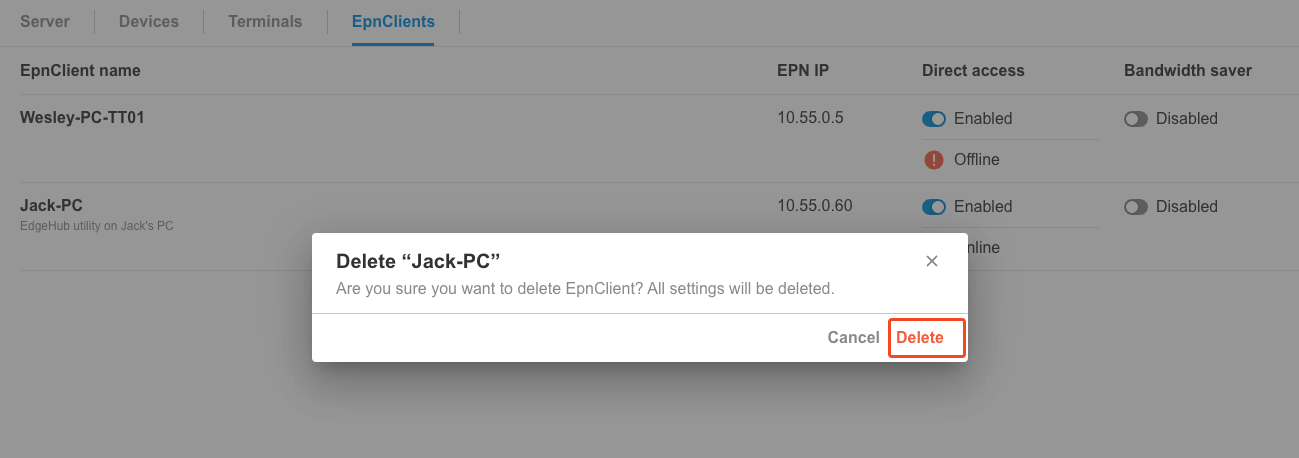
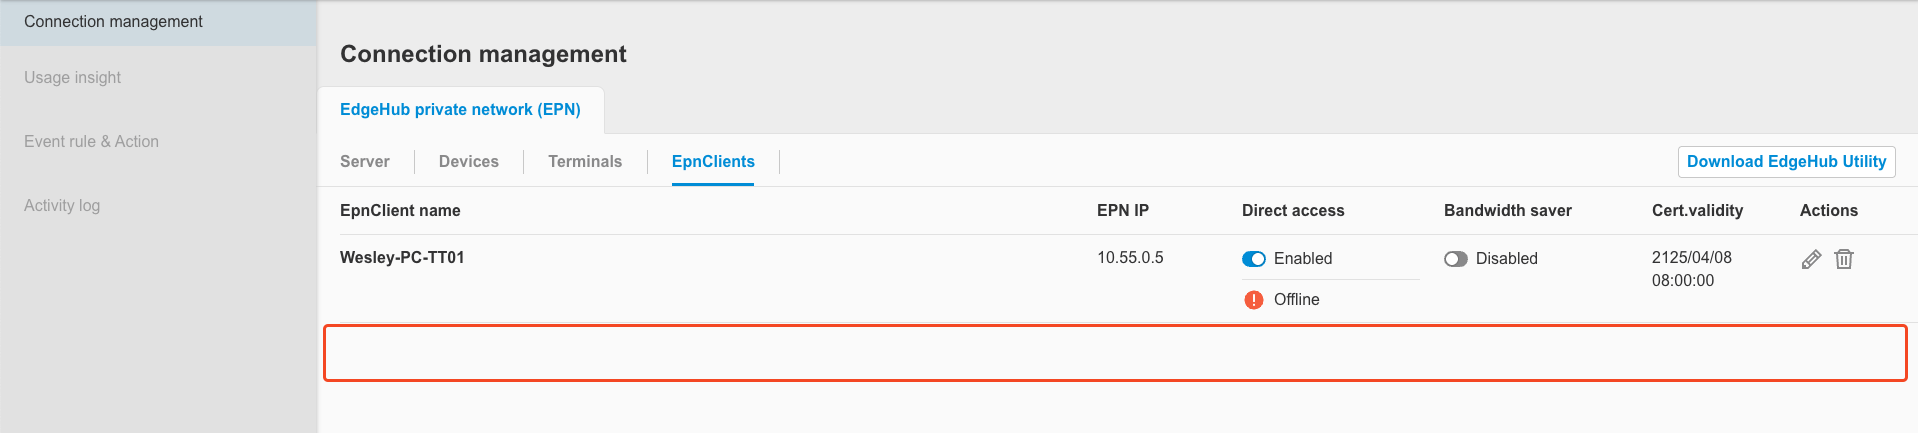
-
After deletion, the screen will return to the EpnClient list, where you can confirm that the client has been successfully removed.
-
In the EdgeHub utility, the status of the EpnClient will show as
Unregistered. If you need to use it again in the future, please re-register the EpnClient.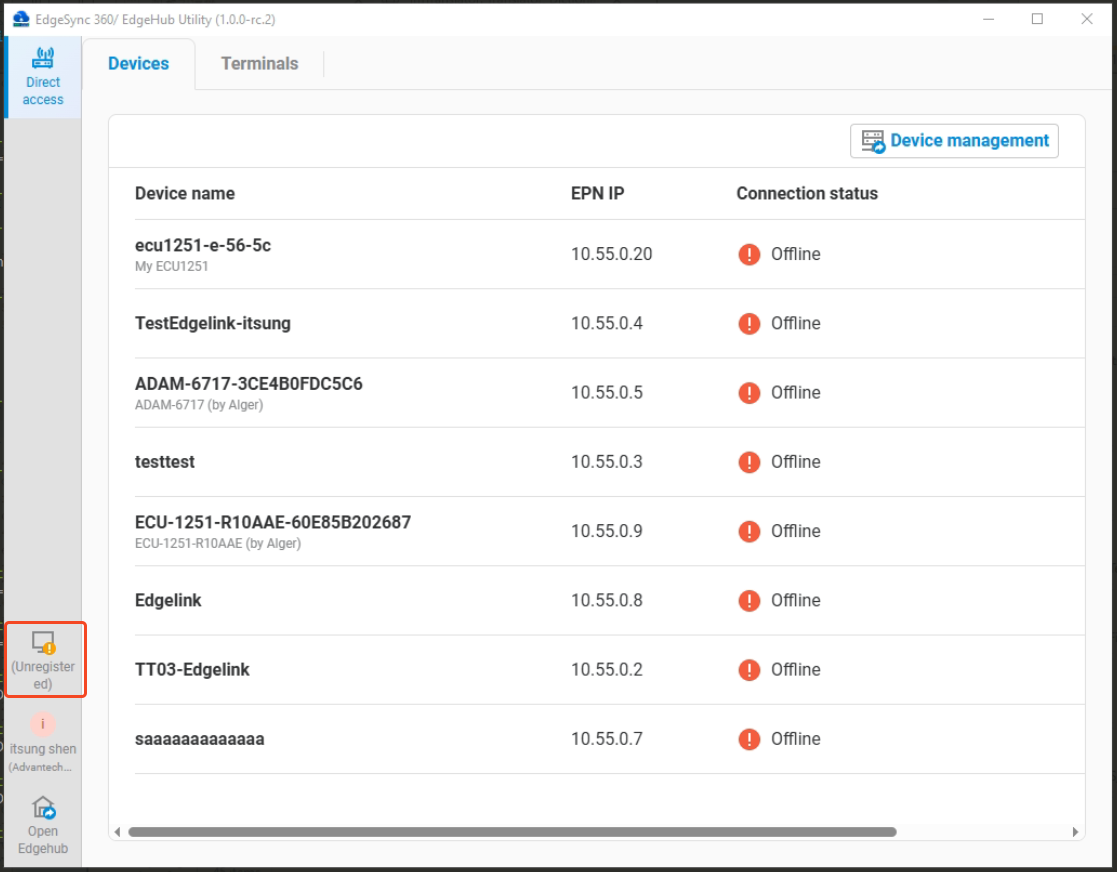
2.3.4 Enable / Disable EpnClient
-
When the EpnClient is enabled, users can disable the EpnClient. Click the switch component on the screen, and a dialog box will appear asking for confirmation to disable. Please click
Disable.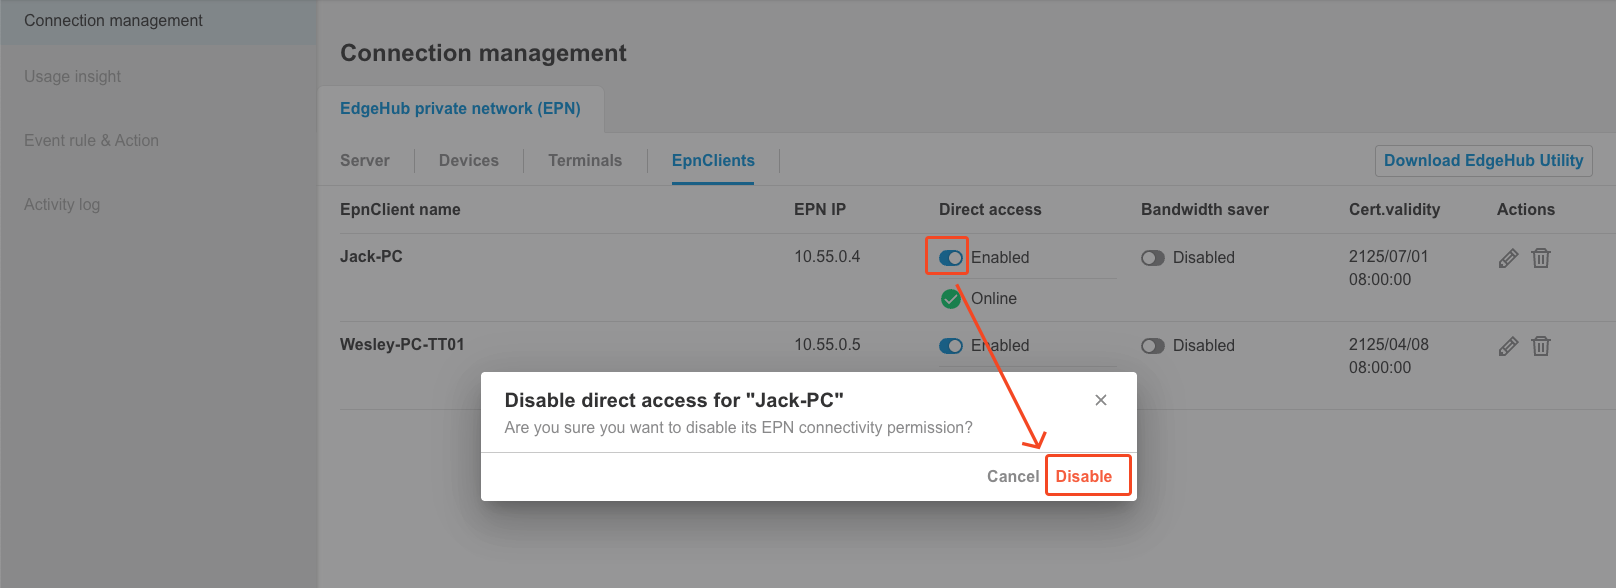
-
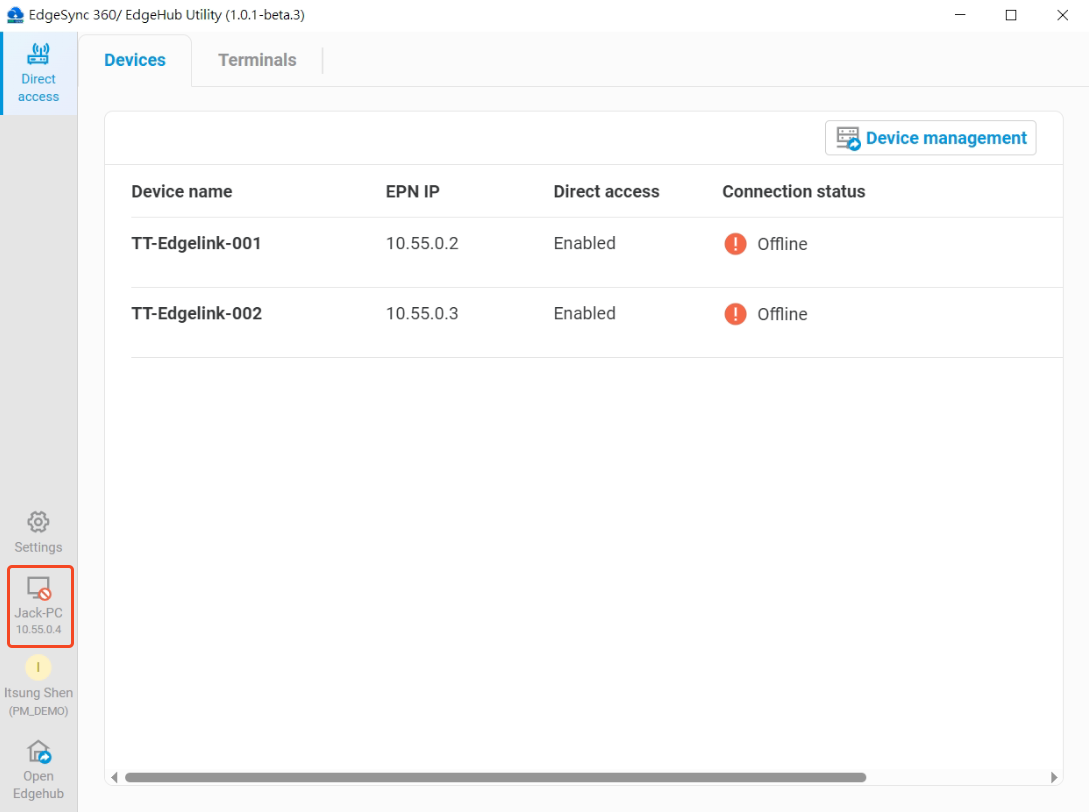
The system will proceed with the disabling process. After completion, the screen will return to the EpnClient list, where the status will show as disabled.
-
In the EdgeHub utility, you can also see that the EpnClient status changes to disabled.
-
When the EpnClient is disabled, only Cert. validity can be edited; other fields are not editable.
-
When the EpnClient is disabled, users can enable the EpnClient. Click the switch component on the screen, and a dialog box will appear asking for confirmation to enable. Please click
Enable.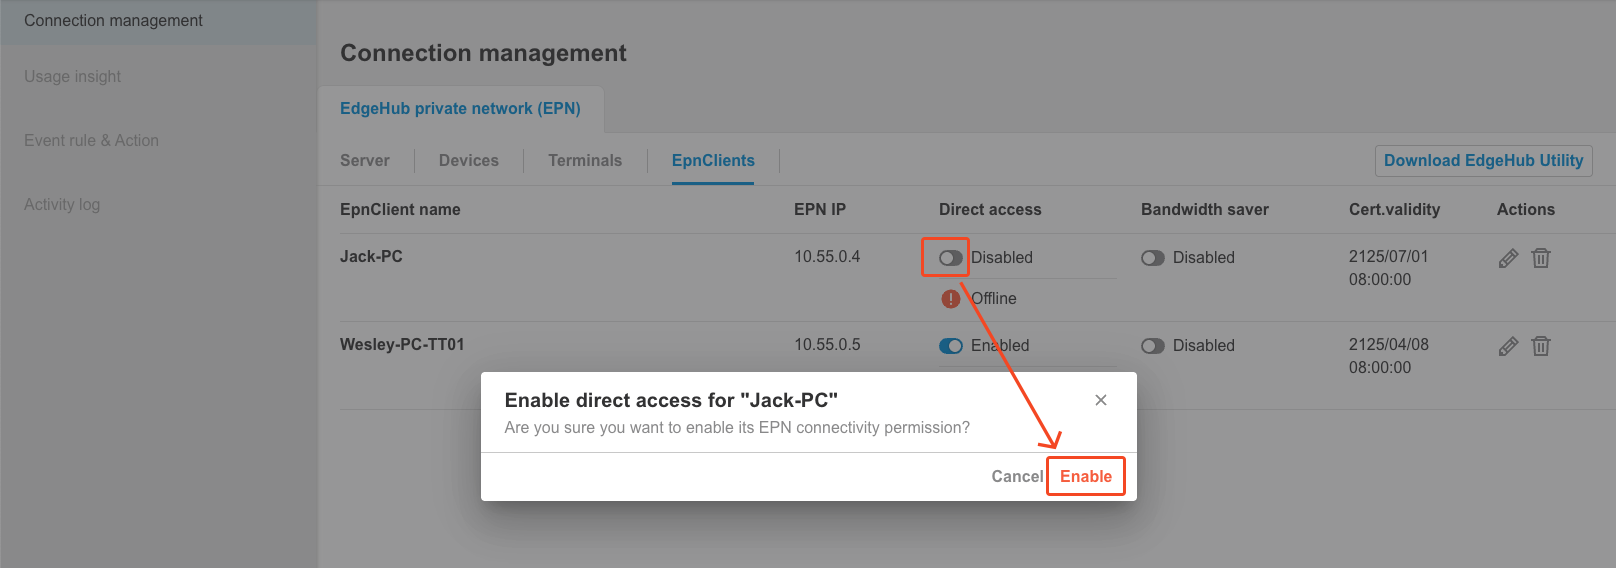
-
The system will execute the enabling process. After completion, the screen will return to the EpnClient list, where the status will show as enabled.
2.3.5 Enable / Disable Bandwidth saver
Users can control whether to enable or disable the bandwidth saver for each EpnClient via the interface (disabled by default). If enabled, the EPN connection will automatically disconnect if no traffic is detected for 30 minutes.
-
Please click the bandwidth saver switch component on the screen to control enable/disable.

2.3.6 Edit EpnClient's alarm rule
Starting from EdgeHub version 2.5.0, the Edit EpnClient page includes configuration options for EpnClient alarm rules. You can enable alarm rules and define their triggering conditions. When a condition is met, EdgeHub will trigger an alarm. These alarms can be further configured to send notifications using the settings described in Section 3: Alarm Settings.
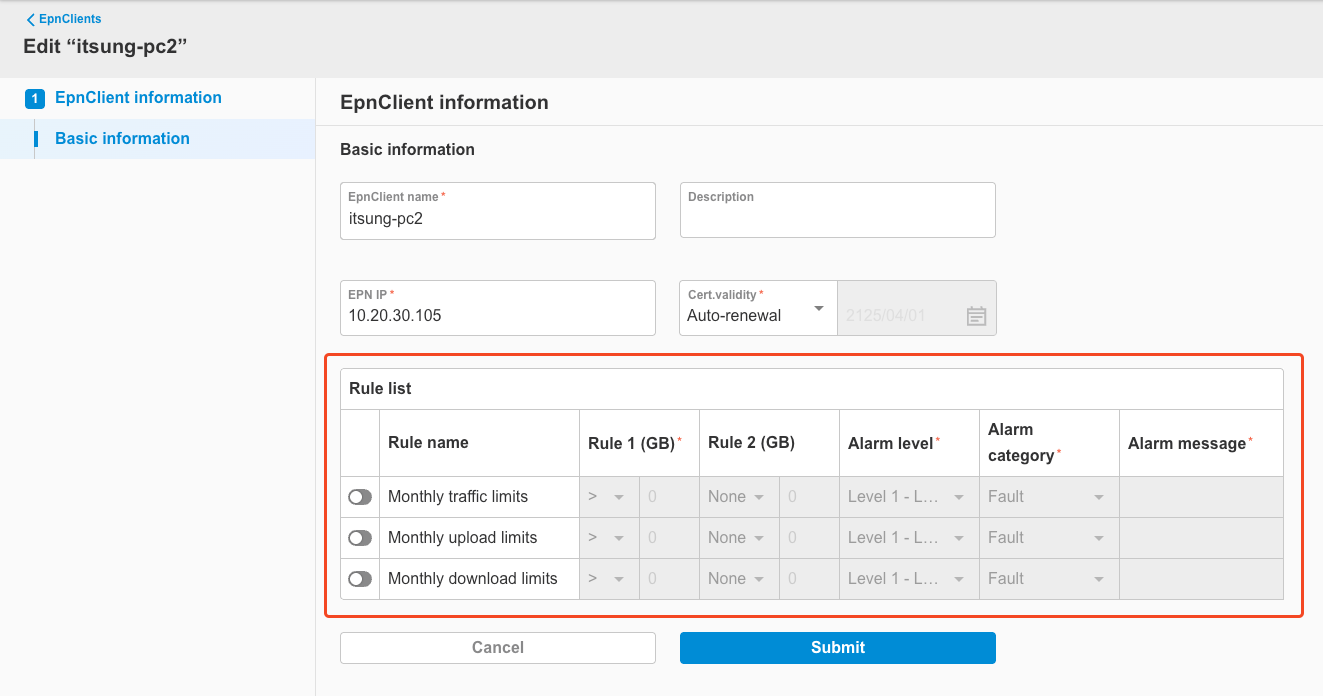
Supported Alarm Rule Types
-
Monthly traffic limits
Total network traffic (upload + download) used by the EpnClient each month (in GB)
-
Monthly upload limits
Total upload traffic used by the EpnClient each month (in GB)
-
Monthly download limits
Total download traffic used by the EpnClient each month (in GB)
> Note: “Monthly” statistics are reset at 00:00:00 (UTC) on the 1st day of each calendar month.
Rule Configuration Fields
The configuration fields for each rule are the same as those described in Section 2.1.4.
(For field descriptions, please refer to Section 2.1.4.)
2.4 Terminal
To perform remote access to a terminal, users must first configure the terminal using the EdgeHub Utility. For detailed configuration steps, please refer to the EdgeHub Utility documentation. Once setup is complete, users can view the configuration details under the Terminals tab.
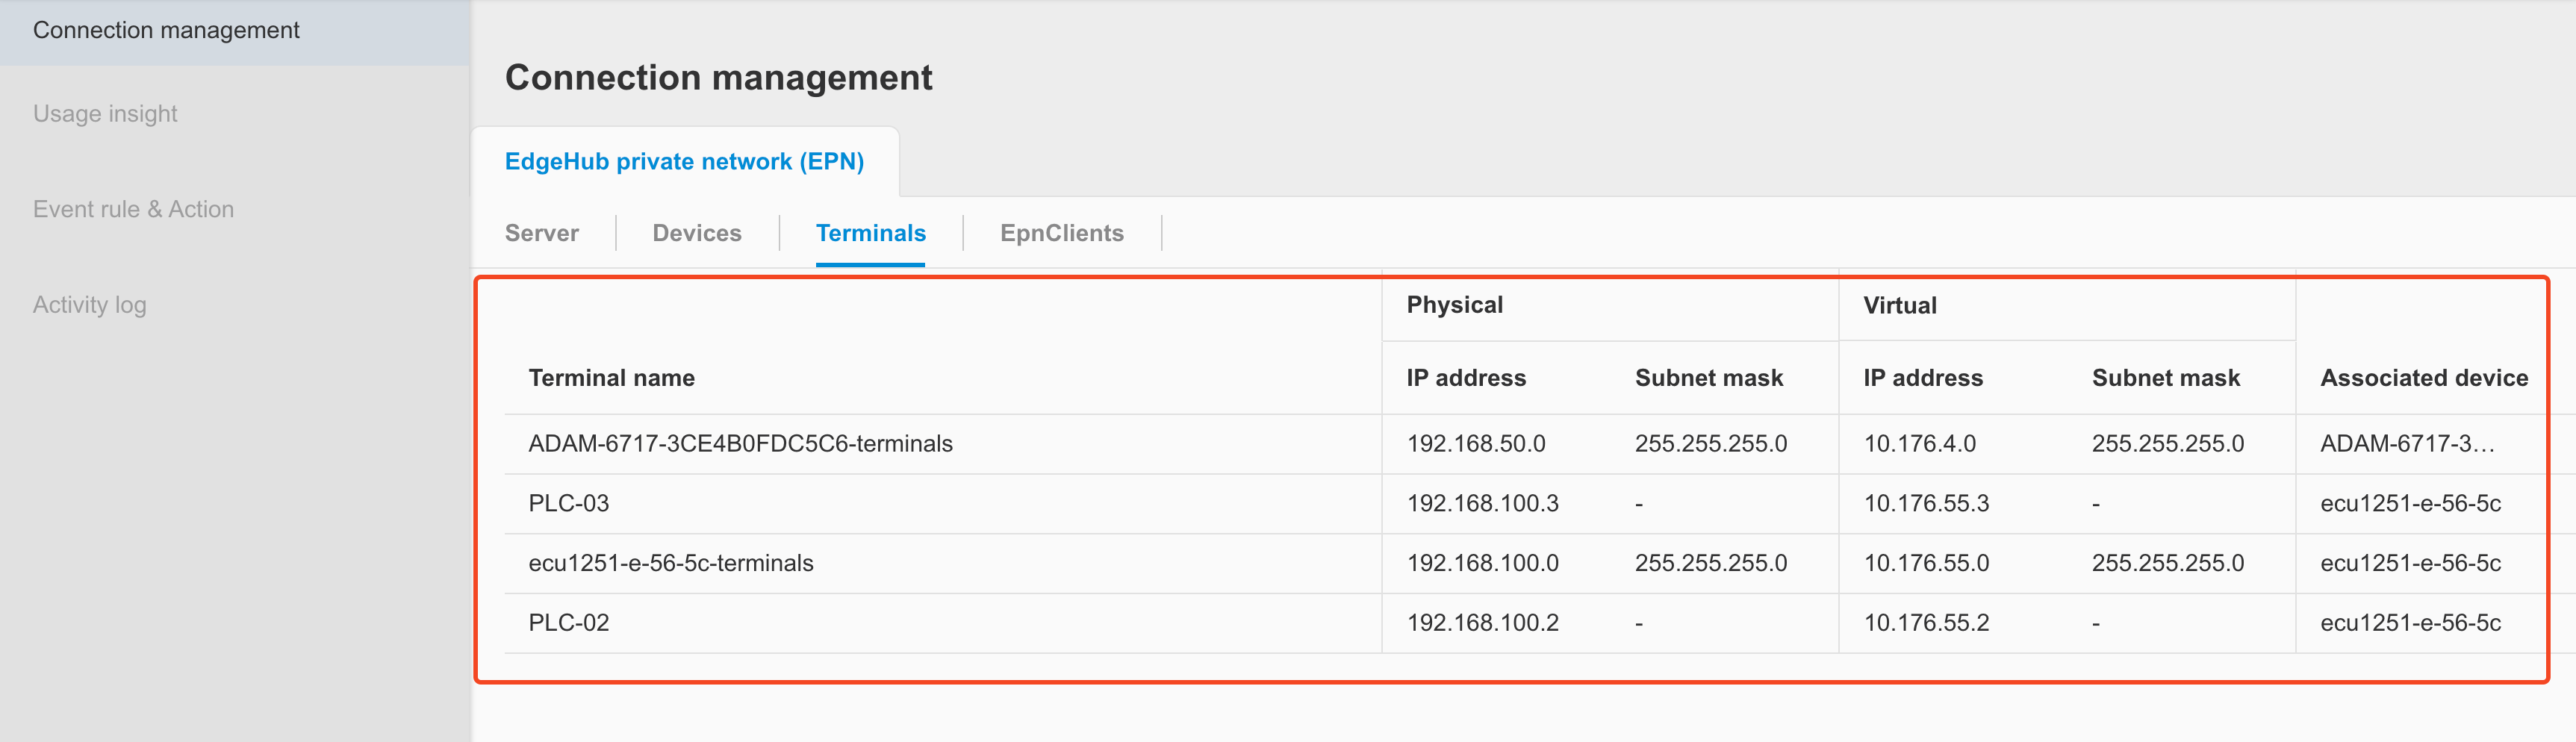
2.4.1 Terminal List
Click the Terminals tab to view the terminal list. The list includes the following fields:
- Terminal name: Displays the terminal name configured by the user.
- Physical - IP address: Shows the physical network interface's IP address of the terminal.
- Physical - Subnet mask:
- This field is only visible for terminals added using the
Add multiple terminalsfeature. - Based on the subnet mask value (e.255.255.255.0), the system determines how many Terminals (e.g., 254) will have physical-to-virtual IP mapping.
- This field is only visible for terminals added using the
- Virtual - IP address: Displays the virtual IP of Terminal subnet assigned to the terminal.
- Virtual - Subnet mask:
- This field is only visible for terminals added using the
Add multiple terminalsfeature. - Based on the subnet mask value (e.255.255.255.0), the system determines how many Terminals (e.g., 254) will have physical-to-virtual IP mapping.
- This field is only visible for terminals added using the
- Associated device: Displays the name of the associated device, indicating which device the terminal is connected to via LAN.
3. Alarm settings
Starting from EdgeHub version 2.5.0, you can configure alarm settings for Direct Access.
Similar to the alarm configurations available in Device Management and Data Management, you may customize the following settings:
- Levels & Categories
- Alarm level: Define the severity of alarms.
- Alarm category: Categorize alarms for easier filtering.
- Events & Actions
- Alarm groups: Assign alarms to specific alarm groups.
- Alarm user groups: Specify user groups to receive alarm notifications.
- Notification groups: Define notification groups for alerts.
- Channel settings: Configure communication channels for alarm delivery.
The following sections describe each configuration item in detail.
3.1 Levels & categories
This chapter describes configurations that are identical to those outlined in the Alarm Settings documentation. For detailed instructions, please refer to that document. The following are some key notes to keep in mind:
- Alarm levels and alarm categories are shared across the entire tenant. Any changes made in the Alarm Settings of Direct Access, Device Management, or Data Management will be synchronized across all three modules.
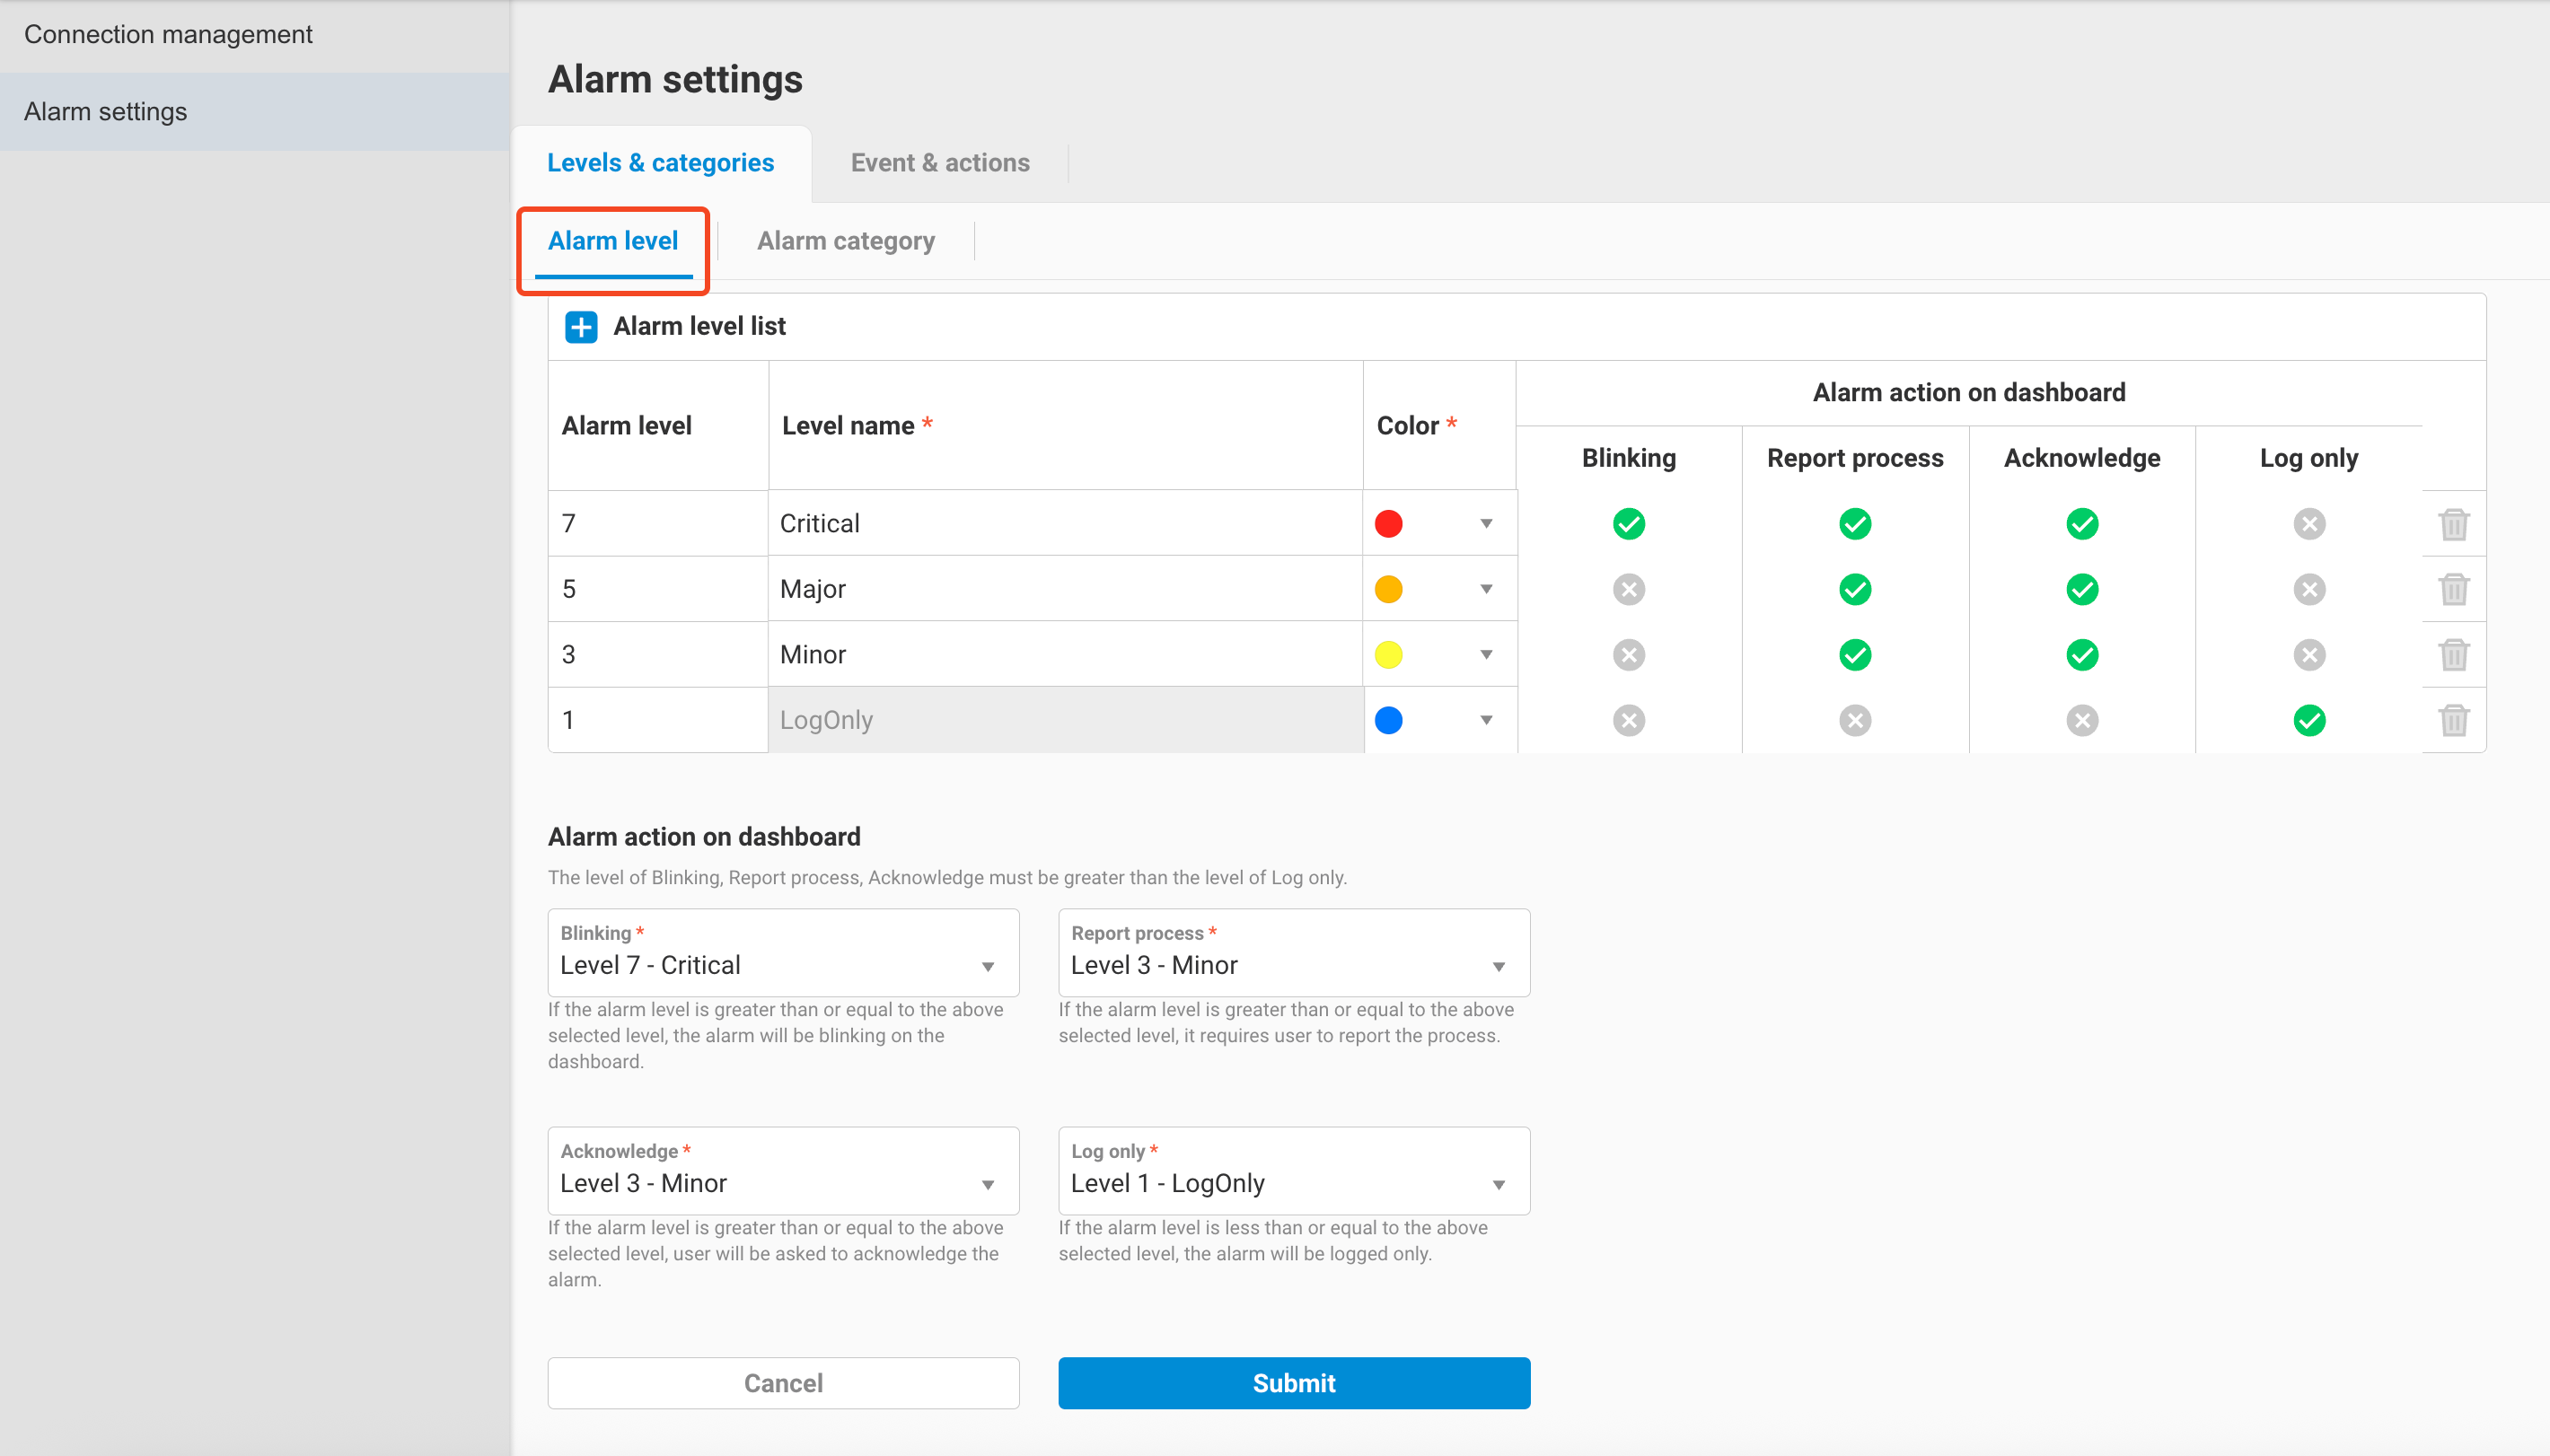
Alarm level setting in Direct Access
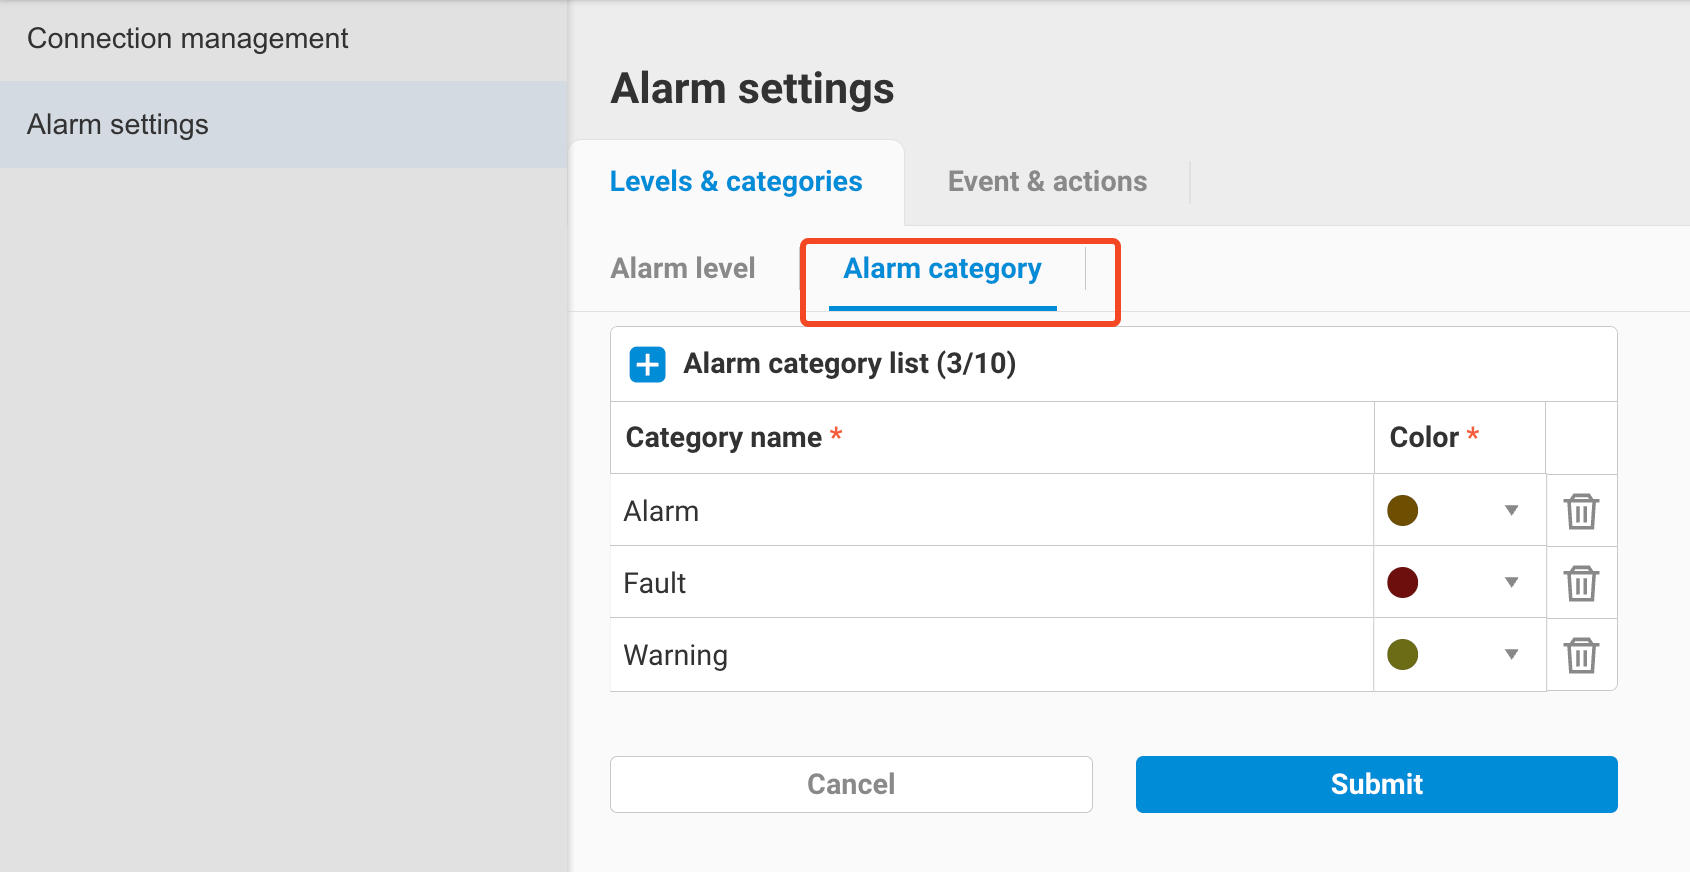
Alarm category setting in Direct Access
3.2 Event & Actions
Through the Event & Actions settings, you can specify how to receive alarm notifications triggered by the alarm rules of Servers, Devices, or EpnClients.
Similar to Section 3.1, please refer to the following documentation for full configuration details:
- Event & Actions: Basic configuration for Alarm Groups, Alarm User Groups, Notification Groups, and Channel Settings.
- Notification by LINE Official Account: How to set up LINE notifications starting from EdgeHub v2.4.1.
This section provides supplementary information specific to the Direct Access feature.
3.2.1 Alarm Groups
Before using Alarm Groups in Direct Access, make sure to configure alarm rules for the Server, Device, or EpnClient as described in Sections 2.1.4 / 2.2.5 / 2.3.6.
Once rules are configured, you’ll see the corresponding clients listed in the Client list when adding or editing an Alarm Group.
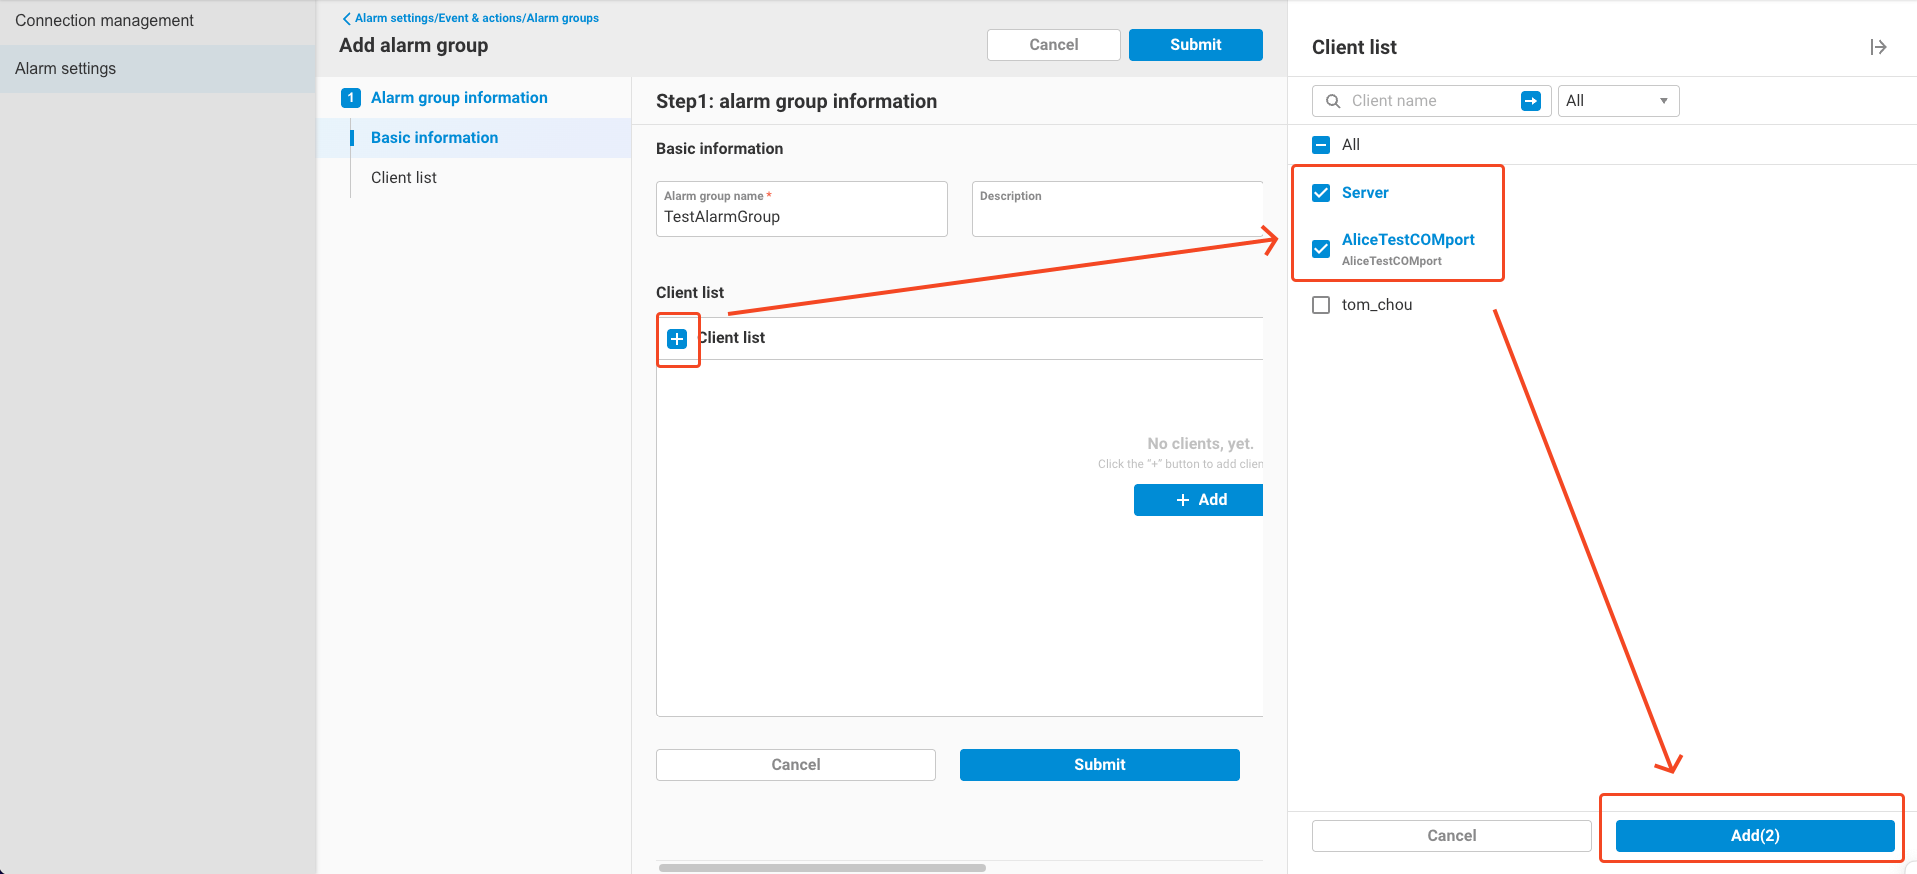
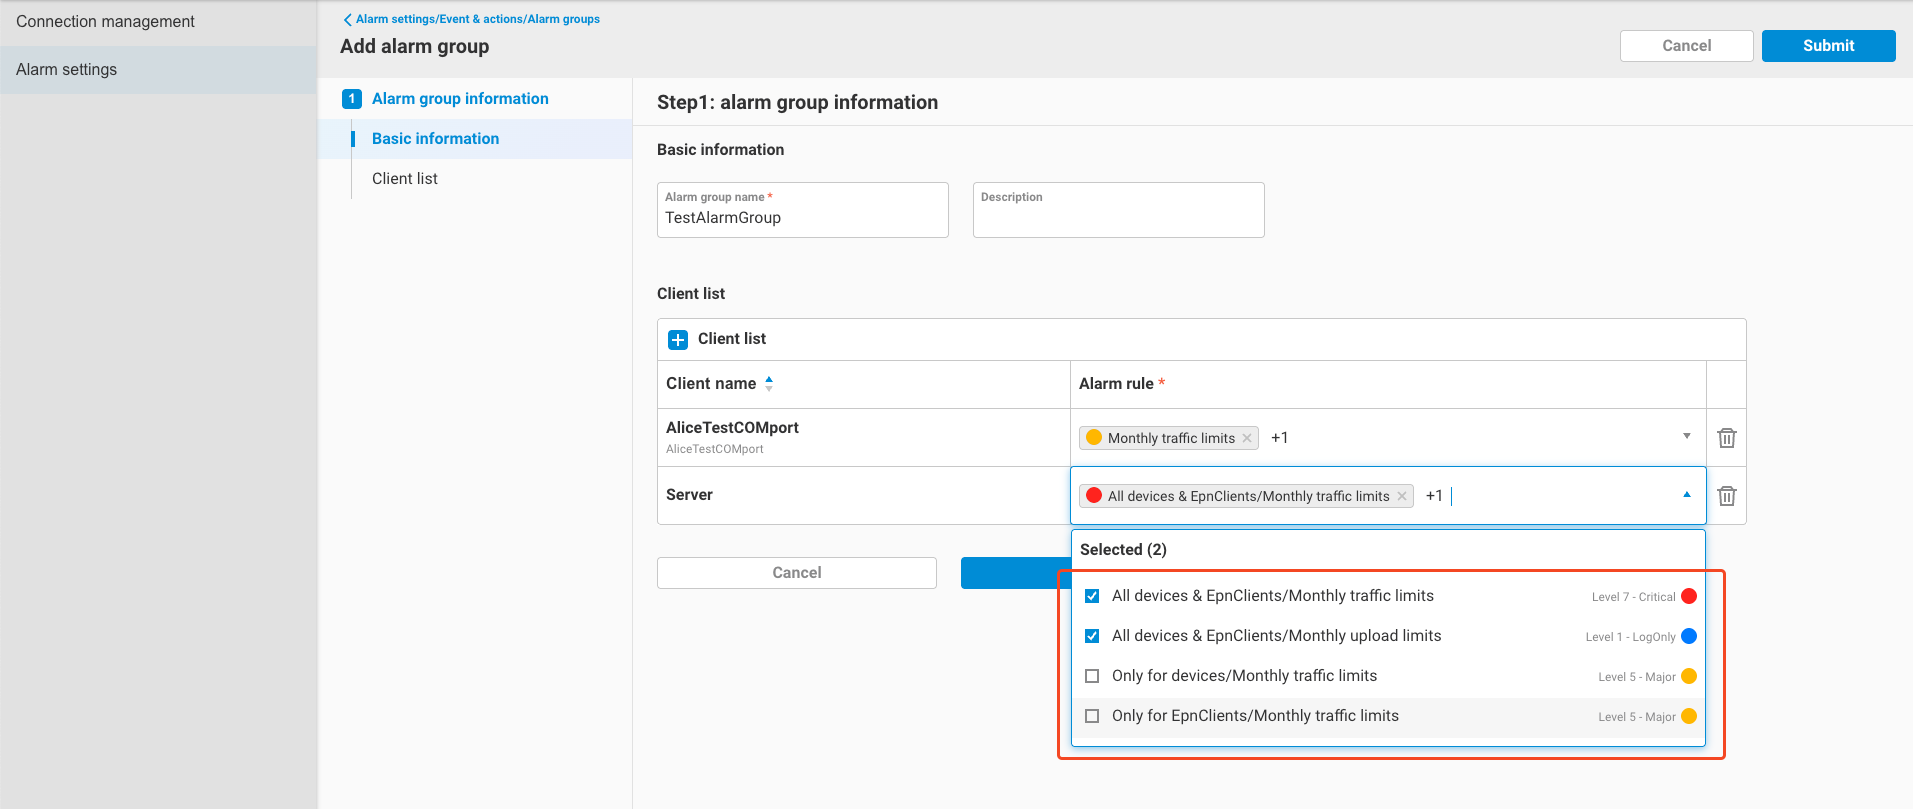
Select the desired clients and their alarm rules:
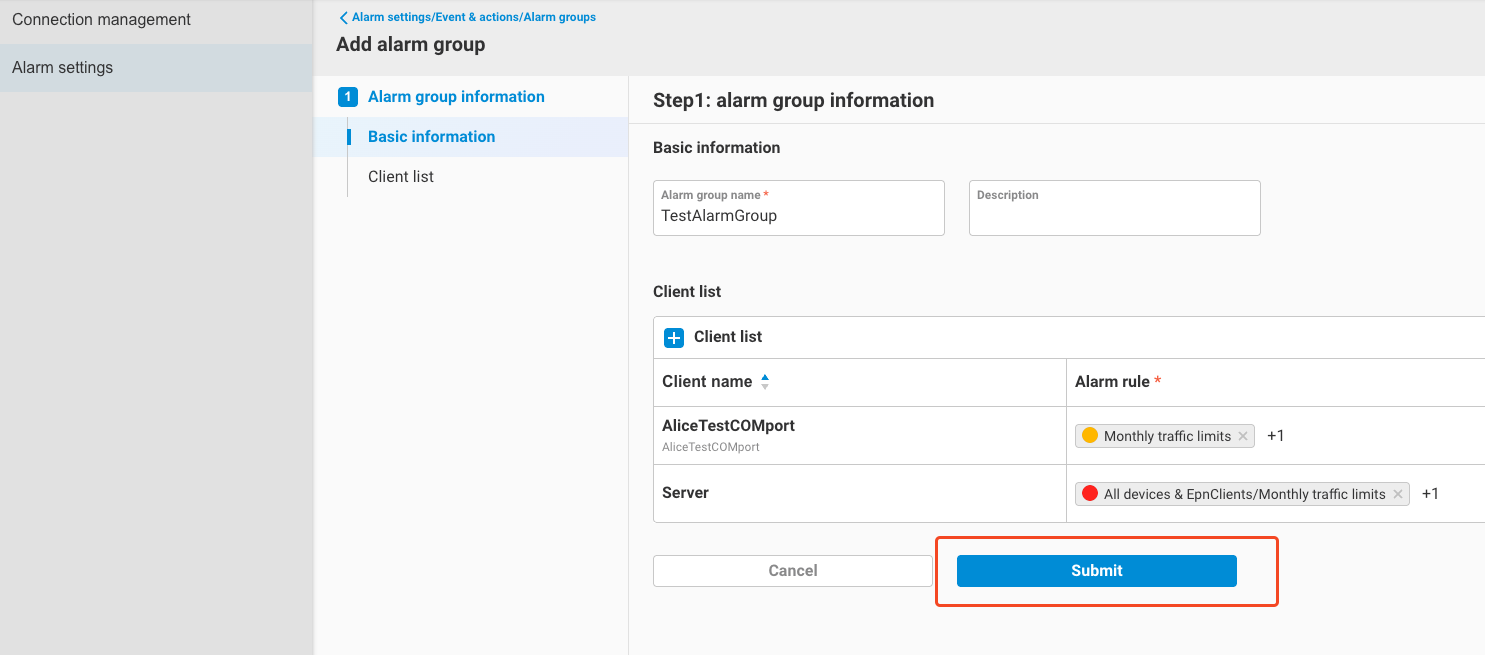
Click Submit to complete the setup:
3.2.2 Alarm User Groups
The configuration of Alarm User Groups is identical to the specifications in:
Please refer to those documents for setup instructions.
3.2.3 Notification Groups
The configuration for Notification Groups is mostly the same as described in the Event & Actions documentation.
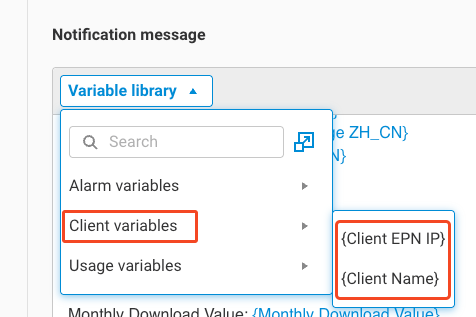
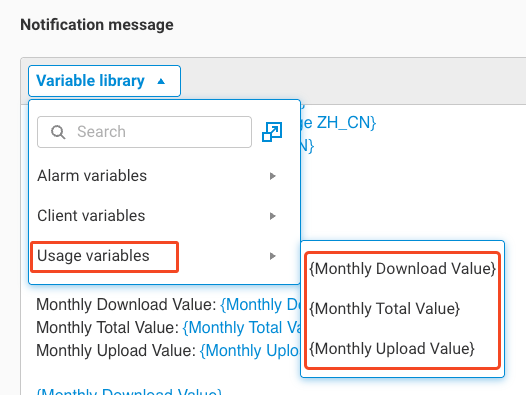
The only difference lies in the variable library, which provides Direct Access-specific variables, including:
-
Client Variables
{Client EPN IP}: EPN IP of the server/device/EpnClient triggering the alarm.{Client Name}: Name of the server/device/EpnClient triggering the alarm.
-
Usage Variables
{Monthly Total Value}: Total monthly traffic for the client.{Monthly Download Value}: Total monthly download traffic.{Monthly Upload Value}: Total monthly upload traffic.
3.2.4 Channel Settings
Channel Settings are configured in the same way as described in the Event & Actions documentation.
Please refer to the document for full details.