Utility Management
When Face Vision successfully recognizes a face, it can trigger external devices such as access control systems, indicator lights, or alarms. The system executes predefined actions—like unlocking doors or sending alerts—based on configured trigger rules.
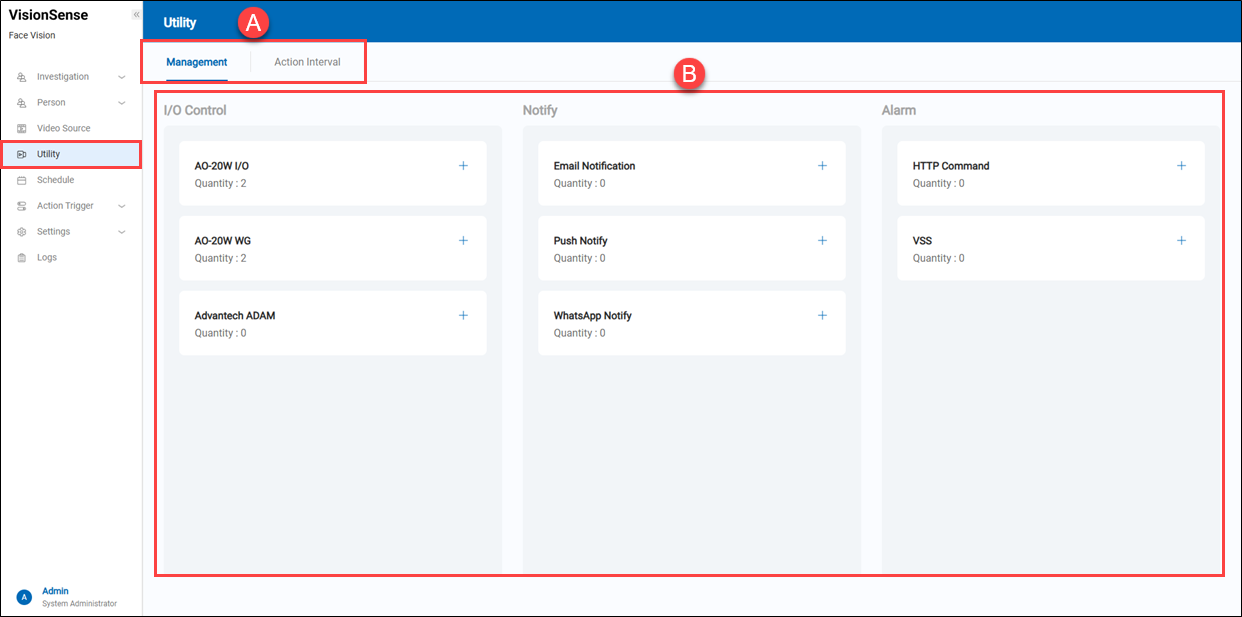 A.【Management/Action Interval】 ⇒ There are two function pages: 'Management' and 'Action Interval'. See below.
- Management: The system provides eight types of utilities for sending notifications or alarms to external utilities. It allows users to perform CRUD operations on this page.
- Action Interval: The ‘Action Interval’ feature must be used in conjunction with the ‘Action Trigger’ function. It allows the ‘Action Trigger’ to have a pause time between each trigger action and the next.
> For example:
- There are two HTTP Command utilities, namely HTTP Command_A and HTTP Command_B. The Action Interval is set to 10 seconds, and the action interval behavior is as follows:
- Suppose HTTP Command_A meets the trigger conditions every second. It triggers the first action at 13:00:10. Due to the 10-second action interval restriction, the next action can only be triggered at 13:00:20.
> Suppose HTTP Command_B also meets the trigger conditions every second. It triggers the first action at 13:00:15. Due to the 10-second action interval restriction, the next action can only be triggered at 13:00:25. In other words, although HTTP Command has only one Action Interval setting, each HTTP Command utility operates independently. Each action trigger follows its own action interval based on its individual trigger time, without being affected by others.
B.【Types of Utilities】 ⇒ It allows users to perform CRUD operations on this page.
【AO-20W I/O】

- Create: Click the
 '+' to directly create a new AO-20W I/O device.
 - Quantity: It displays the quantity of added AO-20W I/O device.
- Device List: Click anywhere to enter the settings page.
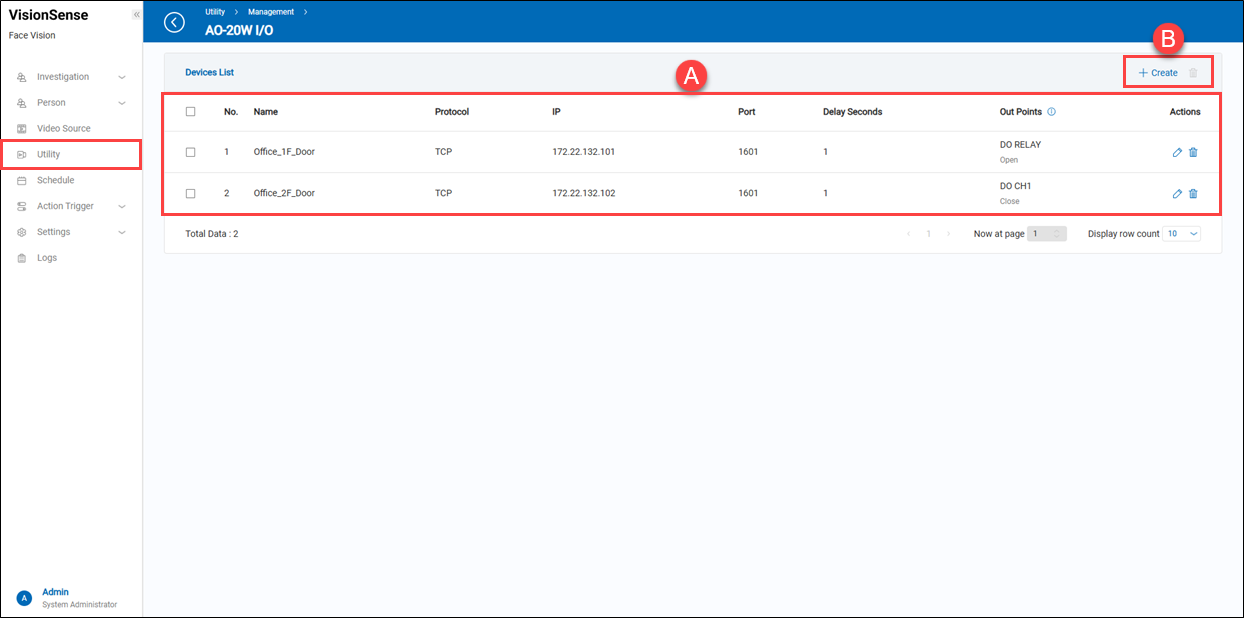 A.【Devices List】
 - Name: The assigned name of the device for identification.
- Protocol: Indicates the communication protocol.
- IP: The IP address of the device.
- Port: The port number used by the device.
- Delay Seconds: The delay in seconds after the output is triggered.
- Actions: Click the
 'Edit' to enter the edit page or click the
  'Delete' to delete the assigned data.
B.【+ Create/Delete】 ⇒ Users can click ![]() '+ Create' to add a new AO-20W I/O device or click
'+ Create' to add a new AO-20W I/O device or click ![]() 'Delete' to remove multiple selected AO-20W I/O device at a time.
'Delete' to remove multiple selected AO-20W I/O device at a time.
【Create a new AO-20W I/O】
 a.【Basic Information】
- Name: A user-defined name for the AO-20W I/O device.
- Protocol: Select the protocol (TCP/UDP) for connecting to the AO-20W I/O.
- IP: Set the IP address for the AO-20W I/O connection.
- Port: Set the port number for the AO-20W I/O connection.
- Delay Seconds: Set the DO channel (Channel 1 ~ 3) and trigger status (Open / Close) for the AO-20W I/O device.
b.【Out Points】
- Channel & Status: Set the DO channel (Channel 1 ~ 3) and initial status (Open / Close) for the AO-20W I/O.
c.【Operation】 Click the 'Save' to apply all settings or the 'Cancel' to return to the previous page without saving. Also, click the ![]() 'Test' to check whether all settings are connected properly.
'Test' to check whether all settings are connected properly.
【AO-20W WG】

- Create: Click the '+' to directly create a new AO-20W WG device.
- Quantity: It displays the quantity of added AO-20W WG device.
- Device List: Click anywhere to enter the settings page.
 A.【Devices List】
 - Name: The assigned name of the device for identification.
- IP: The IP address of the device.
- Port: The port number used by the device.
- Mode: The operating mode of the device, such as iClass_WG34 or Mifare_WG34.
- Actions: Click the 'Edit' to enter the edit page or click the 'Delete' to delete the assigned data.
B.【+ Create/Delete】 ⇒ Users can click ![]() '+ Create' to add a new AO-20W WG device or click
'+ Create' to add a new AO-20W WG device or click ![]() 'Delete' to remove multiple selected AO-20W WG device at a time.
'Delete' to remove multiple selected AO-20W WG device at a time.
【Create a new AO-20W WG】
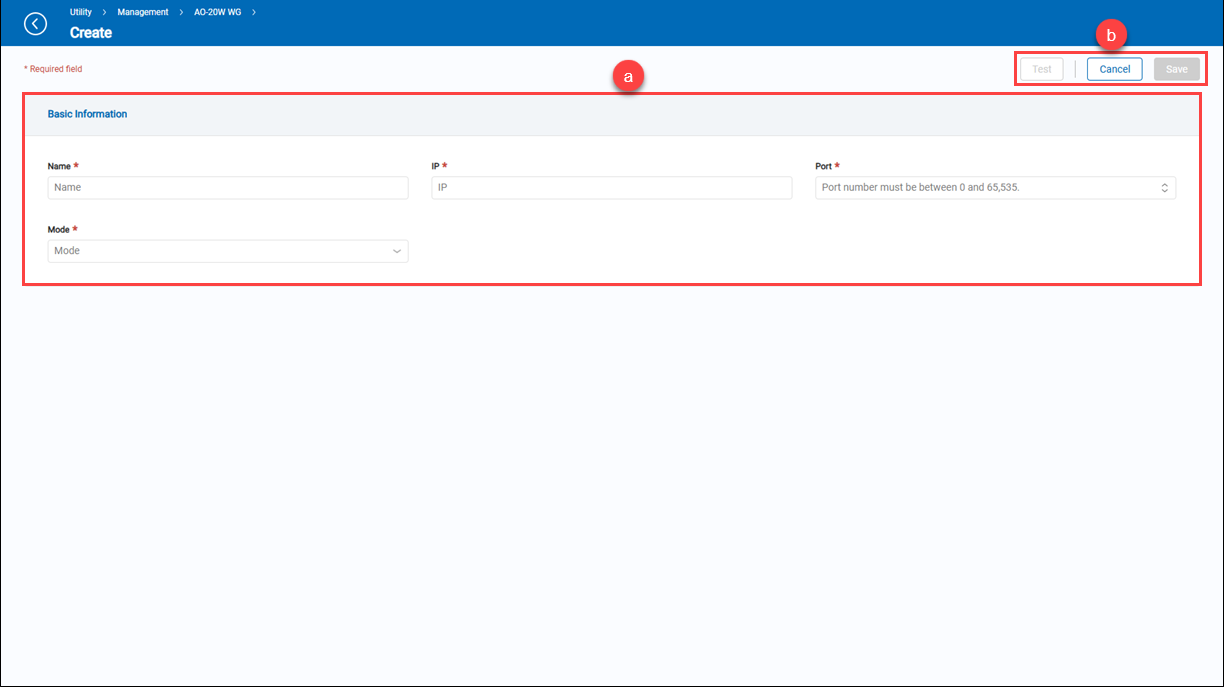 a.【Basic Information】
- Name: Custom name for the AO-20W WG device.
- IP: Set the IP address used to connect to the AO-20W WG device.
- Port: Set the port number used for connecting to the AO-20W WG.
- Mode: Select the card technology (iClass or Mifare) and Wiegand bit format (26 or 34) that the converter will output.
b.【Operation】 Click the 'Save' to apply all settings or the 'Cancel' to return to the previous page without saving. Also, click the ![]() 'Test' to check whether all settings are connected properly.
'Test' to check whether all settings are connected properly.
【Advantech ADAM】

- Create: Click the '+' to directly create a new Advantech ADAM device.
- Quantity: It displays the quantity of added Advantech ADAM device.
- Device List: Click anywhere to enter the settings page.
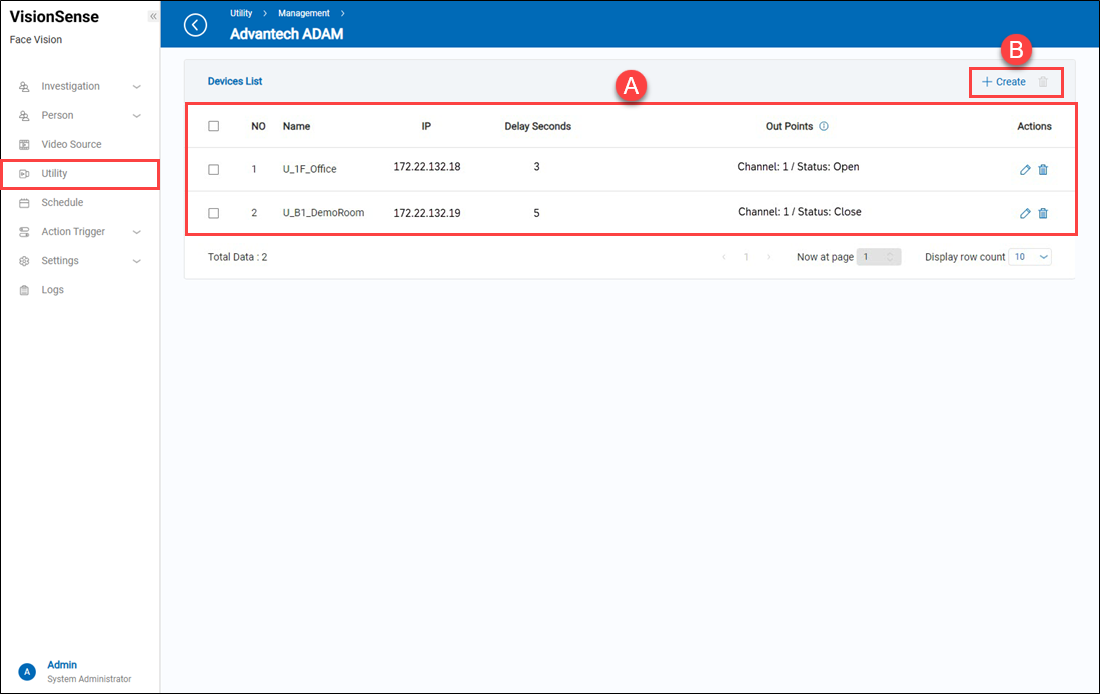 A.【Devices List】
 - Name: The assigned name of the device for identification.
- IP: The IP address of the device.
- Delay Seconds: The delay in seconds after the output is triggered.
- Out Points: This refers to the output channel of the ADAM device along with its initial state.
- Actions: Click the 'Edit' to enter the edit page or click the 'Delete' to delete the assigned data.
B.【+ Create/Delete】 ⇒ Users can click ![]() '+ Create' to add a new Advantech ADAM device or click
'+ Create' to add a new Advantech ADAM device or click ![]() 'Delete' to remove multiple selected Advantech ADAM device at a time.
'Delete' to remove multiple selected Advantech ADAM device at a time.
【Create a new Advantech ADAM】
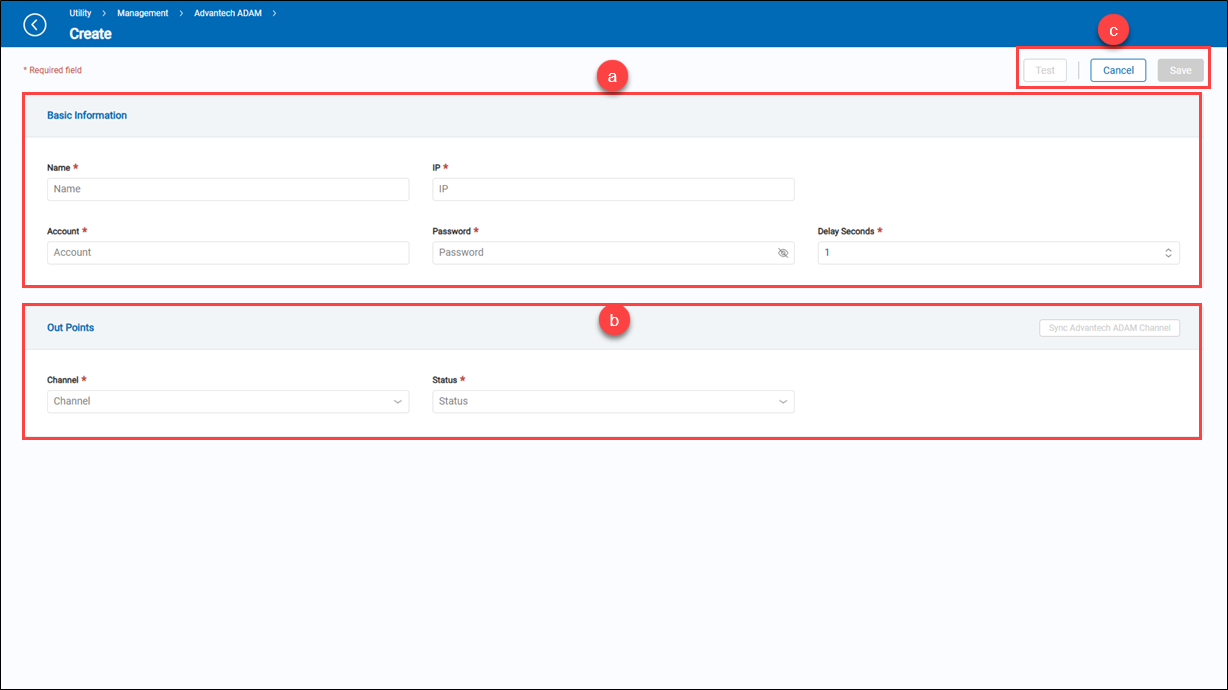 a.【Basic Information】
- Name: A user-defined name for the Advantech ADAM device.
- IP: Set the IP address of the Advantech ADAM device for connection.
- Account: Enter the login account for the Advantech ADAM device.
- Password: Enter the login password for the Advantech ADAM device.
- Delay Seconds: Set the delay duration to maintain the triggered status before returning to the original state.
b.【Out Points】
- Sync Advantech ADAM Channel: This button syncs the channel list from the ADAM device.
- Channel & Status: Select the output channel of the ADAM device (e.g., Channel 0, Channel 1, etc.) and set its status to either "Open" or "Close".
c.【Operation】 Click the 'Save' to apply all settings or the 'Cancel' to return to the previous page without saving. Also, click the ![]() 'Test' to check whether all settings are connected properly.
'Test' to check whether all settings are connected properly.
【Email Notification】

- Create: Click the '+' to directly create a new email notification.
- Quantity: It displays the quantity of added email notifications.
- Device List: Click anywhere to enter the settings page.
 A.【Devices List】
- Name: Customized Email Notification Name.
- Title: Customized notification letter title.
- Send To: Mailboxes of people to be notified.
- Use HTML Format: The content of the letter supports HTML format.
- Entrainment Attachments: Include real-time snapshots of detection area photos.
- Actions: Click the 'Edit' to enter the edit page or click the 'Delete' to delete the assigned data.
B.【+ Create/Delete】 ⇒ Users can click ![]() '+ Create' to add a new email notification or click
'+ Create' to add a new email notification or click ![]() 'Delete' to remove multiple selected email notifications at a time.
'Delete' to remove multiple selected email notifications at a time.
【Create a new email notification】
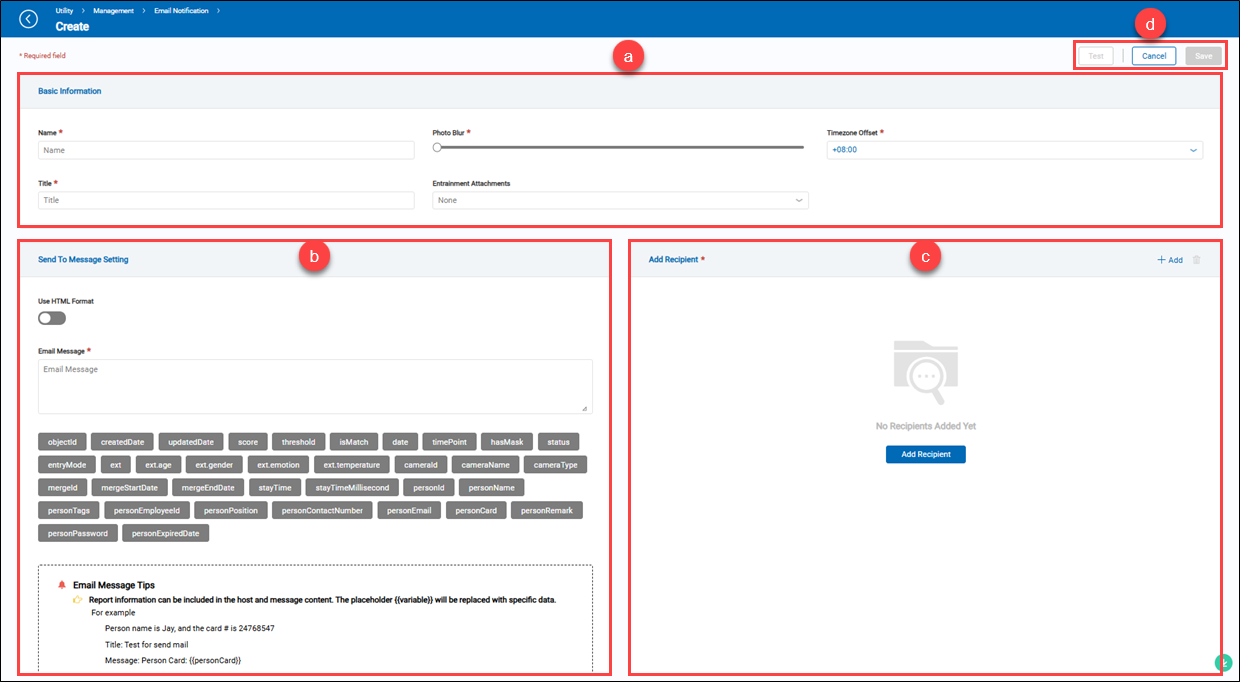 a.【Basic Information】
- Name: The customized email notification name.
- Title: The customized email notification title.
- Photo Blur: Adjust the level of blurring for face images in the email.
- Timezone Offset: Select the time zone of the location where the recipients of the email notifications are based.
- Entrainment Attachments: Include real-time snapshots of detection area photos.
b.【Send To Message Setting】
- Use HTML Format: A toggle switch enables the feature when turned on and disables it when turned off. The content of the letter supports HTML format. If enabled, it will additionally support attaching a snapshot or person register image in the email message.
- Email Message: Content of the email notification. It supports not only text but also variables for replacing specific data.
- Placeholders: A set of predefined placeholders is provided for easy insertion into the message content. These represent event attributes like time, person name, camera, etc.
- Push Notify Tips: Provides guidelines on how variables will be replaced with specific data.
c.【Add Recipient】
- Send To: Email addresses of the recipients for email notifications. (multiple recipients can be set).
- Actions: Click the 'Edit' to enter the edit page or click the 'Delete' to delete the assigned data.
- + Add/Delete: Click
 '+ Add' to add a new Email Notification or the 'Delete' to remove multiple selected data.

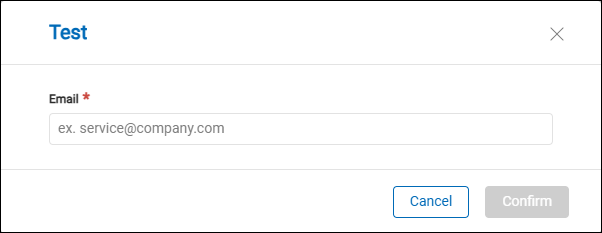
d.【Operation】 Click the 'Save' to apply all settings or the 'Cancel' to return to the previous page without saving. Also, click the ![]() 'Test' to send a test email to the recipient.
'Test' to send a test email to the recipient.
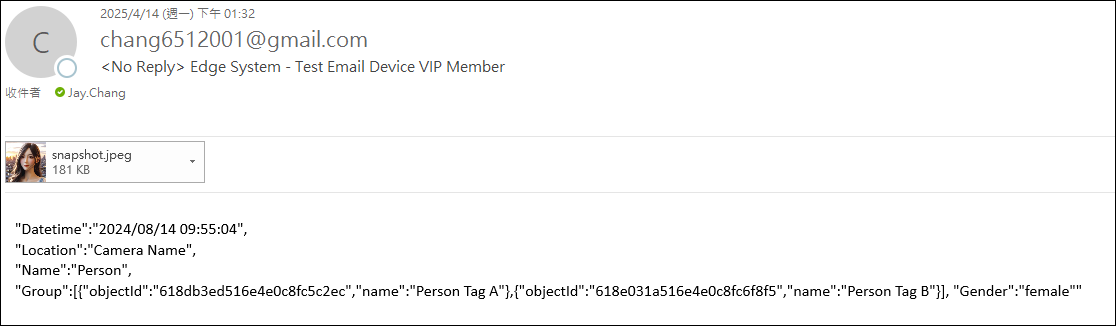
【Email Notification Example】
【Push Notify】

- Create: Click the '+' to directly create a new Push Notify.
- Quantity: It displays the quantity of added Push Notify.
- Device List: Click anywhere to enter the settings page.
 A.【Devices List】
- Name: Customized Push Notify name.
- Send To: Specify the recipient of the push notification.
- Actions: Click the 'Edit' to enter the edit page or click the 'Delete' to delete the assigned data.
B.【+ Create/Delete】 ⇒ Users can click ![]() '+ Create' to add a new push notification or click
'+ Create' to add a new push notification or click ![]() 'Delete' to remove multiple selected push notifications at a time.
'Delete' to remove multiple selected push notifications at a time.
【Create a new push notification】
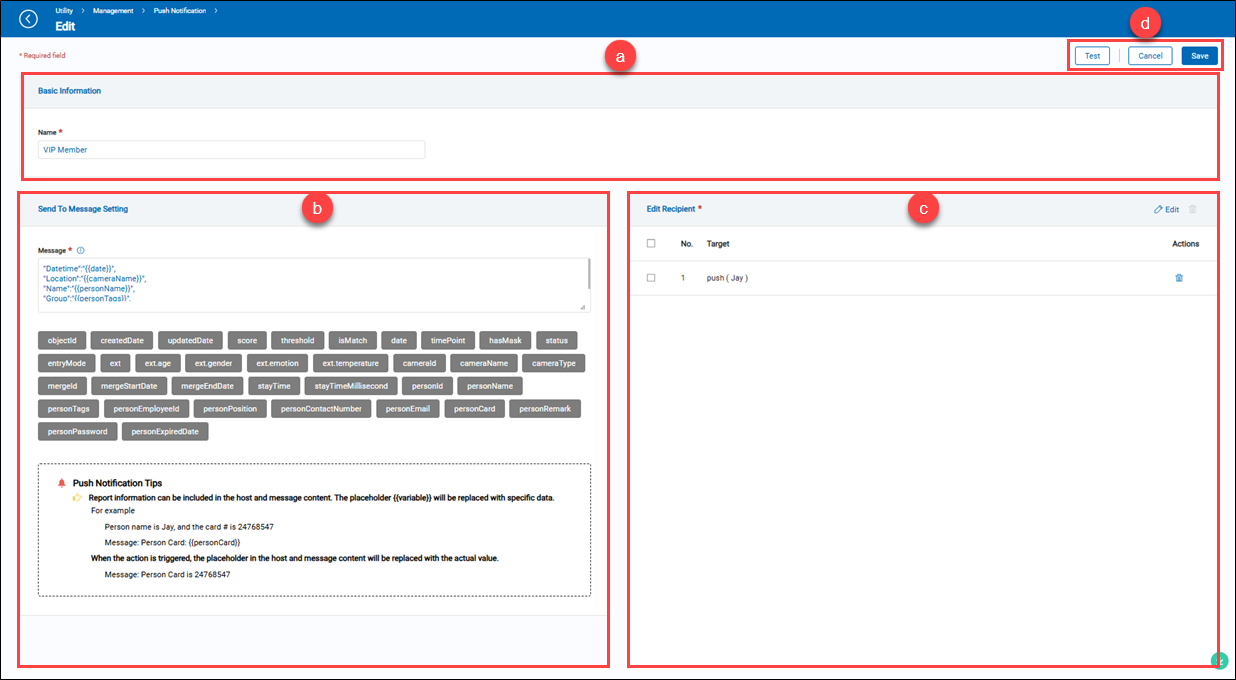 a.【Basic Information】
- Name: Enter a descriptive name for the push notification.
b.【Send to Message Setting】
- Message: Content of the push notification. Users can use predefined variables to dynamically insert data.
- Placeholders: A set of predefined placeholders is provided for easy insertion into the message content. These represent event attributes like time, person name, camera, etc.
- Push Notify Tips: Provides guidelines on how variables will be replaced with specific data.
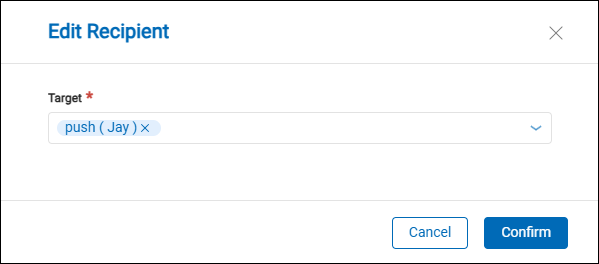
c.【Edit Recipient】
- Target: The name of the device receiving the push notification.
- Actions: Click the 'Delete' to delete the assigned data.
- Edit/Delete: Click
 'Edit' to add a new push notification device or the 'Delete' to remove multiple selected data.
d.【Operation】 Click the 'Save' to apply all settings or the 'Cancel' to return to the previous page without saving. Also, click the ![]() 'Test' to send a test push notification based on the current configuration.
'Test' to send a test push notification based on the current configuration.

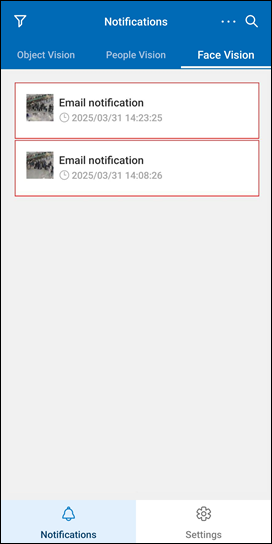
【Push Notify Example】
【WhatsApp Notify】

- Create: Click the '+' to directly create a new WhatsApp notification.
- Quantity: It displays the quantity of added WhatsApp notifications.
- Device List: Click anywhere to enter the settings page.
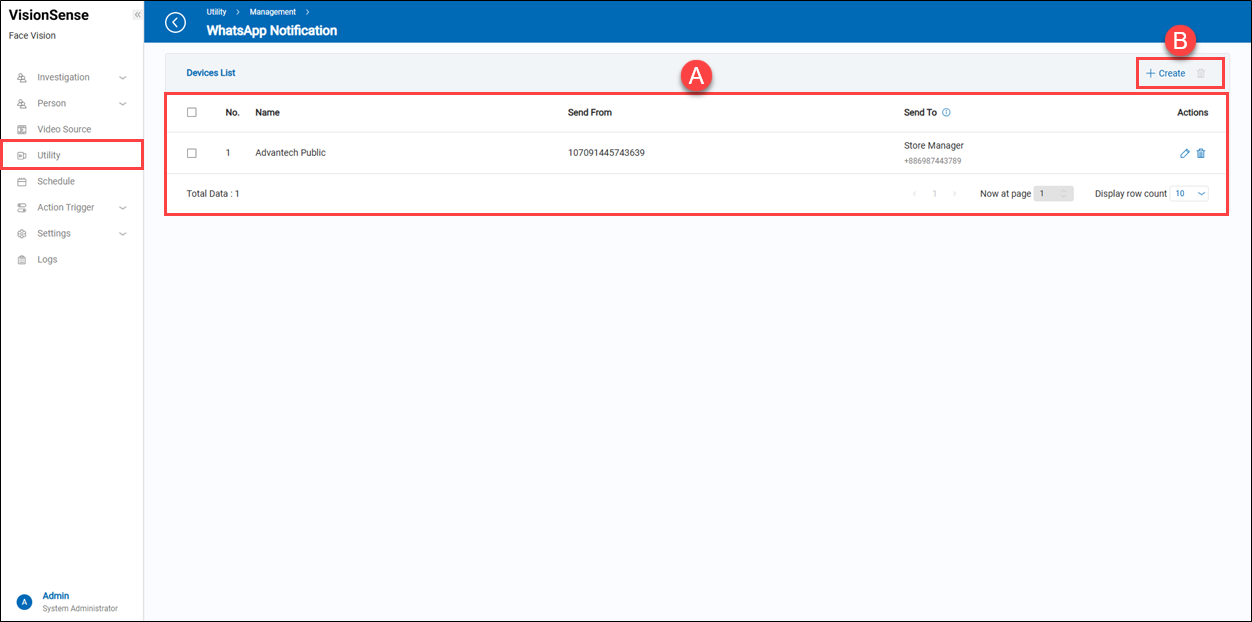 A.【Devices List】
- Name: The customized WhatsApp notification name.
- Send From: Sender's phone number.
- Send To: The recipients of the WhatsApp notifications.
- Actions: Click the 'Edit' to enter the edit page or click the 'Delete' to delete the assigned data.
B.【+ Create/Delete】 ⇒ Users can click ![]() '+ Create' to add a new WhatsApp notification or click
'+ Create' to add a new WhatsApp notification or click ![]() 'Delete' to remove multiple selected WhatsApp notifications at a time.
'Delete' to remove multiple selected WhatsApp notifications at a time.
【Create a WhatsApp notification】
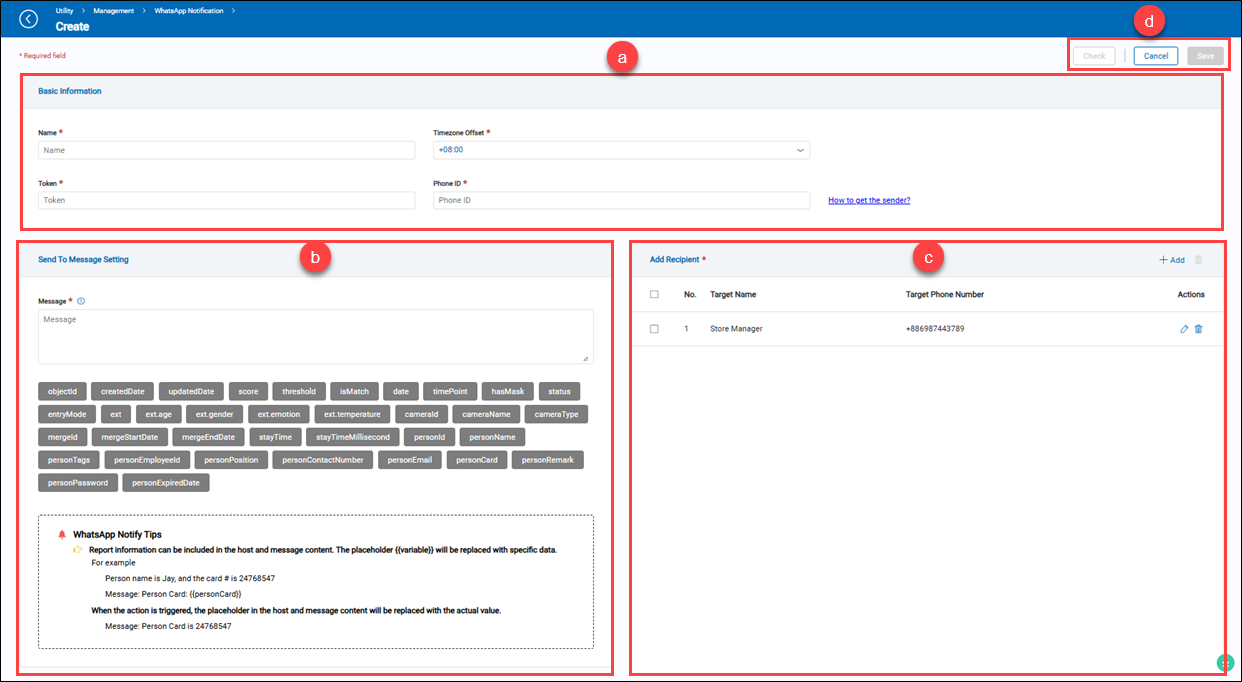 a.【Basic Information】
- Name: The customized WhatsApp notification name.
- Token: Enter a valid WhatsApp Token.
- Timezone Offset: Select the time zone of the location where the recipients of the WhatsApp notifications are based.
- Phone ID: Enter a valid phone number associated with the token.
b.【Send To Message Setting】
- Message: Content of the WhatsApp notification. It supports not only text but also variables for replacing specific data.
- Placeholders: A set of predefined placeholders is provided for easy insertion into the message content. These represent event attributes like time, person name, camera, etc.
- Push Notify Tips: Provides guidelines on how variables will be replaced with specific data.
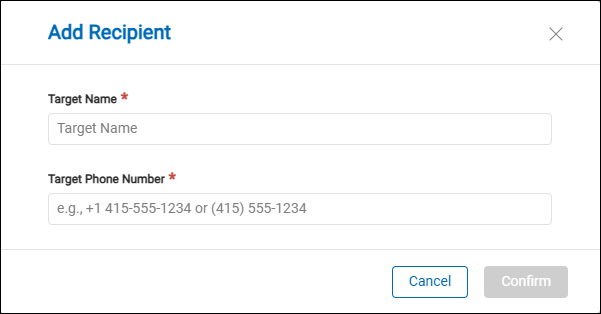
c.【Add Recipient】
- Target Name: The recipient's name of the WhatsApp notification.
- Target Phone Number: The recipients' cell phone number of the WhatsApp notifications.(multiple recipients can be set)
- Action: Click the 'Edit' to enter the edit page or click the 'Delete' to delete the assigned data.
- + Add/Delete: Click '+ Add' to add a new WhatsApp notification recipient or the 'Delete' to remove multiple selected data.
d.【Operation】 Click the 'Save' to apply all settings or the 'Cancel' to return to the previous page without saving. Also, click the ![]() 'Check' to send a test WhatsApp notification to the recipient.
'Check' to send a test WhatsApp notification to the recipient.

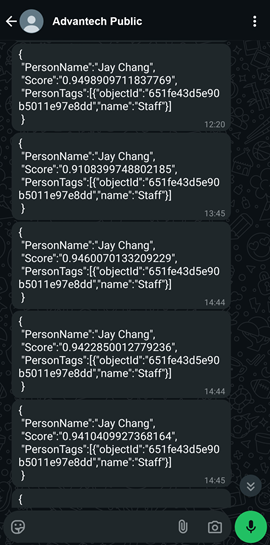
【WhatsApp Notification Example】
【HTTP Command】

- Create: Click the '+' to directly create a new HTTP Command.
- Quantity: It displays the quantity of added HTTP Command.
- Device List: Click anywhere to enter the settings page.
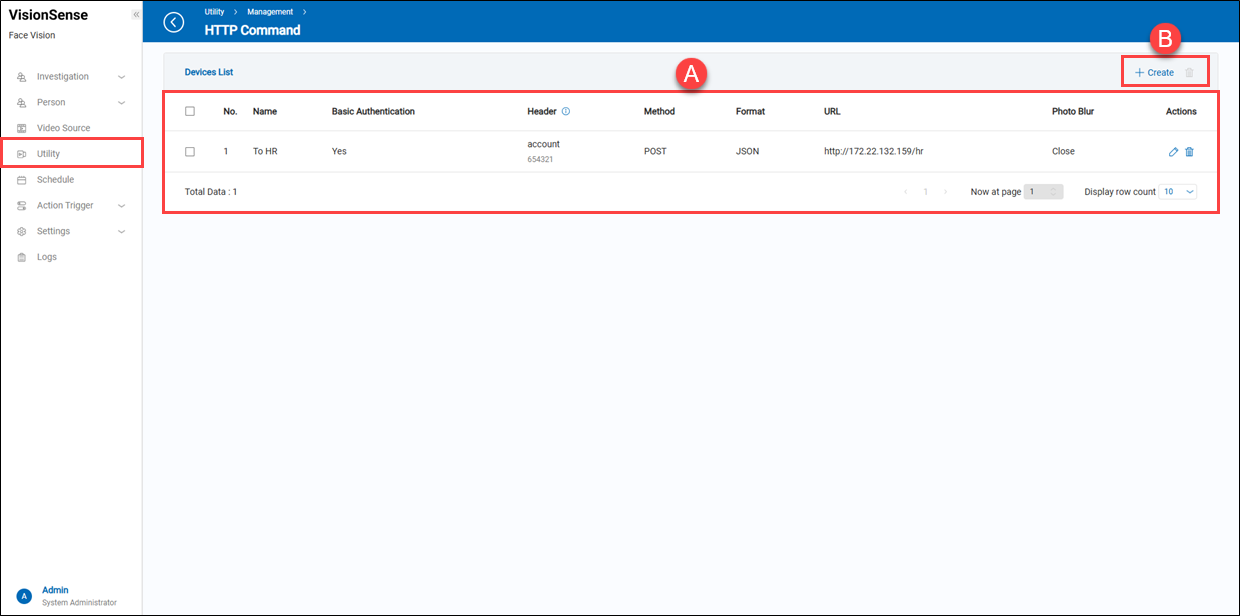 A.【Devices List】
- Name: The customized HTTP command name.
- Basic Authentication: The account and password for Basic Authentication.
- Header: HTTP Header and key values.
- Method: HTTP data transfer method (GET or POST).
- Format: (Unchangeable) JSON format.
- URL: Destination URL where the HTTP message is to be sent.
- Photo Blur: Indicates if photo blurring is applied to faces (e.g., "Close" means blur is disabled).
- Actions: Click the 'Edit' to enter the edit page or click the 'Delete' to delete the assigned data.
B.【+ Create/Delete】 ⇒ Users can click ![]() '+ Create' to add a new HTTP Command or click
'+ Create' to add a new HTTP Command or click ![]() 'Delete' to remove multiple selected HTTP Commands at once.
'Delete' to remove multiple selected HTTP Commands at once.
【Create a new HTTP Command】
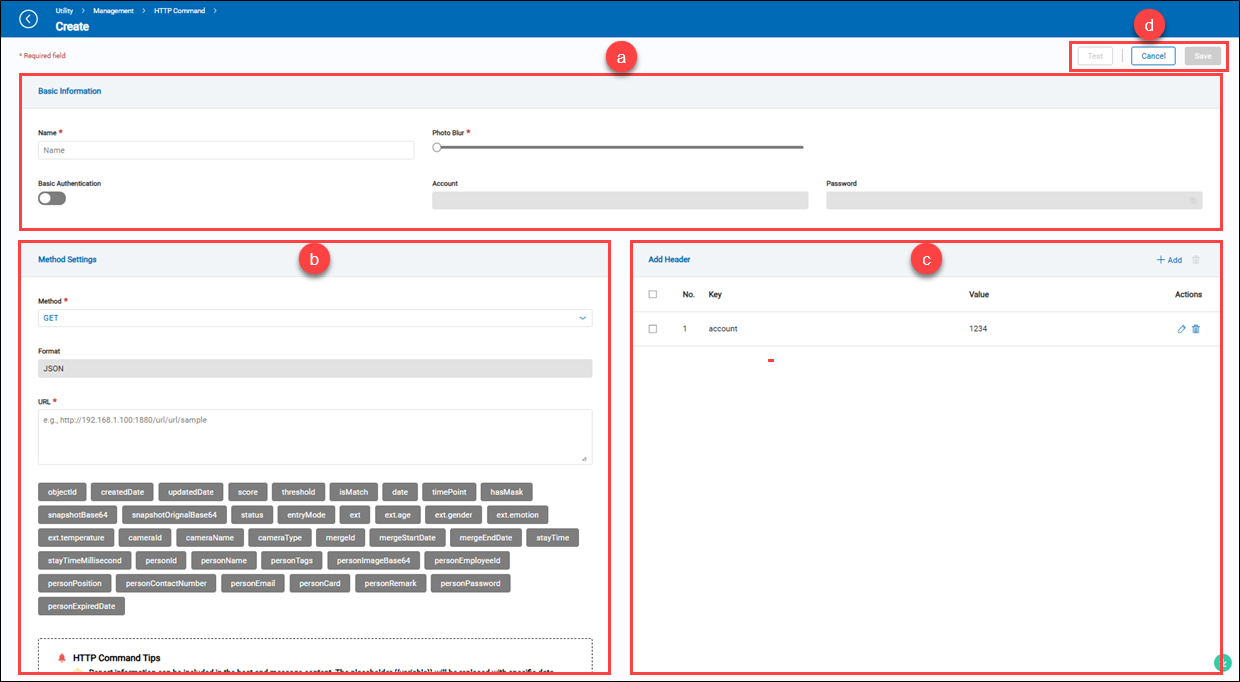 a.【Basic Information】
- Name: Enter a descriptive name for the HTTP Command.
- Photo Blur: Adjust the level of blurring for face images.
- Basic Authentication: Toggle the switch to enable or disable authentication.
- Account & Password: If Basic Authentication is enabled, input the required account credentials.
b.【Method Setting】
- Method: Select the HTTP request method (e.g., POST, GET).
- Format: Defines the data format, such as JSON.
- URL: Specify the endpoint to which the HTTP request will be sent.
- Request Body: Input the request payload in JSON format. Users can use predefined variables to dynamically insert data.
- Placeholders: A set of predefined placeholders is provided for easy insertion into the message content. These represent event attributes like time, person name, camera, etc.
- HTTP Command Tips: Provides guidelines on how variables will be replaced with specific data.
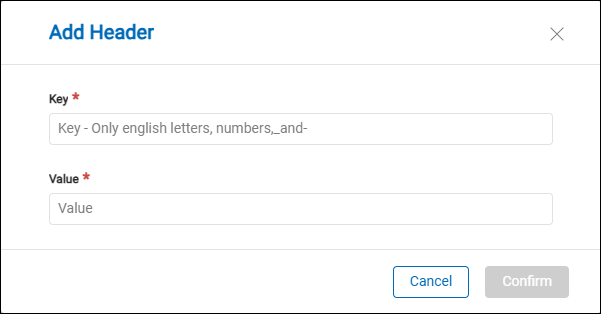
c.【Add Header】
- Key: The name of the header field.
- Value: The value assigned to the header field.
- Actions: Click the 'Edit' to enter the edit page or click the 'Delete' to delete the assigned data.
- + Add/Delete: Click '+ Add' to add a new header or the 'Delete' to remove multiple selected data.
d.【Operation】 Click the 'Save' to apply all settings or the 'Cancel' to return to the previous page without saving. Also, click the ![]() 'Test' to send a test HTTP request based on the current configuration.
'Test' to send a test HTTP request based on the current configuration.
【VSS】

- Create: Click the '+' to directly create a new VSS device.
- Quantity: It displays the quantity of added VSS device.
- Device List: Click anywhere to enter the settings page.
 A.【Devices List】
- Name: The customized VSS device name.
- Hostname: The host location or IP address of the VSS device.
- Port: The port number to connect to this VSS device.
- Data Source: The source name of the VSS device.
- SSL Enable: This shows whether the SSL protocol is enabled or disabled.
- Photo Blur: Indicates if photo blurring is applied to faces (e.g., "Close" means blur is disabled).
- Actions: Click the 'Edit' to enter the edit page or click the 'Delete' to delete the assigned data.
B.【+ Create/Delete】 ⇒ Users can click ![]() '+ Create' to add a new VSS device or click
'+ Create' to add a new VSS device or click ![]() 'Delete' to remove multiple selected VSS devices at once.
'Delete' to remove multiple selected VSS devices at once.
【Create a new VSS device】
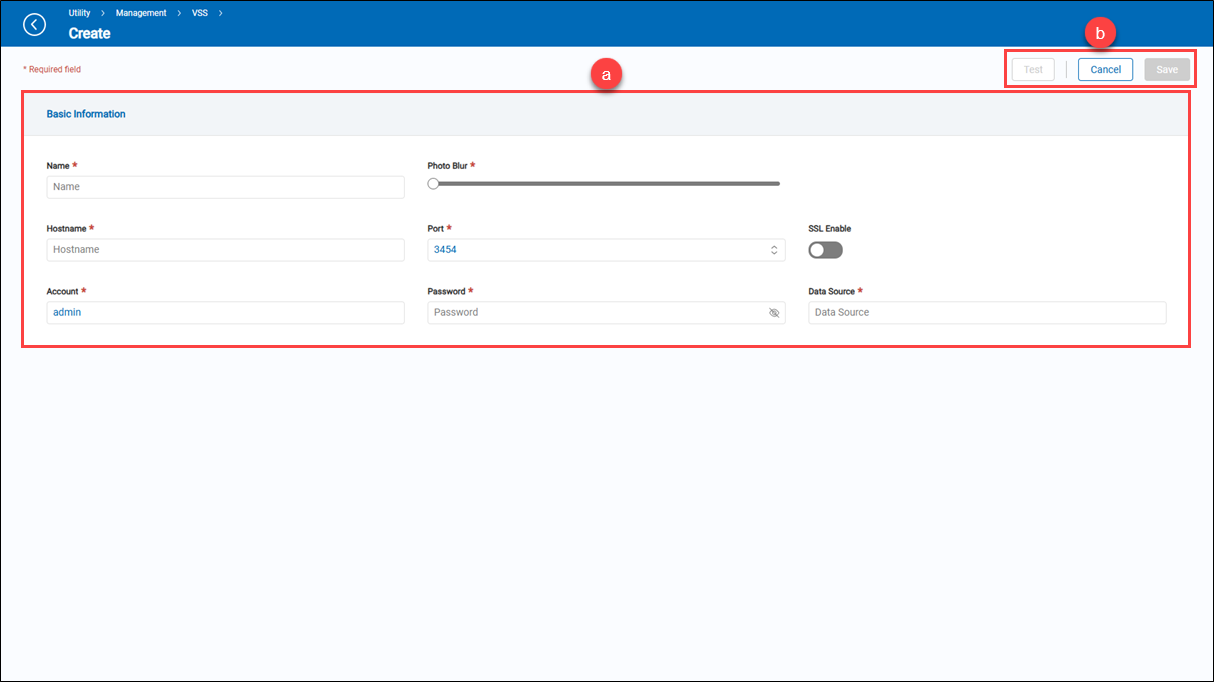 a.【Basic Information】
- Name: Enter a descriptive name for the VSS device.
- Photo Blur: Adjust the level of blurring for face images.
- Hostname: Set up the host location or IP address of the VSS device.
- Port: Set up the port number to connect to this VSS device.
- SSL Enable: Toggle the switch to enable or disable the SSL protocol.
- Account & Password: Enter the required account and password.
- Data Source: Enter the source name of the VSS device
b.【Operation】 Click the 'Save' to apply all settings or the 'Cancel' to return to the previous page without saving. Also, click the ![]() 'Test' to check whether the connection settings are correct or not.
'Test' to check whether the connection settings are correct or not.
【Action Interval】
The 'Action Interval' feature must be used in conjunction with the 'Action Trigger' feature. It allows the 'Action Trigger' to have a delay between each trigger action and the next one.
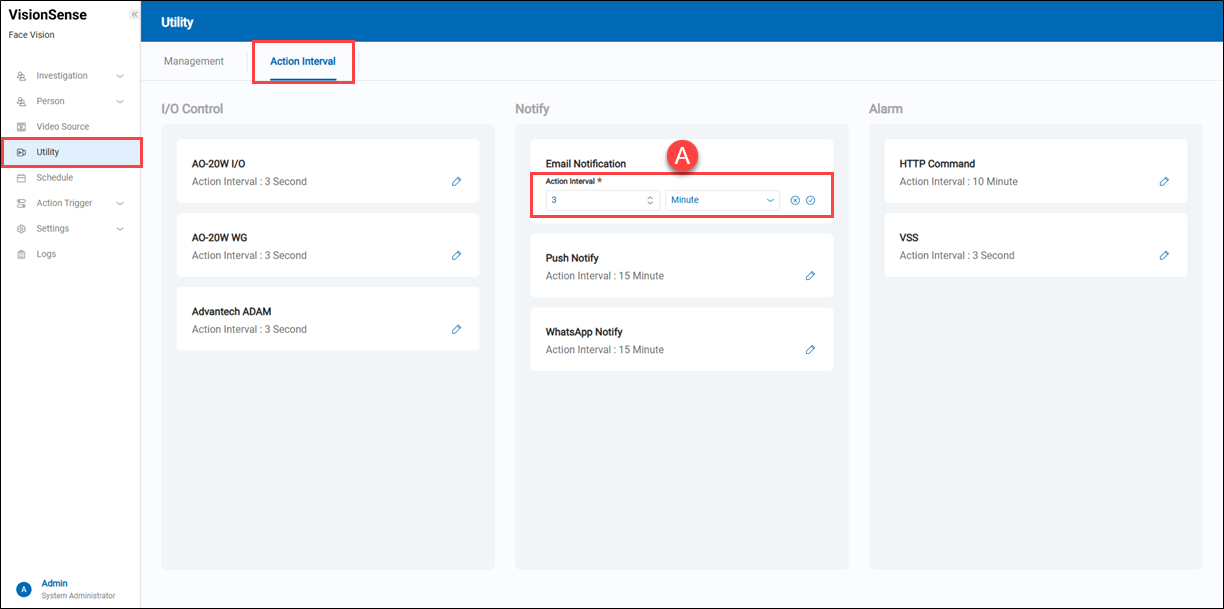 A.【Action Interval】 => Click the
 ![]() 'Edit' to enter the edit mode and click the
'Edit' to enter the edit mode and click the ![]() 'Apply' to apply settings or click the
'Apply' to apply settings or click the ![]() 'Cancel' to cancel the current operation. Three time units are supported: 'Second', 'Minute', and 'Hour'.
'Cancel' to cancel the current operation. Three time units are supported: 'Second', 'Minute', and 'Hour'.