Concept of Interactive Projects
Interactive projects are used when you want to change the content displayed by the player through interactions such as clicks, APIs, sensor inputs, etc. This structure allows you to add multiple programs and switch between them based on your designed events. The steps to set up an interactive project are as follows:
-
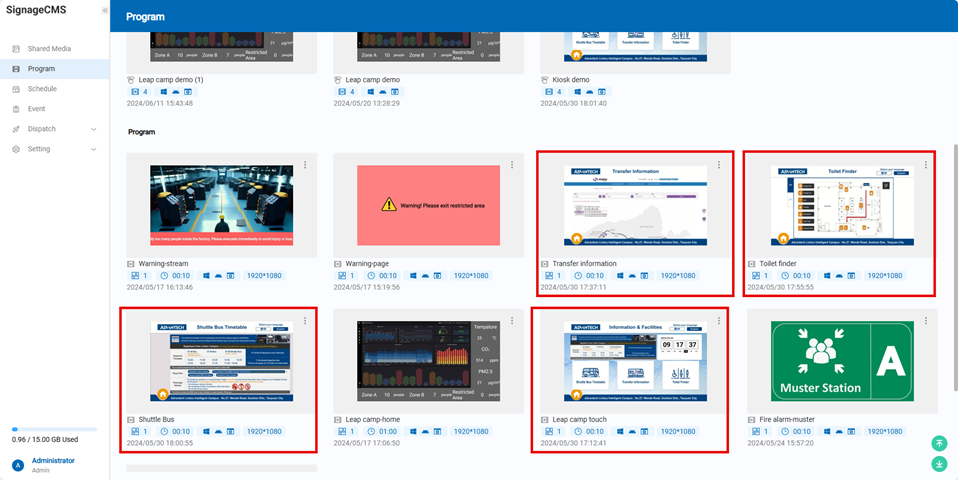
Create Programs Before starting, you need to decide how many different screens you want to present and create them as separate programs. For example, if you want to create an interactive project where scanning an RFID tag switches to different product displays, you might need a home page and individual programs for each product.
-
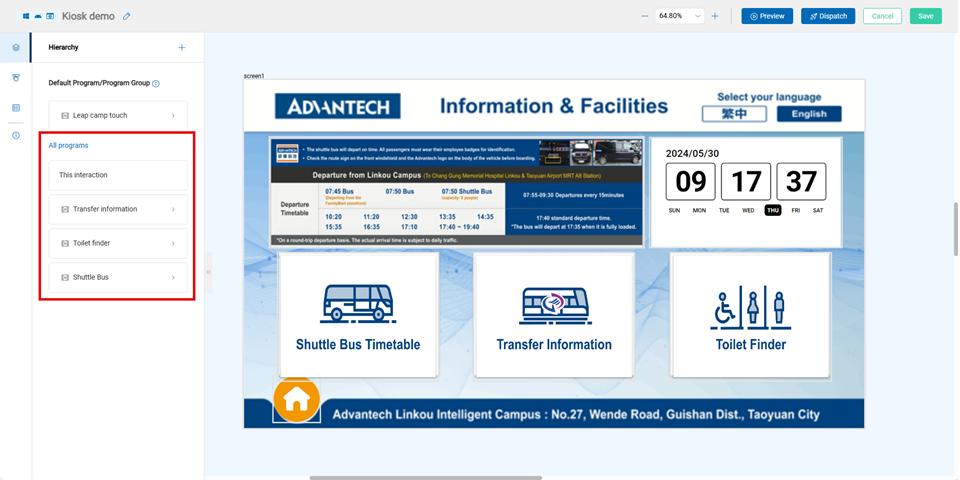
Create an Interactive Project & Import Programs Once you have created all the subpages, you can create a new interactive project in the program center and import the programs into this project.
-
Create Interactive Scripts After entering the interactive project, you will be in a WYSIWYG (What You See Is What You Get) interface. Here, you can set scripts for the interactive project, each program, and each object. The logic for interactive scripts follows this pattern: When "Who" triggers "An Event," then "Who" performs "An Action." Example: When "This Interactive Project" triggers "RFID=ProductA," the "current screen switches to ProductA program."
Below is a detailed step-by-step breakdown of how to create interactive scripts.
3-1. Sensor Source
You can set the sensor source in the respective tab, allowing you to customize the sensor name and define its output type, as shown below:
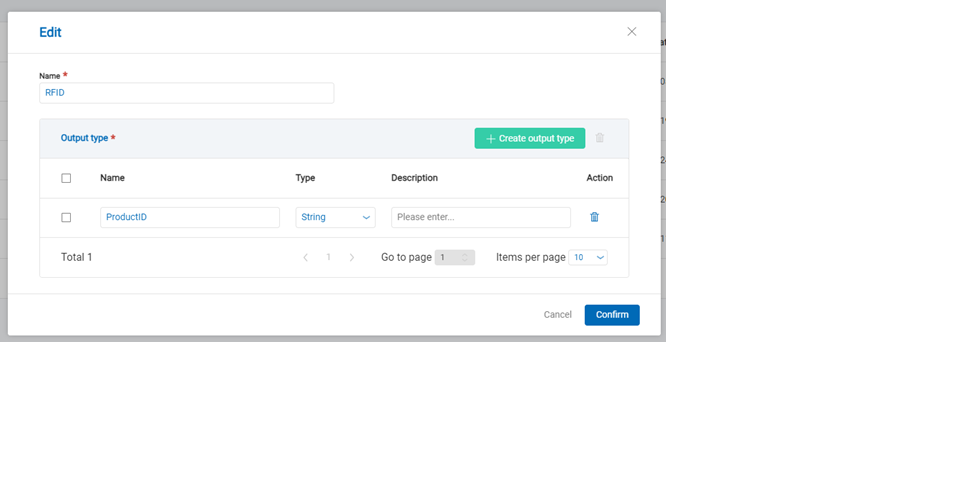
The output types can be divided into string, numeric, and array, and can be configured in the following scenarios:
| Output Type | Supported Conditions |
|---|---|
| String | =、≠ |
| Numeric | >、18. |
 |
3-3. Interactive Script
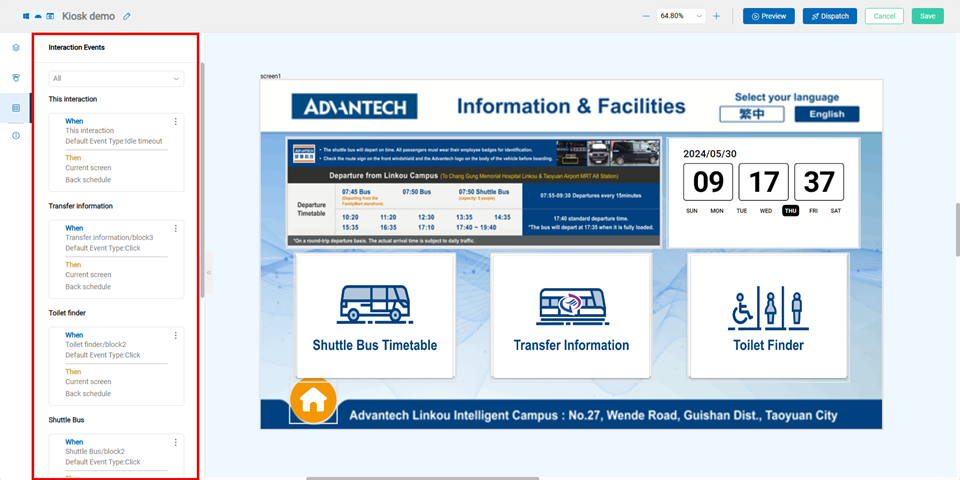
When in an interactive project, you can click on any interactive project/program/object to set up an interactive script.
The logic for interactive scripts follows this pattern:
”When "Who" triggers "An Event," then "Who" performs "An Action."
Example: When "This Interactive Project" triggers "Fire alarm," the "current screen switches to the Fire alarm-escape program."
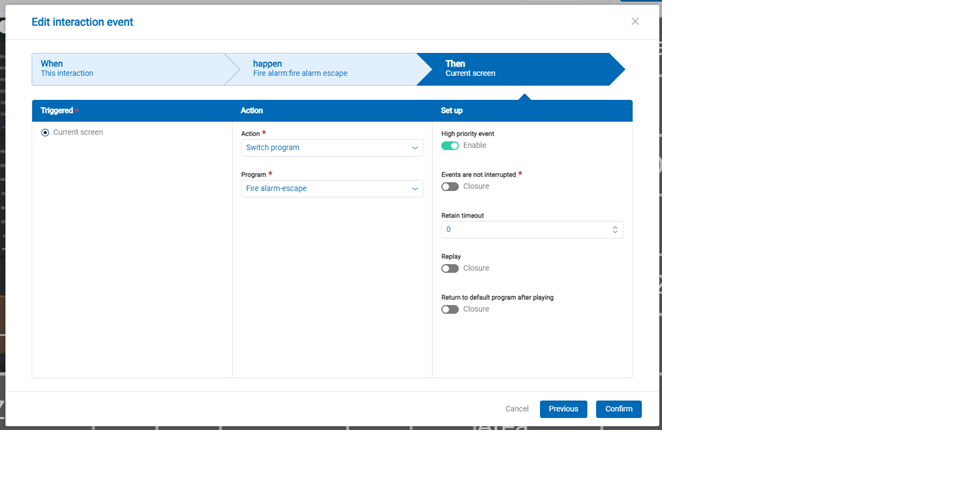
Based on the selected executor, you can set different actions, including:
| Interactive Project | Program | Object |
|---|---|---|
| Switch to a specified programReturn to scheduleResume the previous programCall a URLMinimize | Switch to a specified programReturn to scheduleResume the previous programCall a URLMinimize | Display value (text block only)Change text style (text block only)Next/Previous mediaSwitch to a specified playlistNext/Previous page in a PDF |
The script configuration can also be adjusted according to specific scenarios.
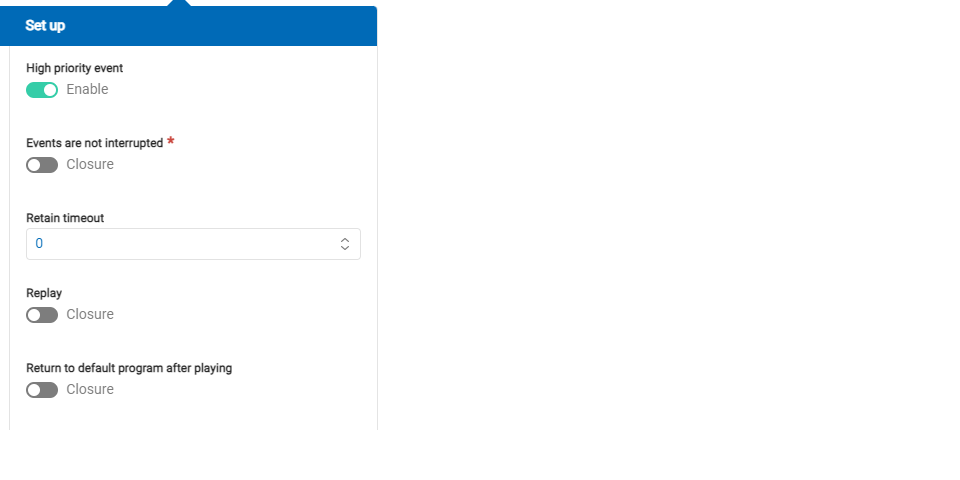
The detailed settings as follows: (1)High Priority Events: If multiple events are triggered at the same moment, the event with higher priority will be executed first. Scenario Example:
- Event 1: When "Program 1" triggers the "Male" event, switch to "Program 2."
- Event 2 (High Priority): When "Program 1" triggers the "Member" event, switch to "Program 3."
- If a person who is both a male and a member is detected, Event 2 will trigger, playing Program 3.
(2)Non-Interruptible Events: When this event is triggered, it cannot be interrupted by other events until it has played at least once or for a specified duration. Scenario Example:
- Event 1: When "Program 1" triggers the "Boy" event, switch to "Program 2," and play for at least 30 seconds.
- Event 2: When "Program 1" triggers the "Girl" event, switch to "Program 3."
- If the boy event is triggered 10 seconds before the girl event, Program 1 will switch to Program 2, but since Program 2 has not played for 30 seconds, it will not switch to Program 3.
(3)Event Hold Time: If an event is triggered while a non-interruptible event is playing, the triggered event will be held for n seconds. Scenario Example:
- Event 1: When "Program 1" triggers the "Male" event, switch to "Program 2," and play for at least 10 seconds.
- Event 2: When "Program 1" triggers the "Female" event, switch to "Program 3," with a hold time of 20 seconds.
- If the male event is triggered first and then the female event is triggered, Program 2 will play for 10 seconds, and then switch to Program 3.
(4)Repeat Playback: If this event is triggered again while it is already playing, it will restart the playback of the event content. Scenario Example:
- Event 1: When "Program 1" triggers the "Male" event, switch to "Video 1."
- If the male event is triggered again while Video 1 is playing, Video 1 will restart from the beginning.
(5)Return to Default Program After Playback: After the event finishes playing, it will return to the default program. Scenario Example:
- Event 1: When "Program 1" triggers the "Male" event, switch to "Video 1."
- After the male event triggers Video 1, it will return to the default program once Video 1 finishes playing.
API Format Explanation
Signage interactive API provides two connection methods:
- Simplified Version: No need to access an access token through a server; just use the URL to make a call and allow multiple parameter returns.
- Format : GET
- API path:
http://{hostname}:{port}/nsapi/v3/sensors?ikey=ABC&name(output)=value
- Authenticated Version:
- Format : POST
- API path :
curl
``` --location ' `http://{hostname}:{port}/api/v3/sensor'`
--header 'access-token: 0000'
--data '[
    {
        "name": "temperature",
        "output": "output1",
        "value": "40.1"
    }
]'

Raw example :
```json
```json
[
    {
        "name": "name_desc",      // sensor name (defined on the frontend)
        "output": "output_desc1",   // sensor output(defined on the frontend)
        "value": ""                // sensor value(defined on the frontend)
    },
    {
        "name": "name_desc",
        "output": "output_desc2",
        "value": "6.7"
    },
    {
        "name": "name_desc",
        "output": "output_desc3",
        "value": "62.1"
    }
]
Environmental Anomaly Detection Cases
- Environmental anomaly detection can include events such as air quality, occupancy control, environmental monitoring, fire alarms, and industrial control systems. When anomalies occur, you might want to display these abnormal states on digital signage. Below are two scenarios: displaying anomaly values and switching programs.
1. Displaying Anomaly Values
Displaying values is commonly used for showing air quality, occupancy numbers, etc. You can set a designated text block on the digital signage to display sensor values, such as temperature. For example:
When the "text block" detects a "sensor input event," then the "text block" executes "display sensor value (Temperature)."

If you want the text to turn red when an anomaly, such as a high-temperature event (Temperature > 38°C), occurs, you can set it so that when the "text block" detects a "high-temperature event," then the "text block" executes "change text style (red)," as shown in the following example.

API Example: For simplicity.
http://localhost:8085/nsapi/v3/sensors?ikey=ABC&IAQ(Tep)=39
2.Switching Programs
In scenarios where environmental control needs to switch programs, such as fire alarm systems or industrial control system alarms, you might need to display evacuation information or specific environmental streaming content. You can create different programs and set up scenarios such as:
When the "interactive project" detects a "fire alarm event," then the "current screen" executes "switch to fire alarm program."

API Example: For simplicity.
http://localhost:8085/nsapi/v3/sensors?ikey=ABC&alarm(fire_alarm)=true
## RFID Content Switching Example
- Programs & Interactive Project Screen:
Using RFID to switch content like product advertisements can involve two modes:
1.Switching Specific Blocks
You can add an "interactive list" object to the program, including multiple lists within the object with the media you need to play. For example, name different lists as RFID outputs (e.g., product names, part numbers).

Then, in the interactive project, set it so that when a "product event" is detected (RFID=ProductA), switch the playlist to the ProductA list, and similarly set up other product switches.
API Example: For simplicity.
http://localhost:8085/nsapi/v3/sensors?ikey=ABC&RFID(RFID)=ProductA
2.Switching the Entire Screen
Similar to the previous scenario, you can create separate programs for different videos. This is useful when displaying different products with different layouts. For example, when specific products have promotional information, you can set the scenario as:
When the "interactive project" detects "RFID=ProductA," then the "current screen" executes "switch to ProductA program."
## eMenu Board Pickup Scenario Example
- Programs & Interactive Project Screen:
As shown in the example, you need to set up an interactive list on the canvas, covering the item price section. When the interactive condition is met, switch to the sold-out image.

- API Example: For simplicity.
http://localhost:8085/nsapi/v3/sensors?emenu(object1)=soldout
## Queue Pickup Scenario Example
- Queue List Program Example Screen:
You can use text functions to format the expected number of waiting groups displayed on the player.
Events are divided into two types:
(1) Preparing: Use waiting as the key value.
(2) Ready for Pickup: Use finish as the key value.

- API Example: For simplicity.
http://localhost:8085/nsapi/v3/sensors?queueing(waiting1) =abc001& queueing(waiting2)=null&nqueueing(finish1)=abc002&queueing(finish2)=null
This example shows:
- Preparing (Key value: waiting) has one order number “abc001.”
- Ready for Pickup (Key value: finish) has one order number “abc002.”
- The POS end needs to sort the "Preparing" and "Completed" lists and regularly report the signage status.
- Current Queue Number Program Example Screen:
If you need to design so that each time a new "Ready for Pickup" order number appears, it switches to a separate page showing only that order number.

- API Example: For simplicity.
http://localhost:8085/nsapi/v3/sensors?queue(newfinish) =abc001