EdgeHub Utility Documentation
Table of contents
[[_TOC_]]
Changelog
| Version | Author | Update date | Comment |
|---|---|---|---|
| 1.0.0 | Zhirong Hsu | 2025/05/09 | First Version |
| 1.0.1 | ITsung Shen | 2025/07/01 | Added chapter numberAdded 4.3.2 / 6.2 Updated 7.1 (Forgot password and Create an account)Updated all images with new UI |
| 1.1.0 | ITsung Shen | 2025/09/01 | Updated section 4.4.1 to include COM port list contentAdded section 4.4.3 for COM port mapping feature |
1. Introduction
EdgeHub Utility is a Windows desktop application that helps you discover and manage edge devices, map serial (COM) ports, and establish secure private network connections (EPN) to remote equipment.
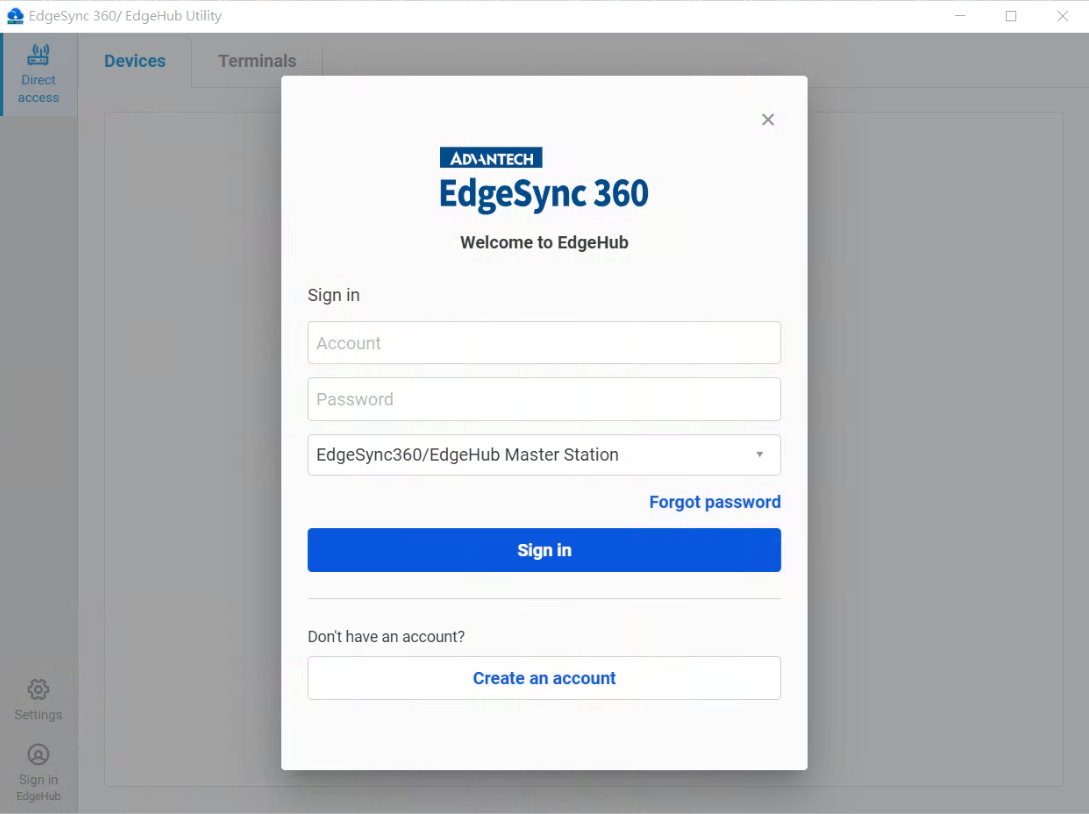 EdgeHub Utility before sign-in, showing tabs and sign-in prompt
1.1 Key Features
- Device discovery on local networks (Not yet available)
- COM port mapping between physical and virtual ports
- Terminal access for diagnostics and configuration
- EdgeHub Private Network (EPN) registration & VPN-style connectivity
- System tray shortcuts, status tooltips & menu
1.2 System Requirements
- OS: Windows 10/11 (64-bit)
- CPU: ≥1.5 GHz
- RAM: ≥4 GB (8 GB recommended)
- Disk: ≥200 MB free
- Network: Internet for EPN features
1.3 Terminology
- EpnClient: The EdgeHub Utility application running on your PC, referred to here as "EpnClient."
- Remote device: An edge device that supports EPN and can be brought onto your virtual network.
- Virtual network: The private overlay network created by EPN, e.g. 10.176.x.x/24.
2. Getting Started
2.1 Installation
-
Download the installer from the Advantech website.
-
EdgeHub -> Direct Access -> Connection management -> EPN ->
Download EdgeHub Utilitybutton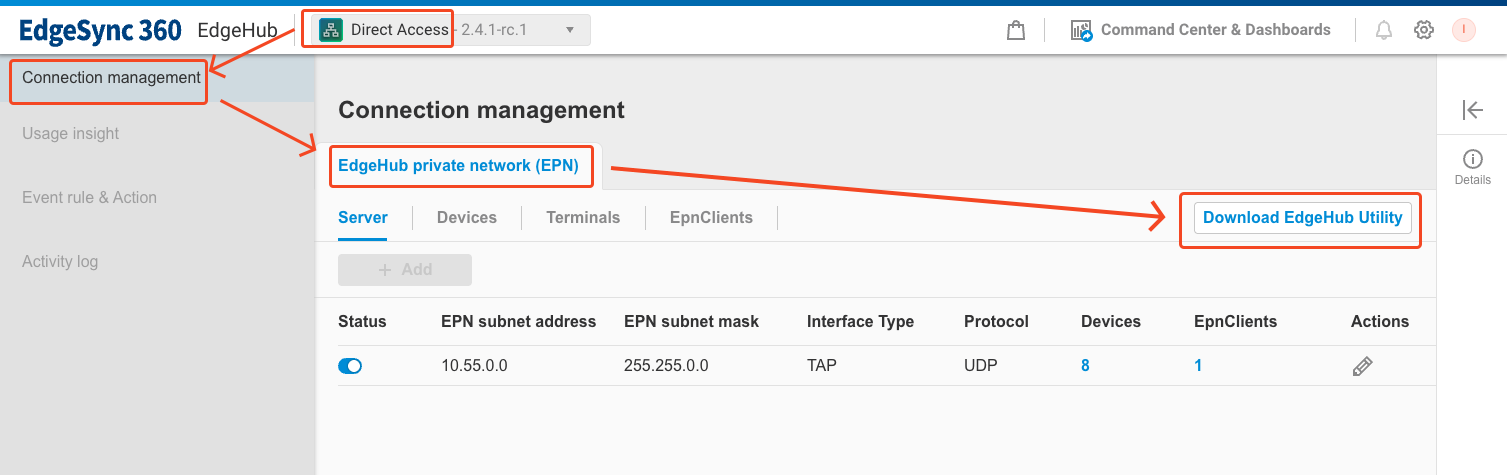 Download from EdgeHub
-
-
Run the installer and follow the wizard.
-
Launch EdgeHub Utility when finished.
2.2 First-Time Setup
- Accept Terms of Service.
- Configure any initial preferences.
- Sign in or create an account.
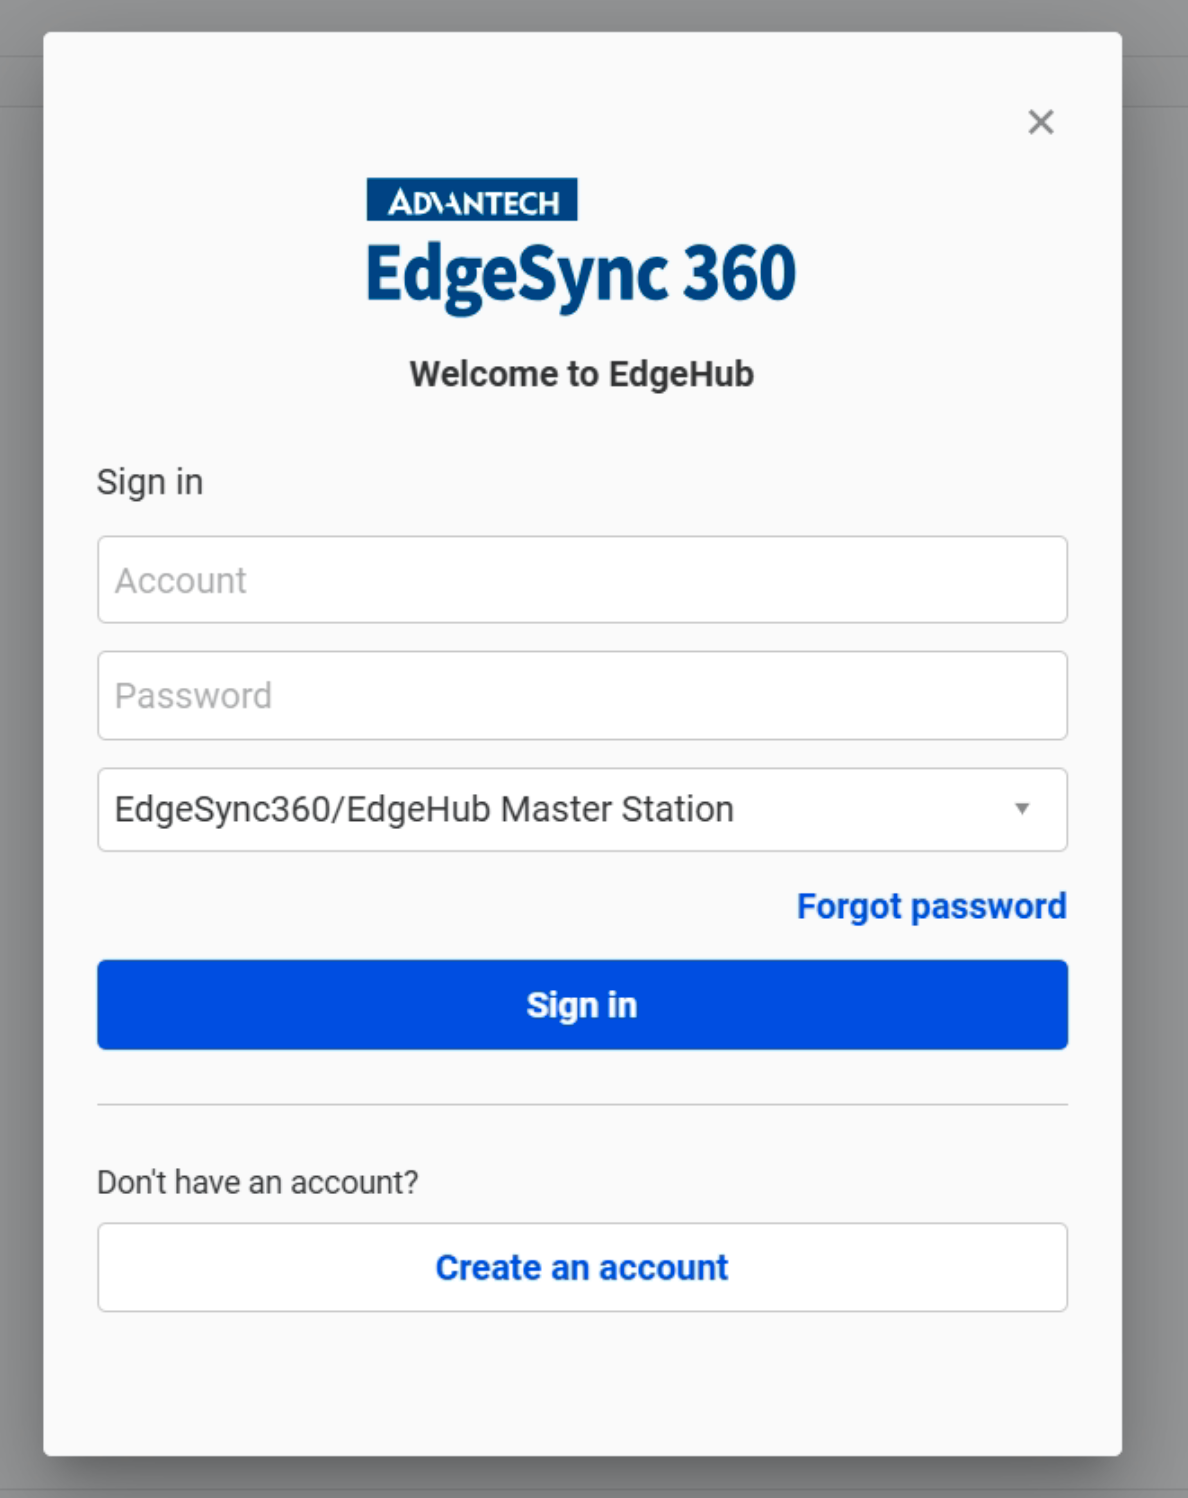
2.3 Authentication
-
Sign In: The sign-in process involves multiple steps:
-
Click Sign in EdgeHub in the sidebar or Sign in in the tray menu
-
In the sign-in dialog, enter your Account and Password
-
Select a station from the dropdown
-
Click Sign in to authenticate
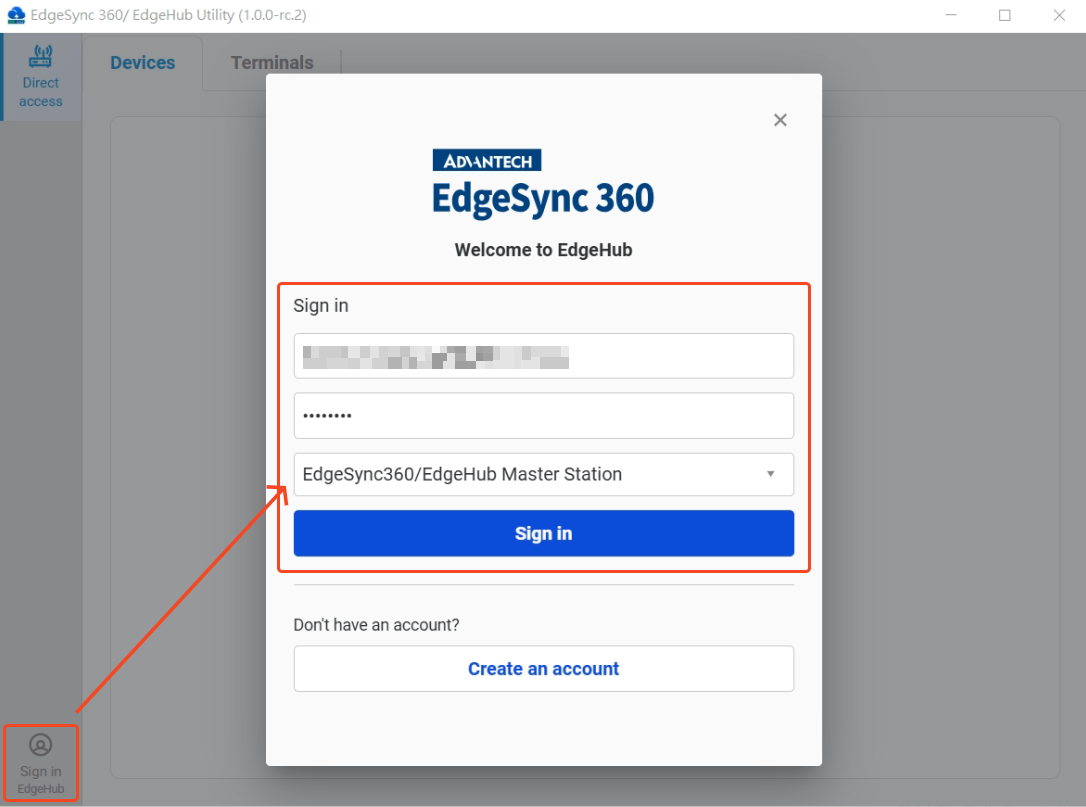 Step 1~ Step 4: Login process
 -
If authentication is successful, a tenant selection dialog will appear
-
Select the tenant you wish to work with
-
Click Select to complete the sign-in process
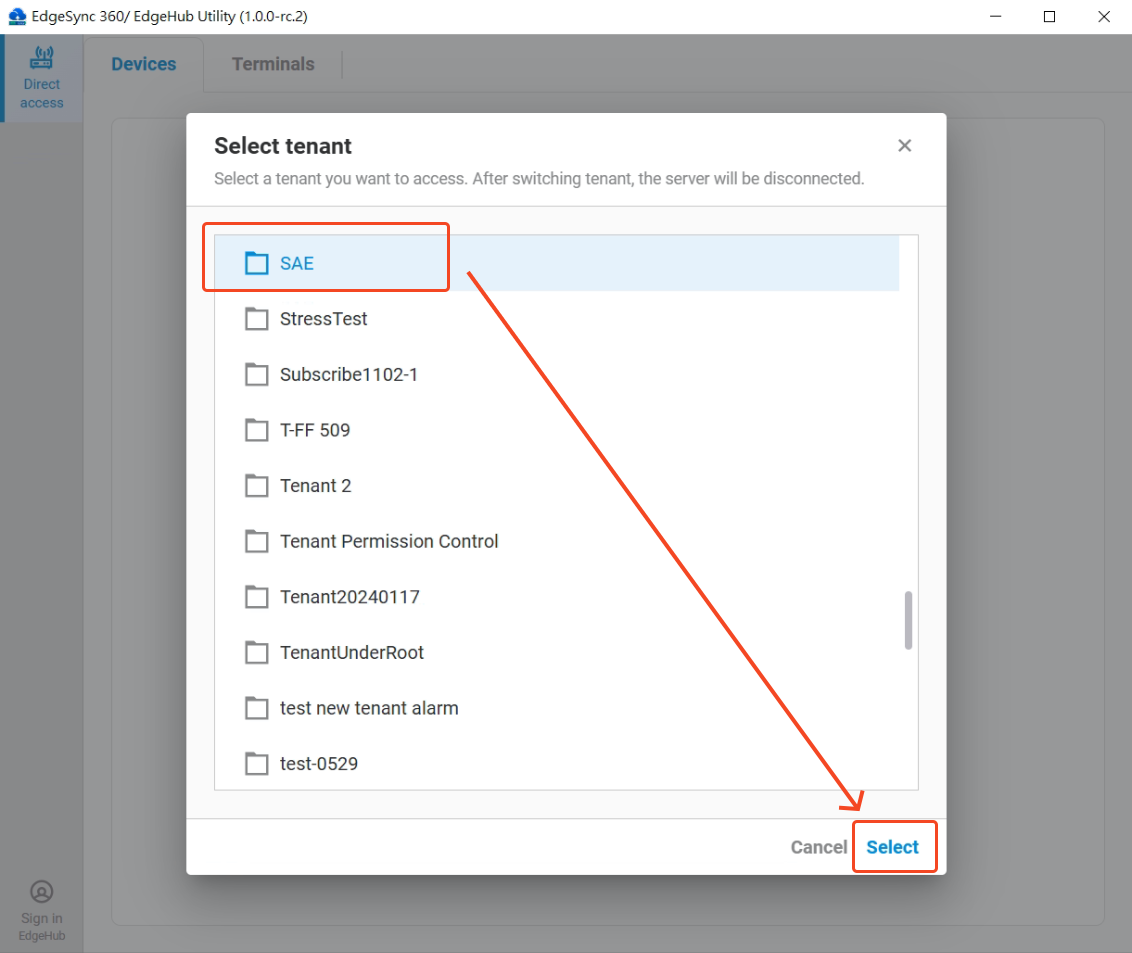 Step 5 ~ Step 7: Select tenant
-
-
Sign Out: Open user menu (bottom-sidebar icon) in the main window or tray menu → Sign out.
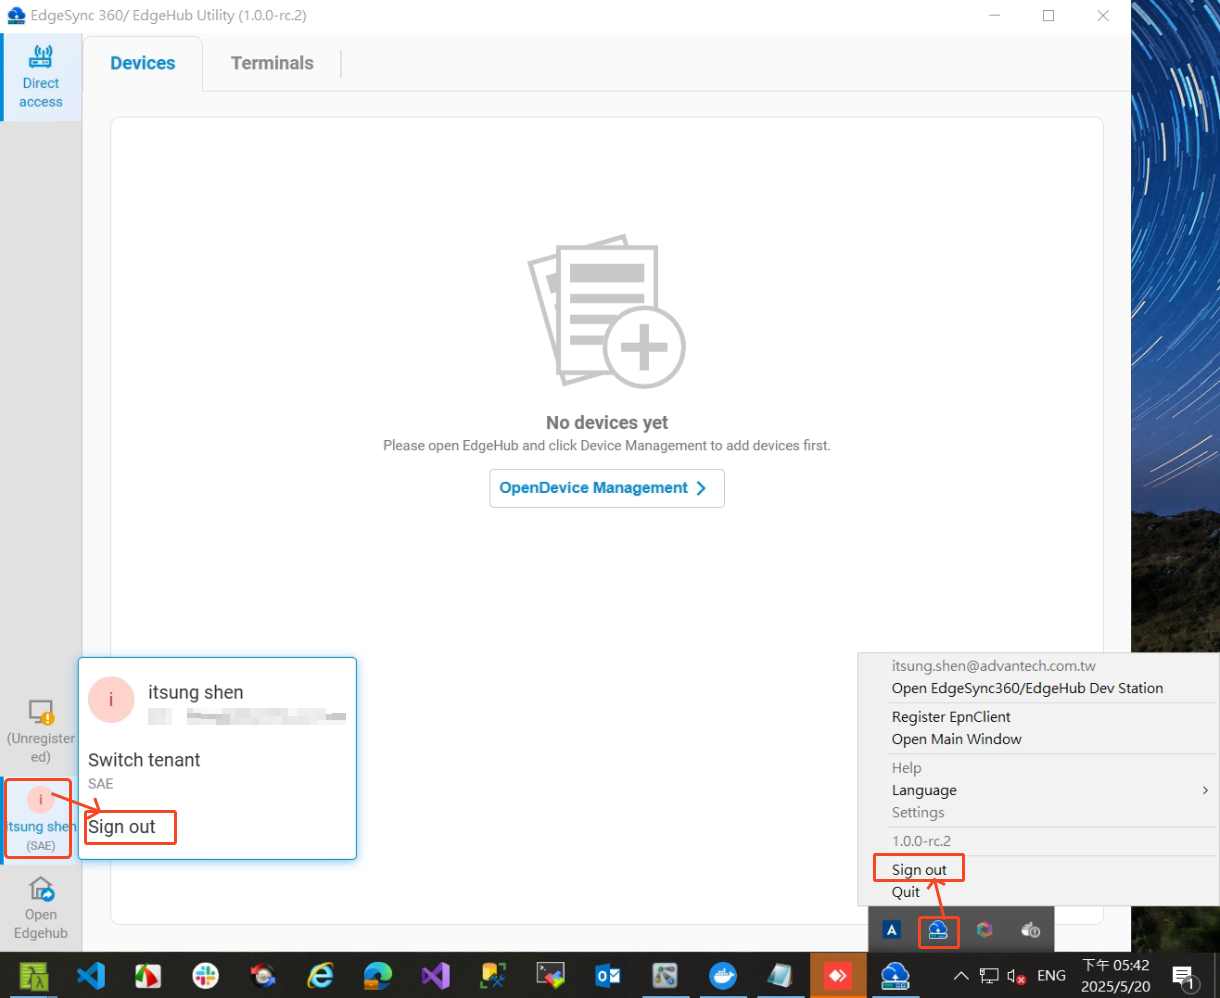 Sign out from main window or tray menu
3. User Interface Overview
3.1 Main Application Window
- Top Bar: App name & window controls
- Sidebar (left):
- Navigation (top): Direct Access, Device Discovery (Not yet available)
- Status & Actions (bottom): Settings, EPN icon, User profile, Open EdgeHub portal
- Main Panel: context‑sensitive screens (Discovery, Direct Access, etc.)
 Main application window
3.2 Navigation Sidebar
The sidebar contains icons for accessing different features:
 Navigation sidebar
3.3 Top Section
- Direct access: Manage remote devices / Terminals over EPN
3.4 Bottom Section
- Sign in EdgeHub: Sign in to access authentication functions
- EPN icon: Register & connect EpnClient
- User Profile: Sign out, switch tenant
- Open EdgeHub: Launches web portal in your tenant context
- Settings: EdgeHub Utility's system settings
4. EdgeHub Private Network (EPN) and Direct Access
The EdgeHub Private Network (EPN) and Direct Access features work together to provide a secure connection solution for remote devices:
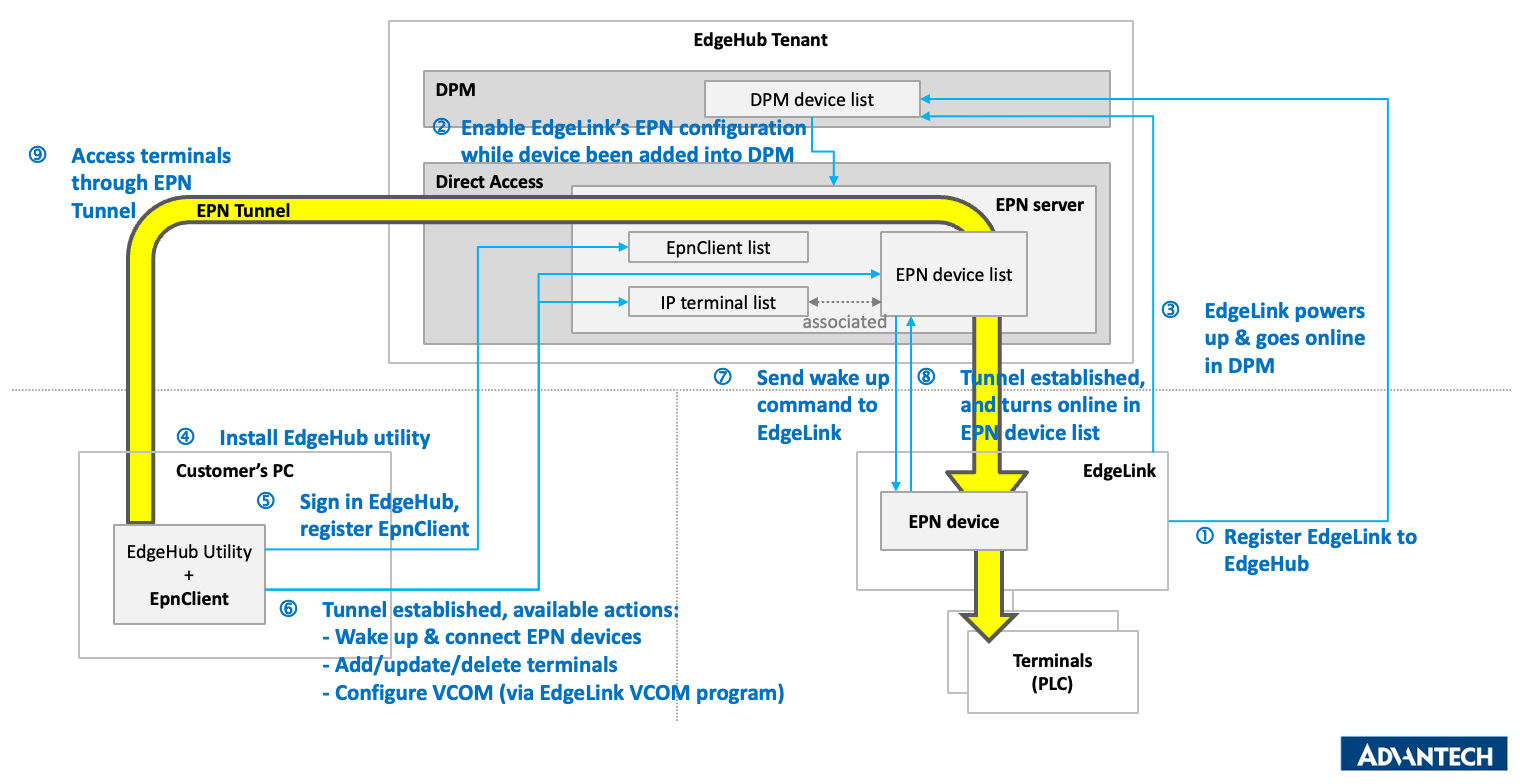 Diagram showing how EPN connects your PC to remote devices
-
EPN creates a secure virtual network (similar to a VPN) with:
- End-to-end encryption
- No need for public IP addresses
- Centralized access control
-
Direct Access leverages the EPN connection to:
- Connect to remote devices by their EPN IP addresses
- Map serial (COM) ports from remote devices to your PC
- Enable access to PLCs and other equipment connected to the remote devices
- Configure terminals (sub-devices) for direct access through the EPN
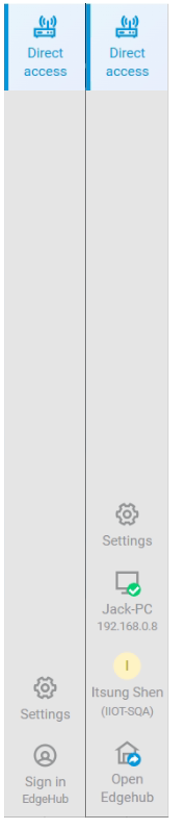
4.1 Understanding EPN Icon Status
The EPN icon appears in the bottom section of the sidebar and can display different statuses:
 Different EpnClient states in the sidebar
-
Unregistered: Shown when the EpnClient has not been registered yet. You'll need to complete the registration process before connecting.
-
Disabled: Indicates that your EpnClient has been disabled by the administrator. A message will appear stating "Your EpnClient is disabled. Please contact the administrator." The EPN icon in the sidebar will show "(Disabled)" and have a red indicator.
-
Registered/Disconnected: After registration but before connection, the EPN icon will display your device information but won't be connected yet.
-
Connected: When successfully connected to the EPN, the icon will show your device with connection information.
4.2 Registering Your EpnClient
- Before registering your EpnClient, please ensure your EPN server has been created. For detail information, please refer to Direct access - 2.1.1 Add server documentation.
- When using the application for the first time, the EPN icon in the sidebar will show "Unregistered"
- Click on the unregistered EPN icon to start the registration process
- A "Register EpnClient" dialog will appear with the following fields:
- EpnClient name (required): Enter a unique name for your client
- Description: Optional field to provide details about this client
- EPN IP: Input the desired IP address for your client on the EPN (typically provided by your administrator)
- Bandwidth saver (required): Toggle to enable/disable bandwidth optimization
- Click Submit to complete the registration
- Registration only needs to be done once per machine (EpnClient) and tenant.
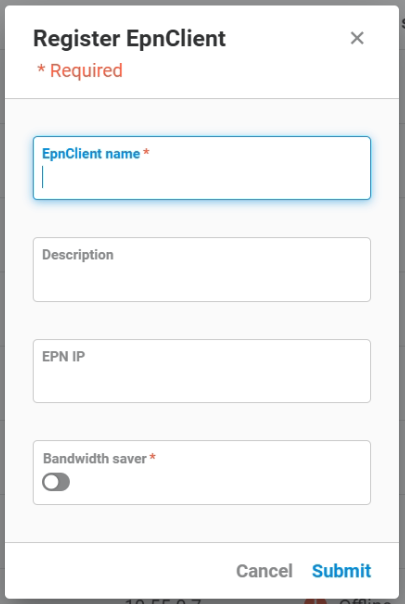 Register EpnClient dialog with required fields marked with asterisks
> Note: Registration is per machine and per tenant. If you switch tenants, register your EpnClient again under that tenant.
4.3 EPN pop-up menu from EPN icon
After EpnClient is registered, you can use EPN pop-up menu from EPN icon to do the following things:
- Connect / Disconnect EPN
- Bandwidth saver setting
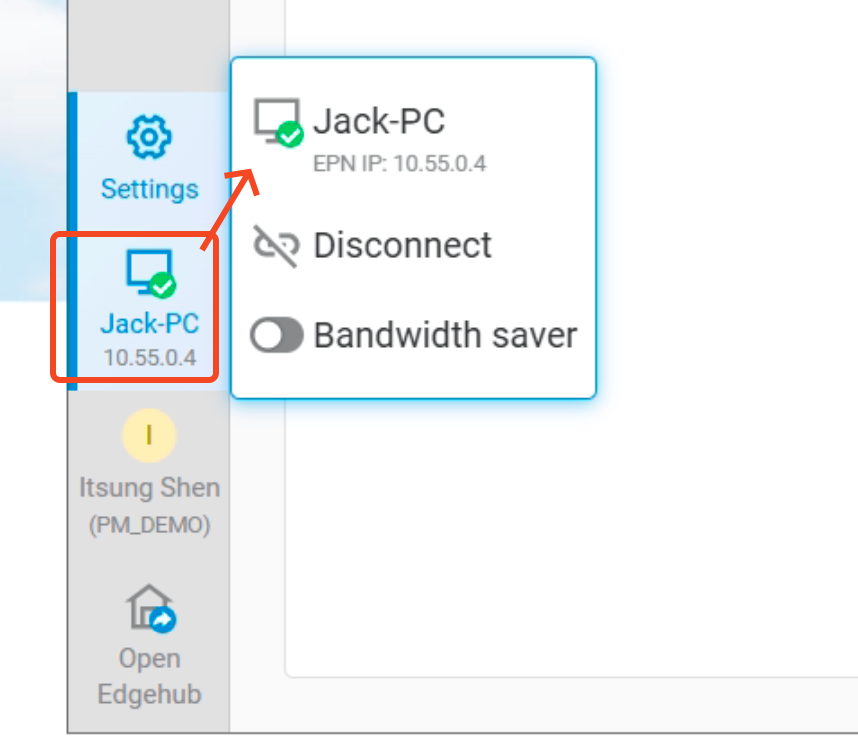 EPN pop-up menu showing your client name, EPN IP, connect/disconnect action and Bandwidth saver setting
4.3.1 Connecting to EPN
- Ensure EpnClient is registered (this only needs to be done once)
- If your EPN connection is enabled, the EPN icon in the sidebar will show your registered client name (e.g., "NP-001")
- Click the EPN icon in the bottom panel
- A pop-up menu will appear showing your client name and Virtual IP (e.g., 10.176.10.0)
- Click "Connect" to initiate the EPN connection
- A "Connecting..." dialog will appear with a progress indicator
- Wait for the connection process to complete (do not close the window until the connection is established)
- Once connected, you can access the remote devices onto the same EPN as your EpnClient.
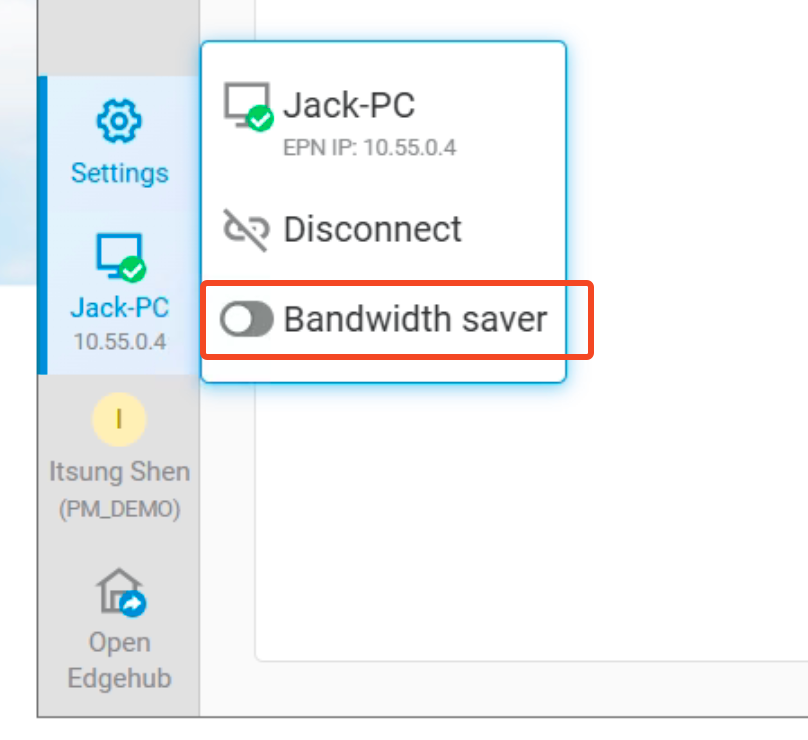
4.3.2 Bandwidth saver setting
Users can control whether to enable or disable the bandwidth saver for EpnClient via the interface (disabled by default). If enabled, the EPN connection will automatically disconnect if no traffic is detected for 30 minutes.
-
Please click the bandwidth saver switch component on the pop-up menu to control enable/disable.
4.4 Direct Access Features
The Direct Access feature brings remote devices onto the same EPN as your EpnClient, then lets you connect to them by EPN IP or map their serial ports.
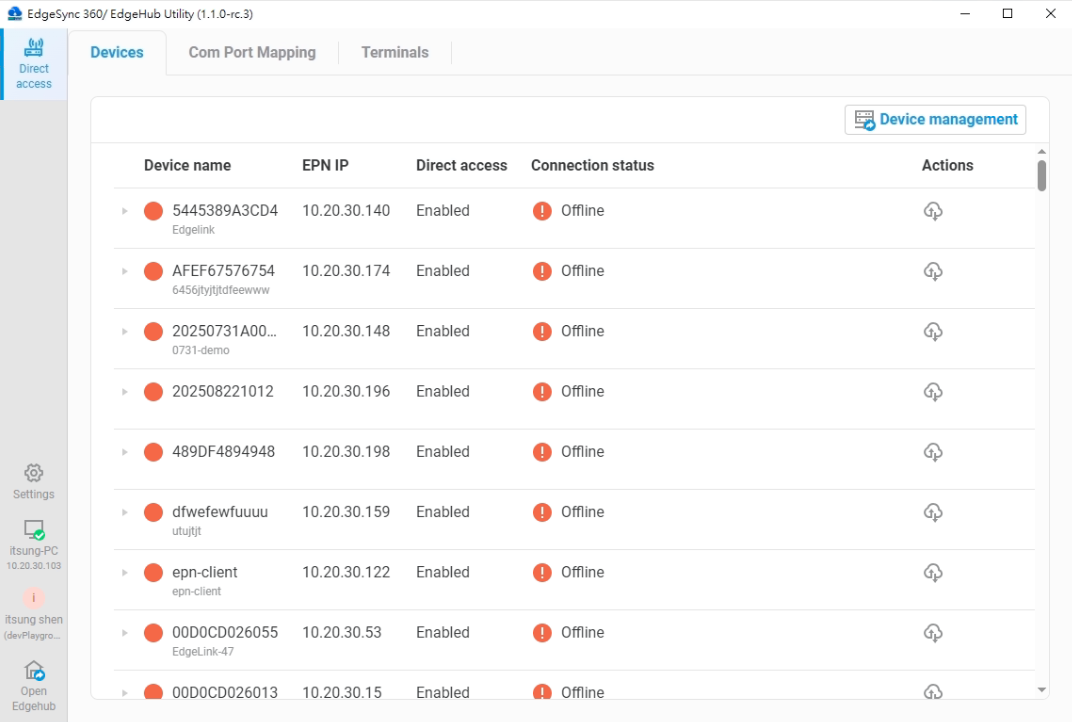
4.4.1 Devices
The Devices tab in Direct Access shows all EPN-supported devices:
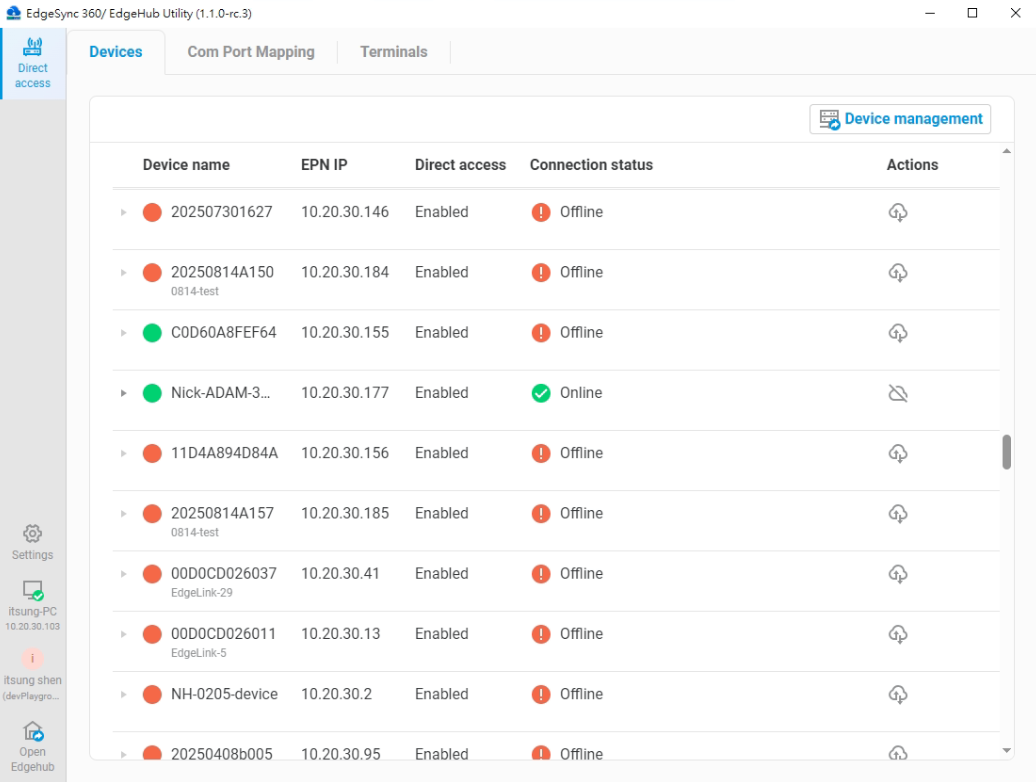
Devices tab showing the list of EPN-supported devices with their EPN IPs and connection status
Device List Information�
The Devices tab in Direct Access shows the following columns:
- Device name: Displays the device identifier and model (e.g., EdgeLink-46)
- EPN IP: Shows the device's IP address on the EPN network (e.g., 10.55.0.15)
- Direct access: Indicates whether EPN functionality is enabled or not.
- Connection status: Indicates whether the device is Online or Offline
- Actions: Cloud icon with up/down arrows to connect/disconnect the device to/from EPN
Device’s COM Port List
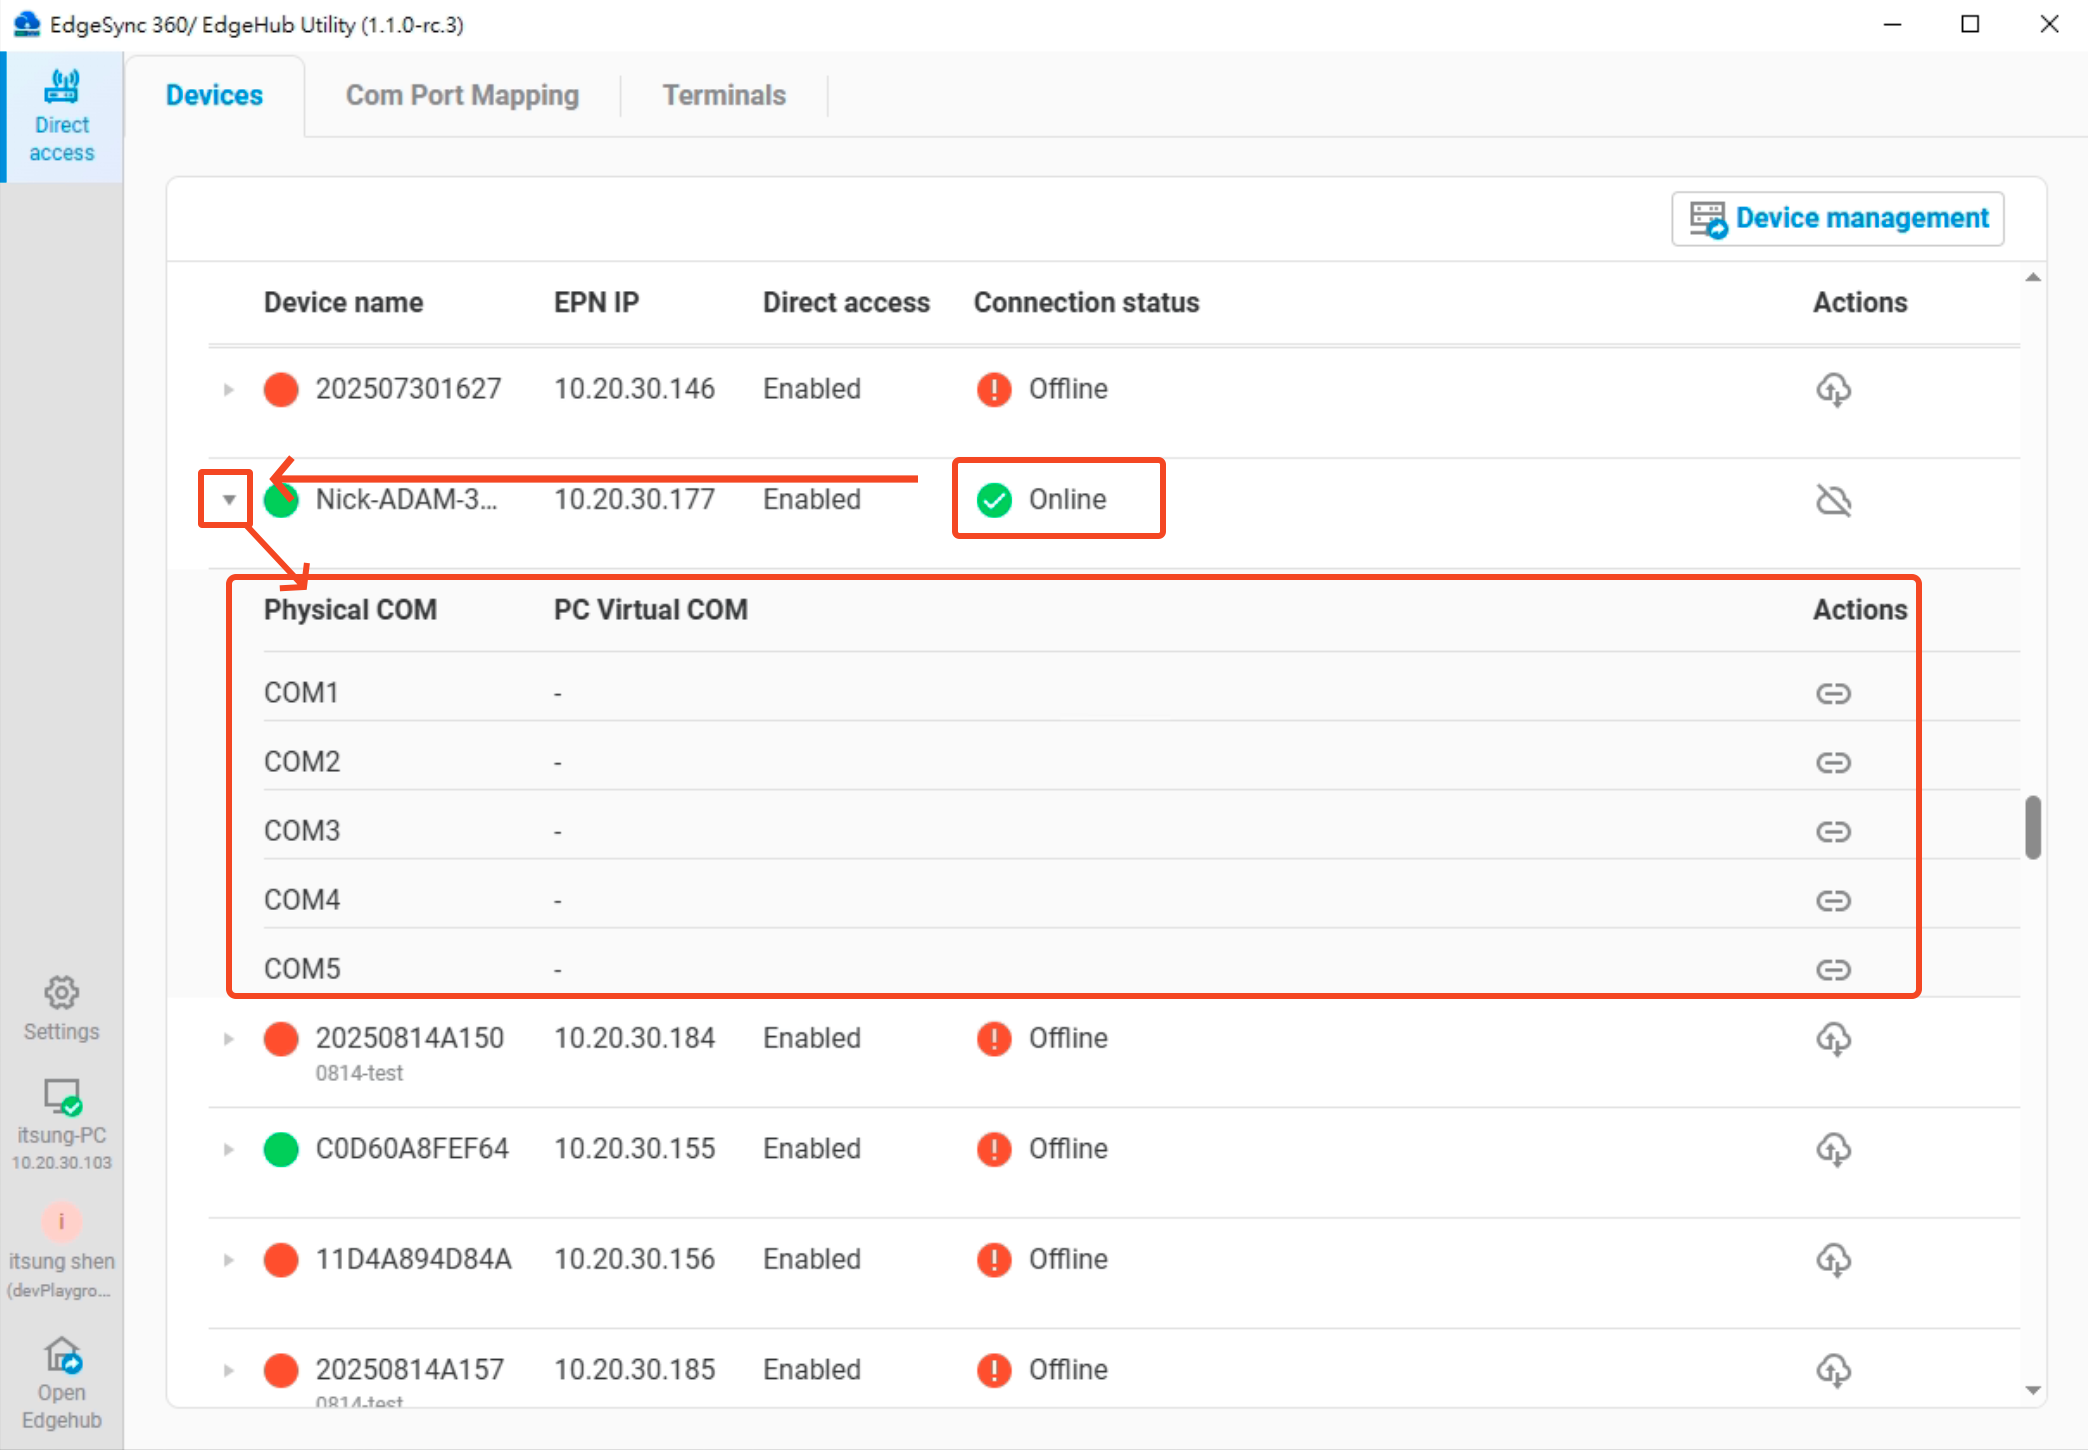
COM port list
When the device’s Connection Status is Online, you can click the icon on the left to expand the Device’s COM Port List. Once expanded, it will display the list of physical COM ports currently available on the device. The list includes the following columns:
- Physical COM: Lists the actual COM ports available on the remote device
- PC Virtual COM: Indicates the virtual COM port created on the PC running EdgeHub Utility
- Actions: Bind / Unbind the virtual COM port
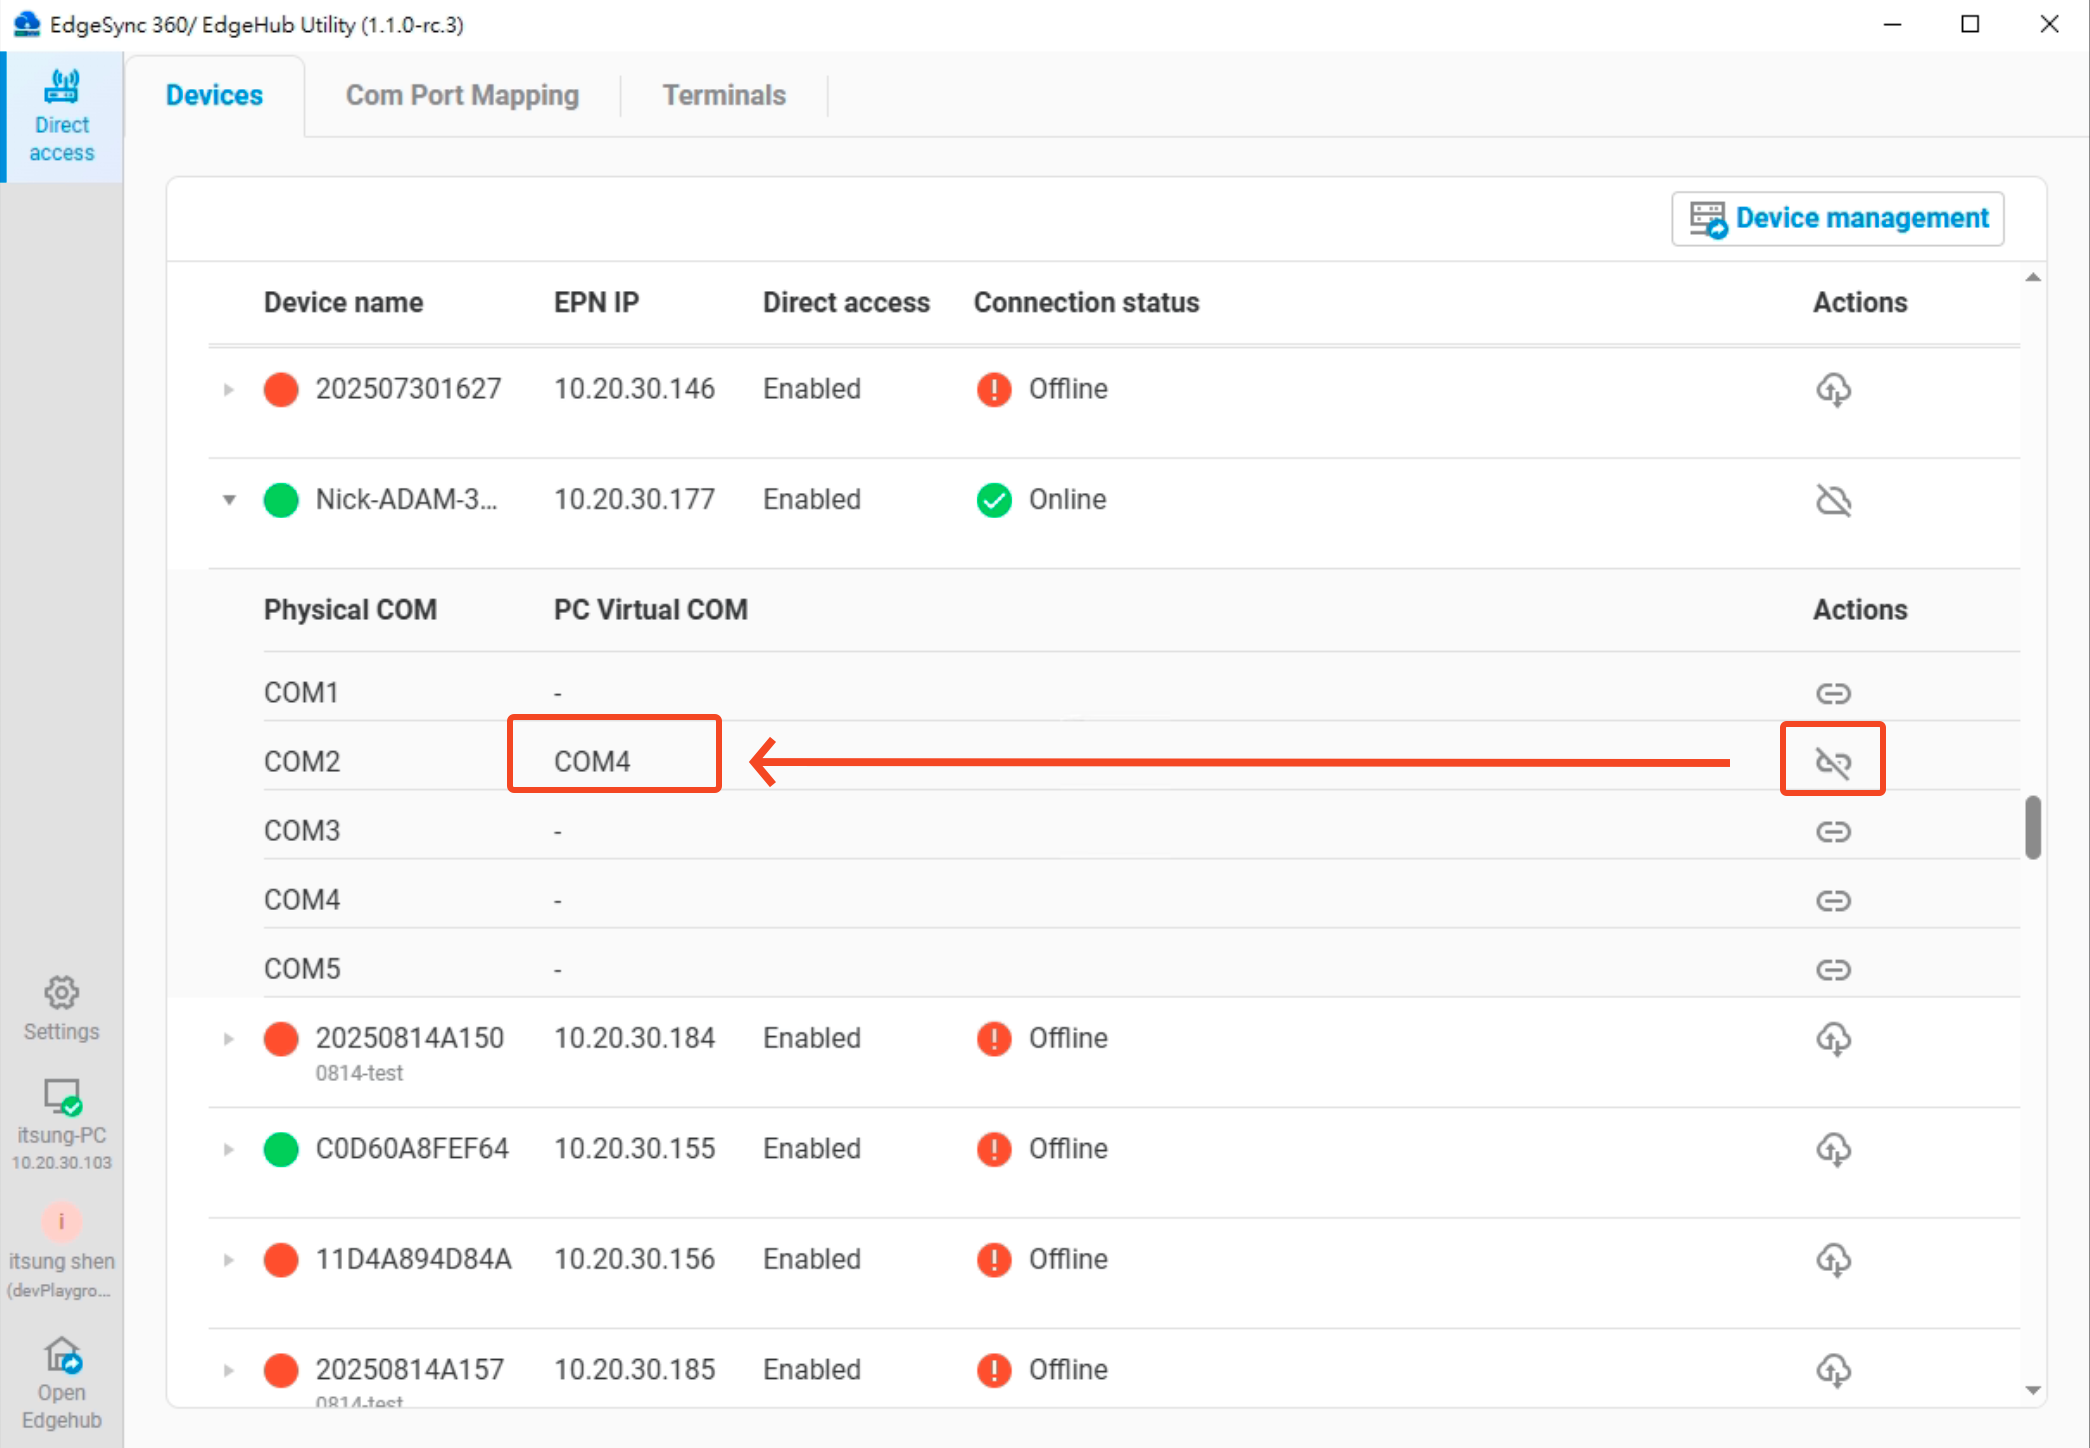
Example: Bind and establish a virtual COM port
Users can click the Bind button to establish a virtual COM port connection with the remote device. Once the binding is successful, a new virtual COM port will appear on the PC. Users can then use any software that communicates via COM ports through this virtual COM port to interact with the physical COM port on the remote device. The user experience is identical to directly connecting to the physical COM port on the device.
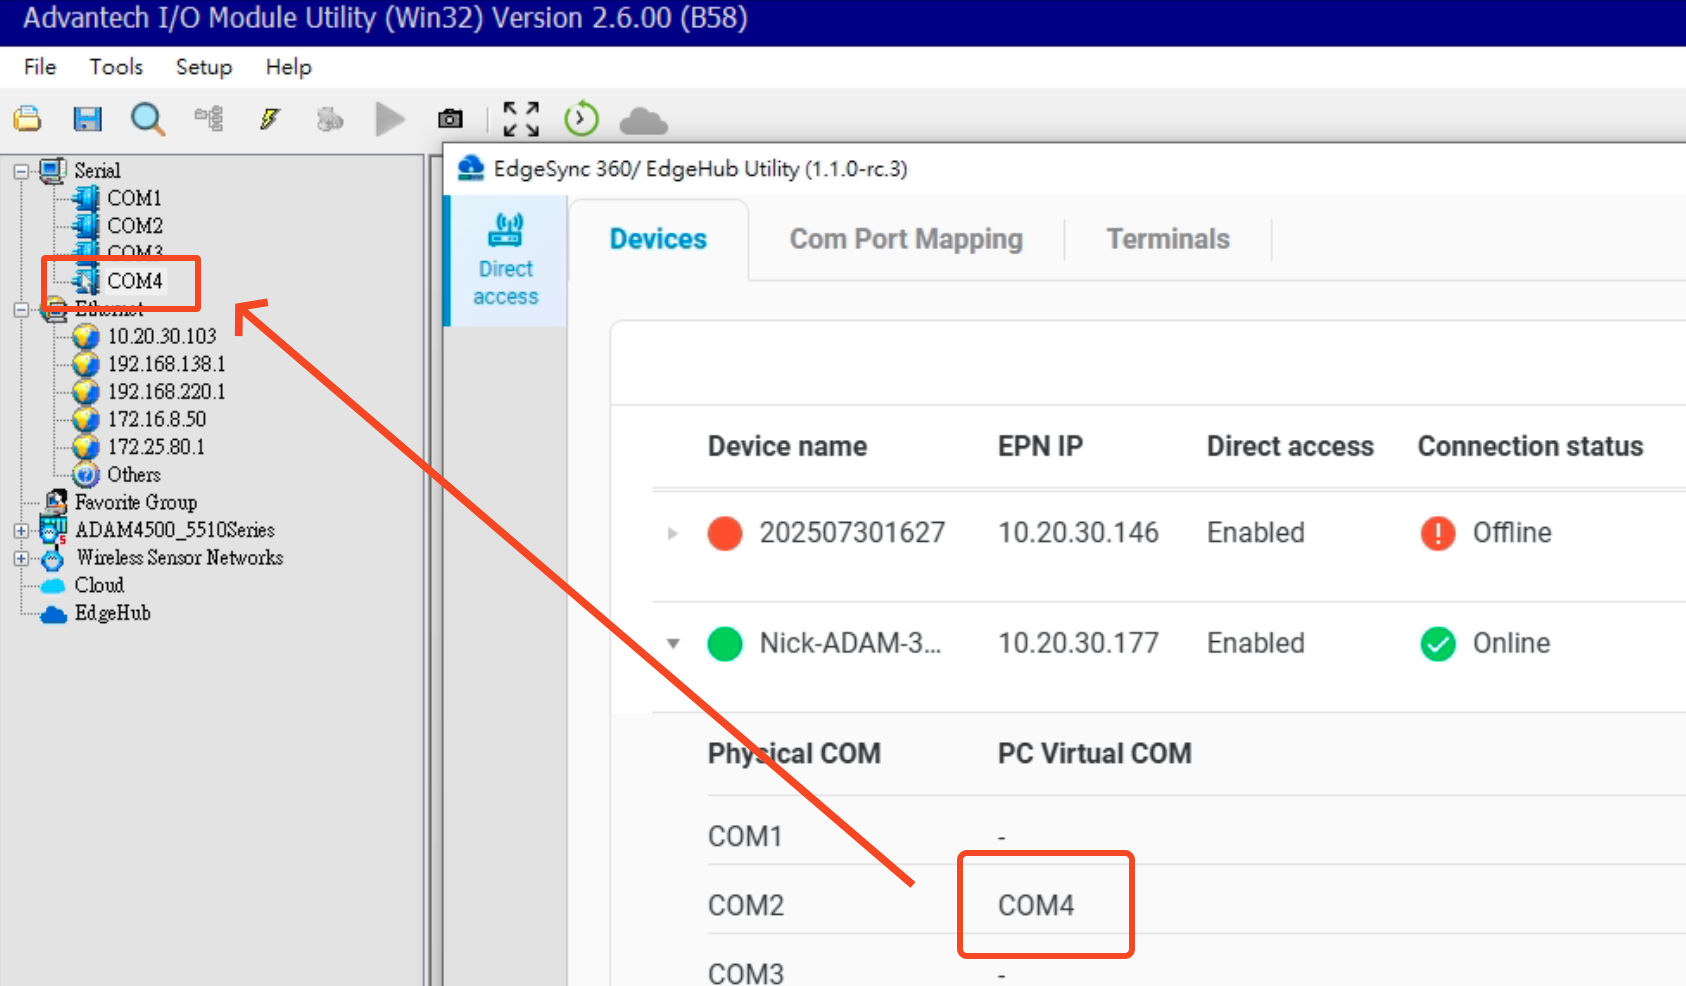
Example: Virtual COM port being used by other software
4.4.2 Terminals
The Terminals tab allows you to configure sub-devices (like PLCs) connected to your EPN-supported devices:
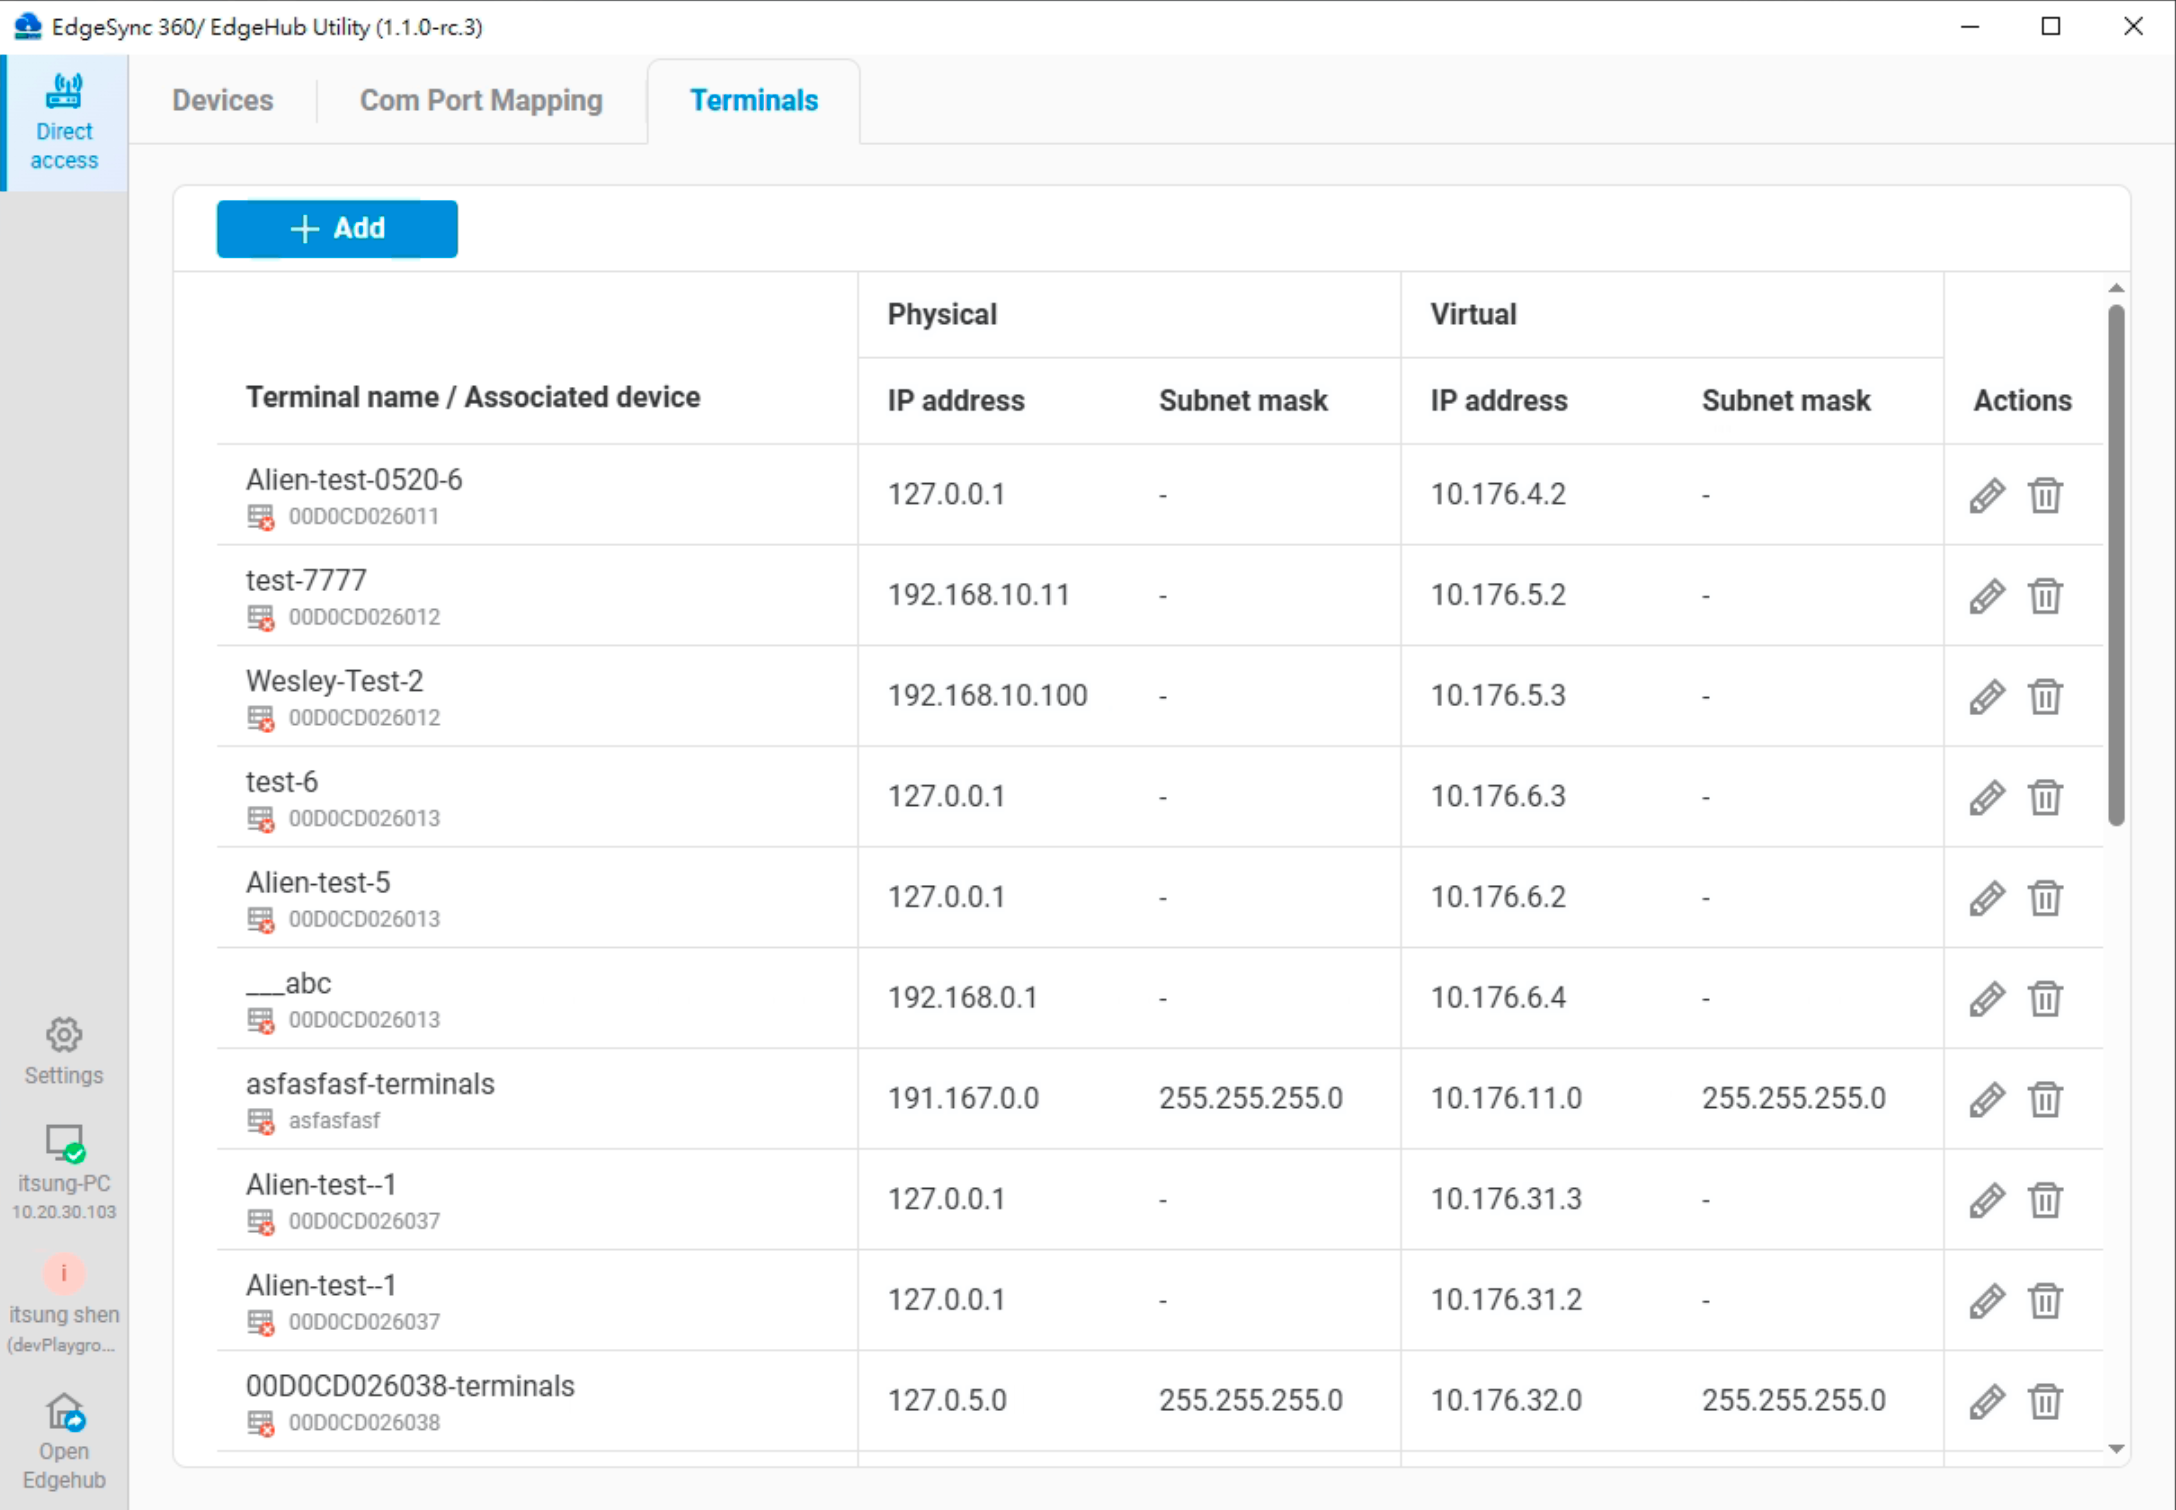 Terminals tab showing list of configured sub-devices with their physical and virtual IP mappings
Understanding Terminals
- A "Terminal" represents a sub-device (e.g., a PLC) connected to an EPN-supported device
- Terminals allow you to create IP mapping tables (routing) for these sub-devices
- By assigning virtual IPs to these terminals, your EpnClient can directly access them through the EPN connection
Terminal List Information
The Terminals tab displays the following columns:
- Terminal name: Name of the sub-device (e.g., EPM-ECU-TEST-PLC)
- Associated device: The EPN-supported device this terminal is connected to
- Physical IP address: Actual IP address of the sub-device on the local network (e.g., 192.168.10.100)
- Physical subnet mask: Network mask for physical IP (if applicable)
- Virtual IP address: Assigned IP address on the virtual network (e.g., 10.172.102.2)
- Virtual subnet mask: Network mask for virtual IP (if applicable)
- Actions: Edit or delete the terminal configuration
Adding Terminals
The Terminals tab provides two methods for adding terminal configurations. (Add a Single Terminal or Add Multiple Terminals; each device can only use one of these methods at a time, and they cannot be mixed) :
Add a Single Terminal
- Click the Add button in the Terminals tab
- Select Add terminal from the dropdown menu
- In the "Add terminal" dialog, enter the required information:
- Physical IP: Actual IP address of the sub-device
- Terminal name: Name to identify this sub-device
- Associated device: Select the EPN-supported device this terminal is connected to
- Virtual IP: Assigned IP address on the virtual network
- Click Submit to create the terminal configuration
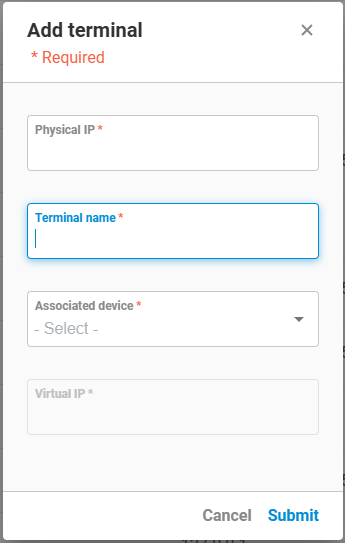 Add terminal dialog with fields for configuration
Add Multiple Terminals
- Click the Add button in the Terminals tab
- Select Add multiple terminal from the dropdown menu
- In the "Add multiple terminal" dialog, enter the required information:
- Physical IP subnet: Network address for a range of physical IPs
- Physical IP subnet mask: Mask to define the range (default: 255.255.255.0)
- Associated device: Select the EPN-supported device these terminals are connected to
- Virtual IP: Starting IP address on the virtual network
- Virtual IP mask: Mask to define the virtual IP range (default: 255.255.255.0)
- Click Submit to create multiple terminal configurations
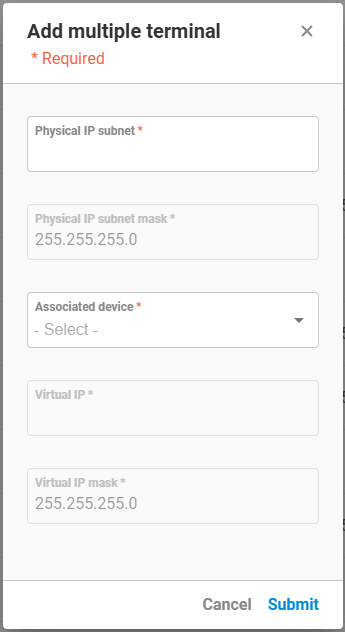 Add multiple terminals dialog for batch configuration
How Terminals Work
When you configure a terminal:
- IP Mapping: You create a mapping between the physical IP (on the local network) and the virtual IP (on the EPN)
- Routing: The EPN-supported device acts as a router, forwarding traffic between the EpnClient and the terminal
- Access Path:
- Your PC (EpnClient) → EPN → EPN-supported device → Terminal (PLC)
- All communications are secured through the EPN tunnel
Use Cases for Terminals
Terminals are particularly useful for:
- PLC Access: Connect to PLCs that are on local networks behind EPN-supported devices
- Legacy Equipment: Access equipment that can't directly connect to EPN
- Network Segmentation: Access devices on different network segments through a single EPN connection
- IP Conservation: Multiple physical IPs can be mapped to a organized virtual IP structure
Managing Terminals
- Edit: Click the pencil icon in the Actions column to modify a terminal's configuration
- Delete: Click the trash icon to remove a terminal configuration
- Batch Management: Add multiple terminals at once using the "Add multiple terminal" option for subnets
4.4.3 COM Port Mapping
If a Virtual COM port has been created from the Device’s COM port list, you can switch to the COM Port Mapping tab to view the list of Virtual COM ports currently established on this PC. The list includes the following columns:
- PC Virtual COM: The Virtual COM port created on this PC, along with a status indicator:
- Green: Virtual COM is connected
- Red: Virtual COM is disconnected
- Gray: Virtual COM is disabled
- Enable/Disable: Enable or disable the Virtual COM function
- Bound device: The device that this Virtual COM is bound to
- Device physical COM: The physical COM port on the device that is bound
- Actions: Available actions include Unbind and Monitor
- Unbind: Disconnect the Virtual COM port binding
- Monitor: Open the COM packet monitoring interface for the selected Virtual COM port
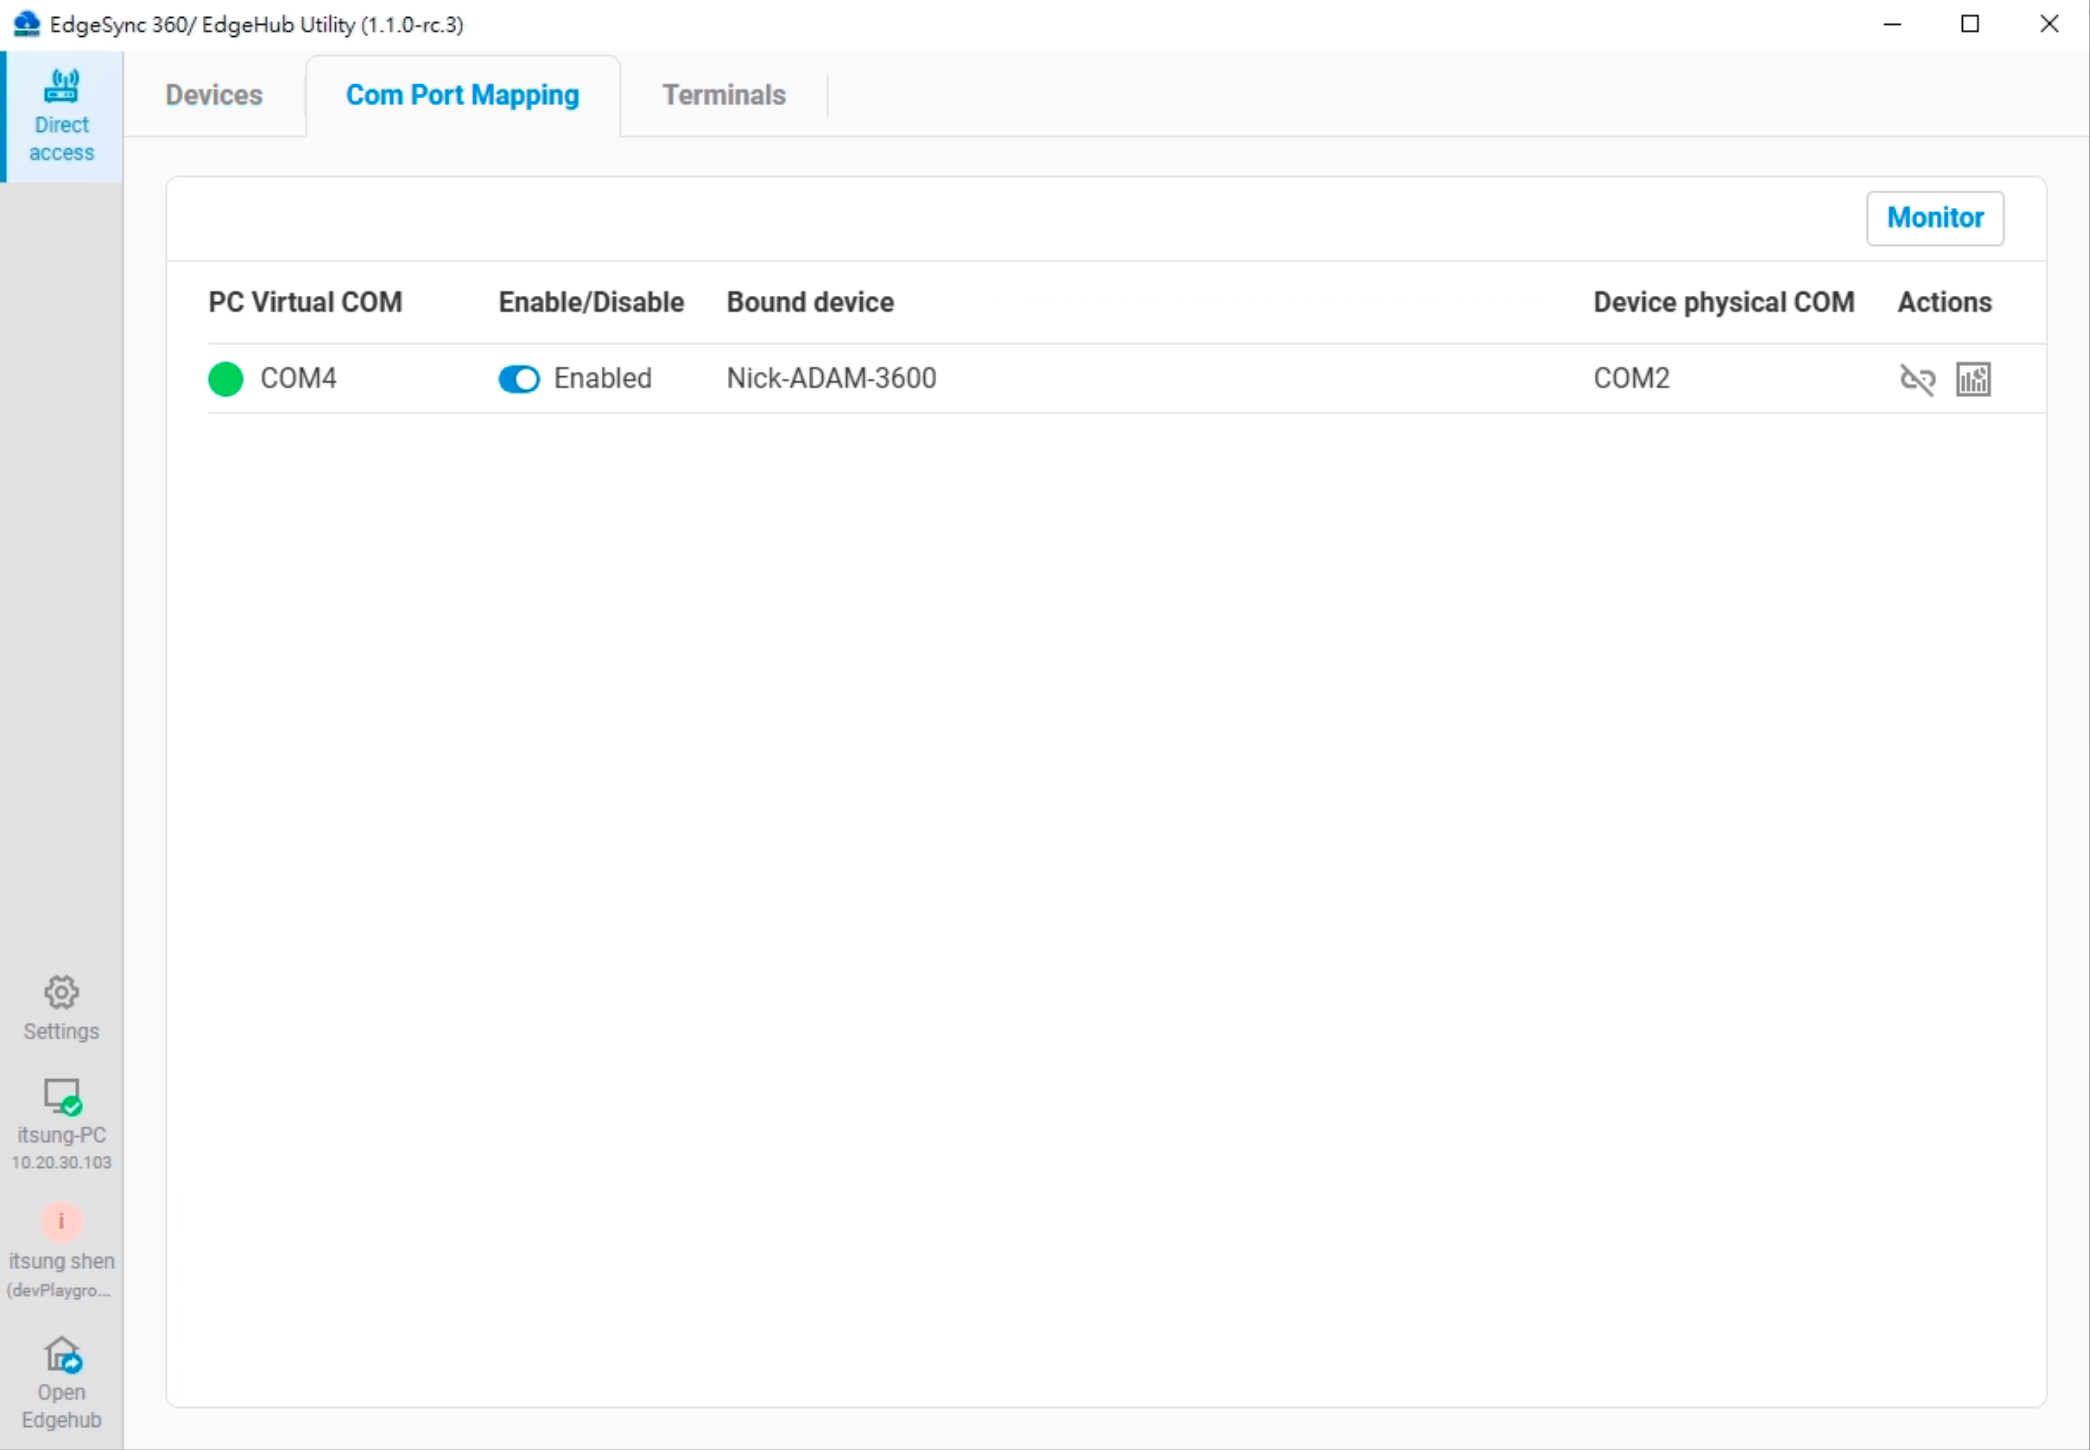
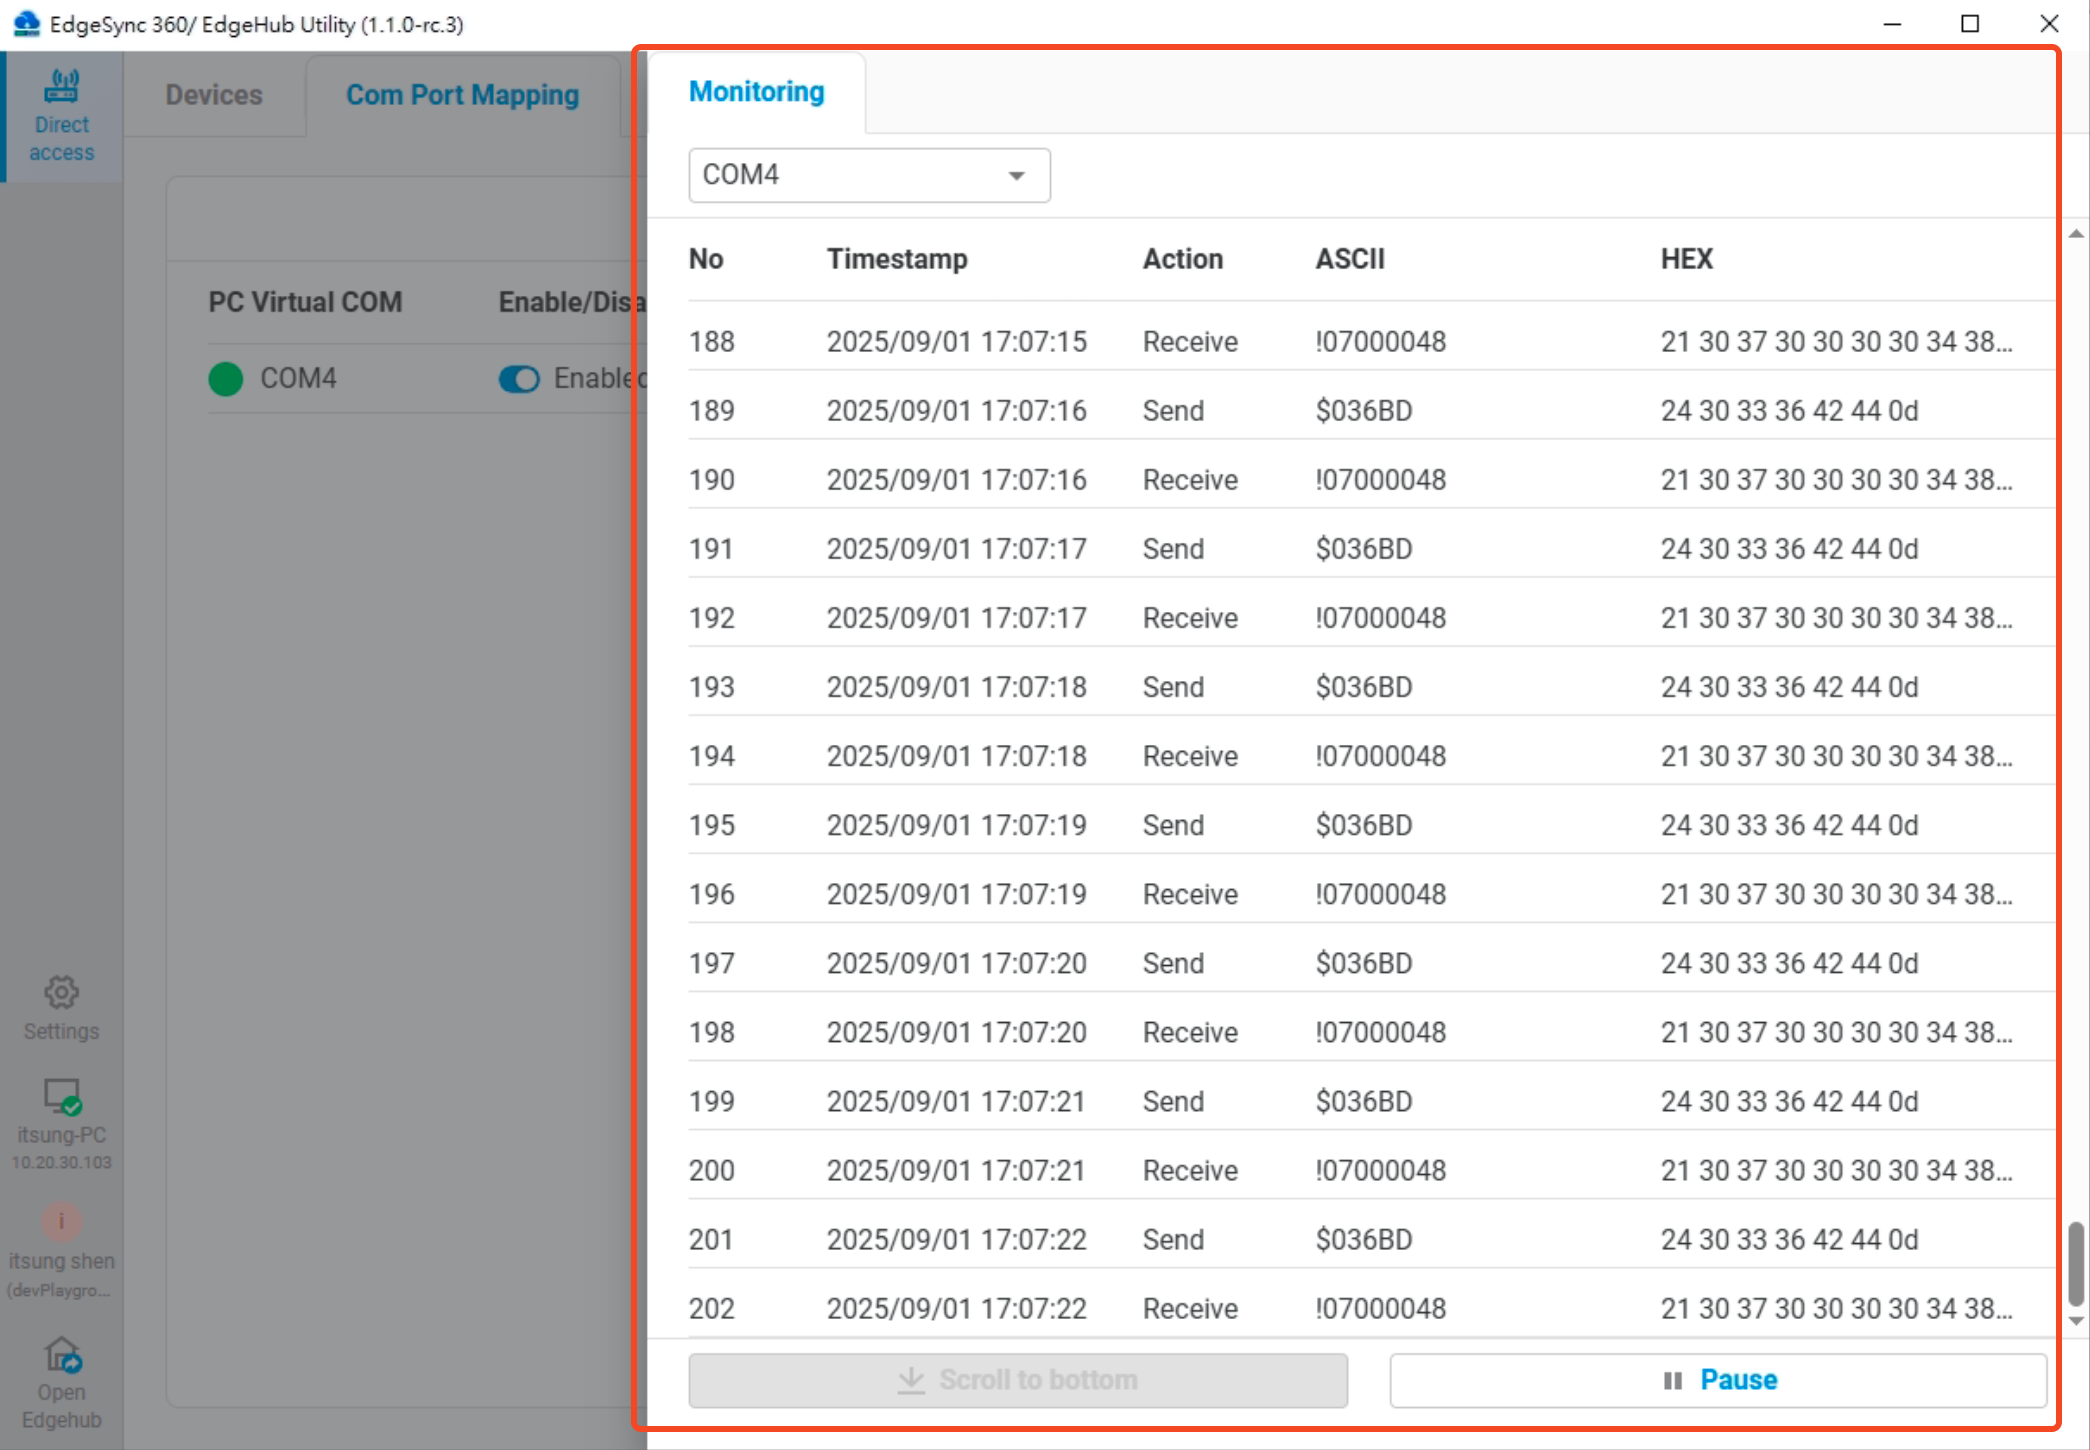
COM Port Mapping tab
Monitor
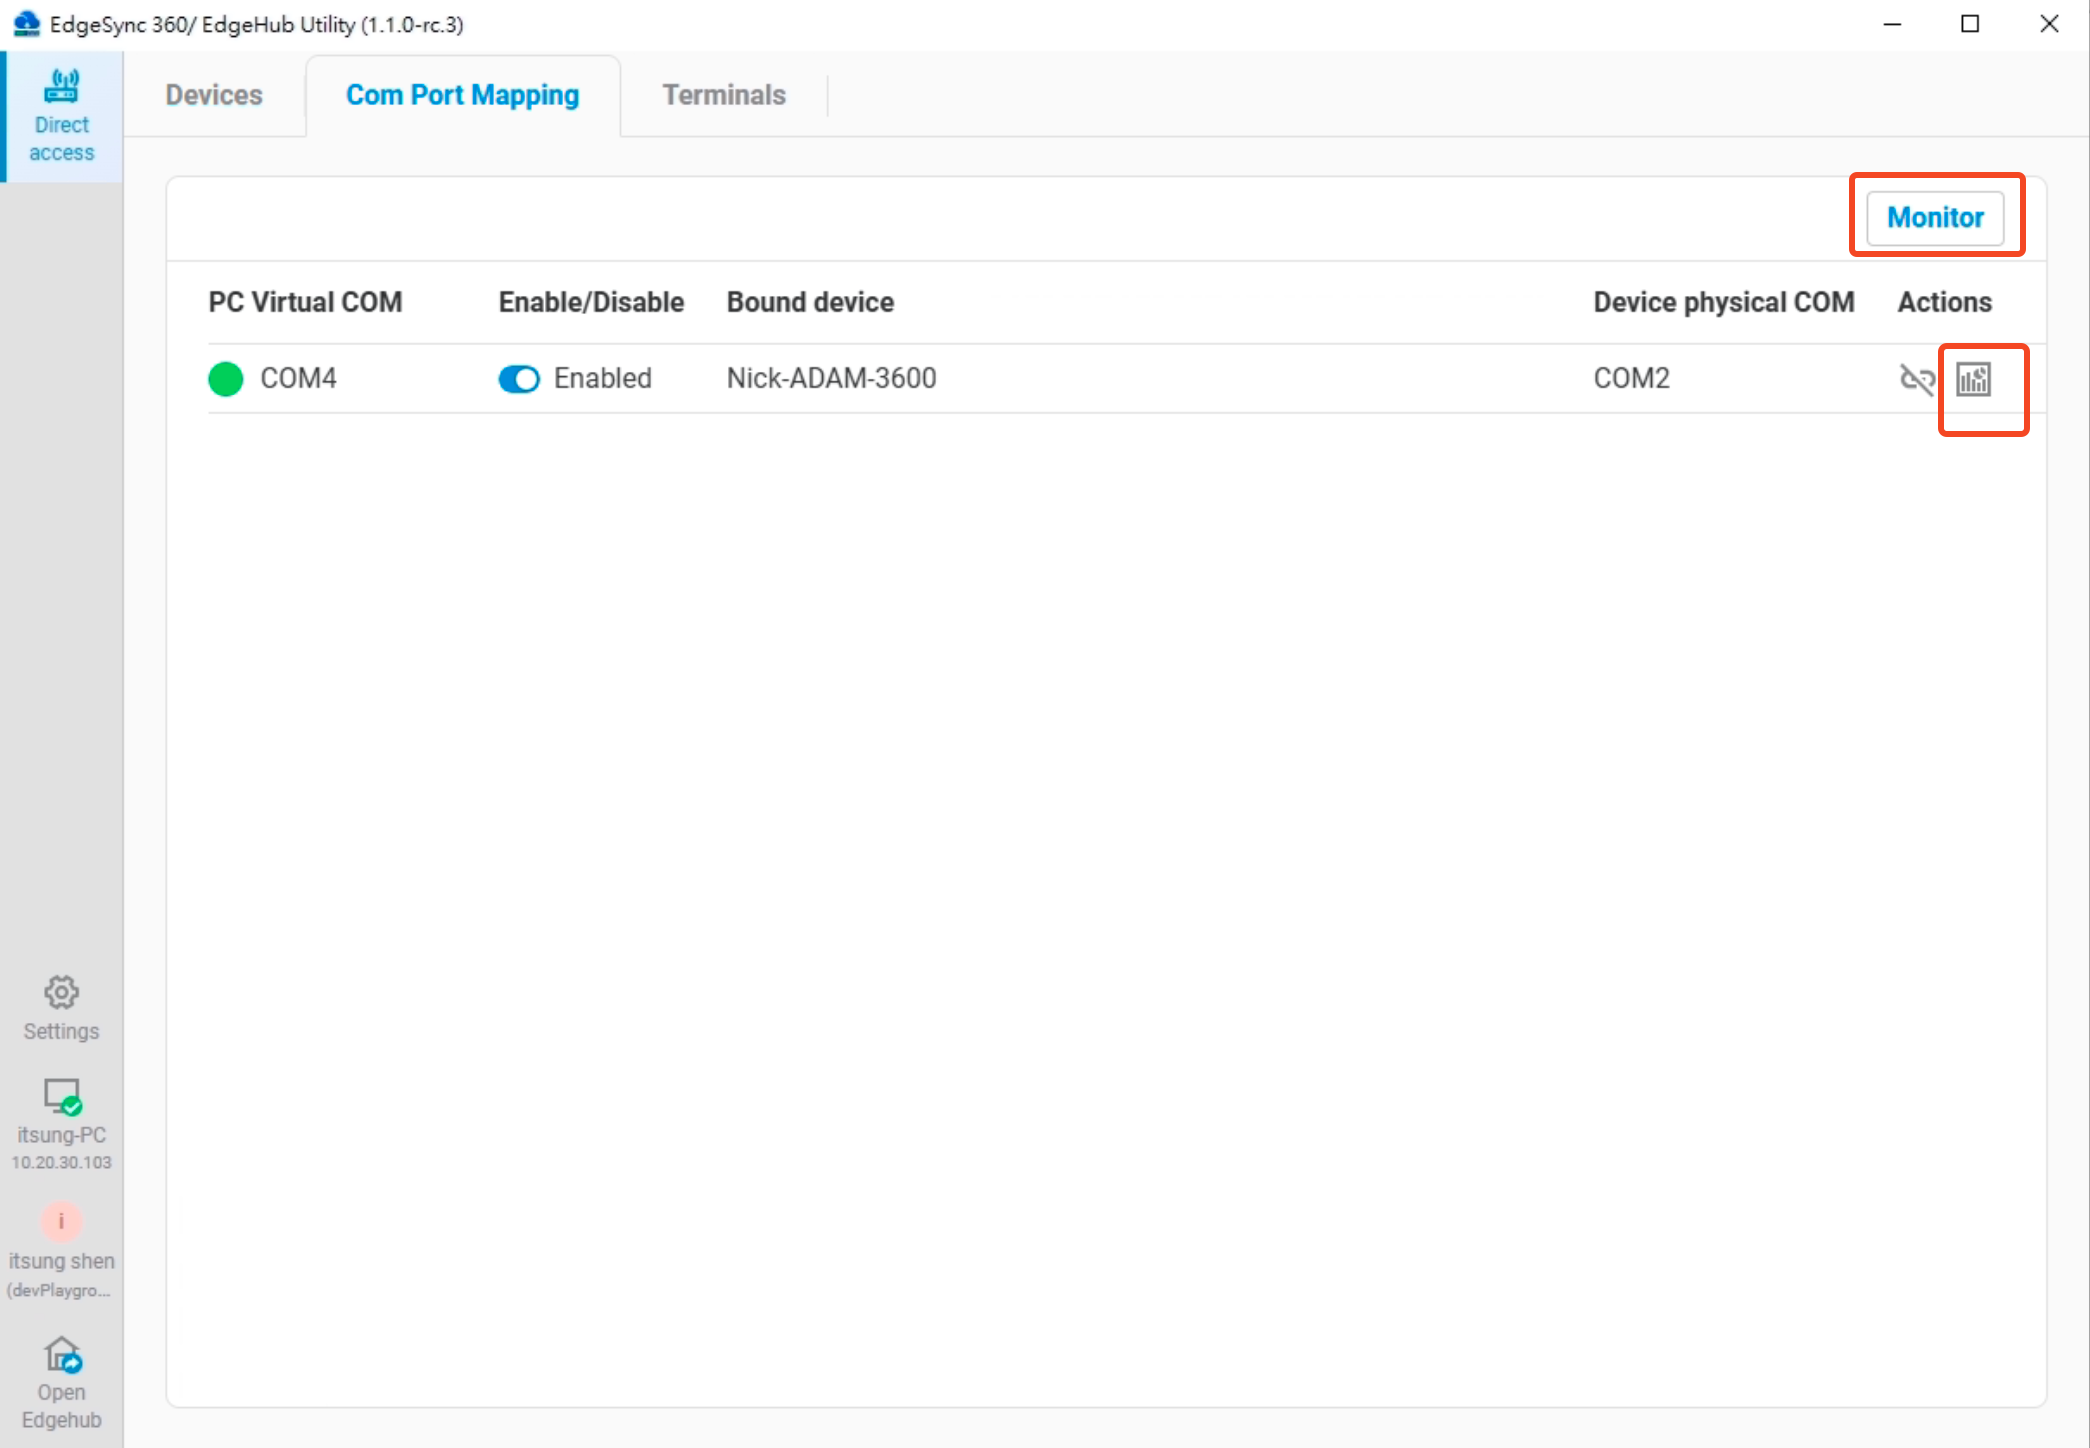
You can use the Monitor feature to inspect the packet data transmitted through the Virtual COM port. When the Monitor button is clicked, a COM packet monitoring interface will be displayed, showing the following columns:
- No: Packet serial number
- Timestamp: Time the packet was captured
- Action: Indicates whether the packet was received or sent
- ASCII: Packet content converted to ASCII format
- HEX: Raw packet data in HEX format
You can also perform the following actions using the buttons below:
- Pause / Run: Pause or resume packet capture
- Scroll to bottom: Stick the view to the most recent packet entry
4.5 Direct Access Workflow
- EpnClient Connection: First connect your EpnClient to EPN (must be registered)
- Access Device List: Navigate to the Devices tab in Direct Access
- Remote Device Connection: Click the cloud icon with arrows in the Actions column next to a device to:
- Connect the device to the EPN (upload arrow)
- Disconnect it from the EPN (download arrow)
- Network Access: Once both EpnClient and remote device share the same EPN, you can:
- Open TCP/UDP sessions from your PC to the device's virtual IP
- Use
ssh user@10.20.30.xxto access a PLC's console directly - Run PLC utility software to connect to PLCs under the device
- Map COM ports for serial-based applications (via EdgeLink VCOM program)
4.6 Troubleshooting EPN and Direct Access
If experiencing issues, follow these troubleshooting steps:
4.6.1 Unregistered Status
- If you see "Unregistered" status, click on the EPN icon to start the registration process
- Ensure you have the necessary permissions to register a new EpnClient
- Contact your EdgeHub account administrator if registration fails
4.6.2 Disabled Status
- If you receive the message "Your EpnClient is disabled. Please contact the administrator":
- Your access has been restricted by the system administrator
- Contact your EdgeHub account administrator for access
- Provide your username and client details when requesting access
4.6.3 Connection Issues
- If the connection fails:
- Check your internet connection
- Verify firewall settings aren't blocking communication
- Ensure your virtual IP address is valid and not conflicting with other clients
- Try restarting the application
- Check with your administrator that the EPN server is operational
5. System Tray Features
5.1 Accessing System Tray Functions
 Tray icon of EdgeHub Utility
- Left-click the EdgeHub Utility icon in the Windows tray to show the main window
- Right-click to open the tray menu
- Hover over the icon to view the current status tooltip
 System tray menu showing available options
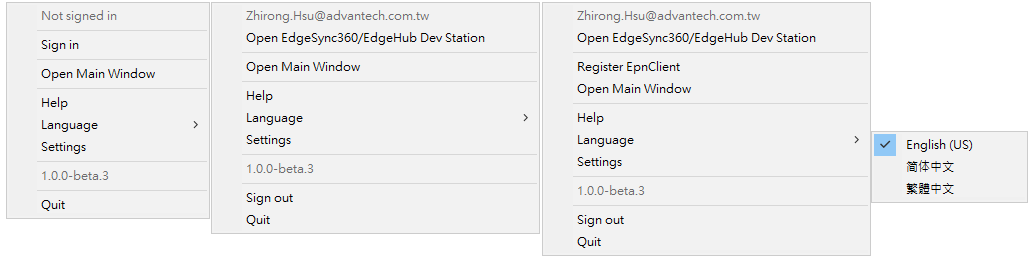
5.2 Available Tray Menu Options
- Open Main Window: Display the main application
- Open {station name}: Open the selected signed-in station
- Register EpnClient: Start the EPN registration process
- Sign in: Sign in EdgeHub to access authentication functions
- Language: Change application language
- Settings: Access application settings (Not yet available)
- Help: Access documentation and support (Not yet available)
- Quit: Exit the application
5.3 Status Tooltips
The system tray icon displays tooltips with information about:
- User sign-in status (Not signed in)
- EPN connection status (Connecting, Connected, Access denied, etc.)
- Application process status (Shutting down...)
6. Settings and Preferences
6.1 Language Preferences from tray menu
- Click "Language" in the system tray menu
- Choose your preferred language (English, 繁體中文, 简体中文)
- The application will update immediately
6.2 Settings from sidebar
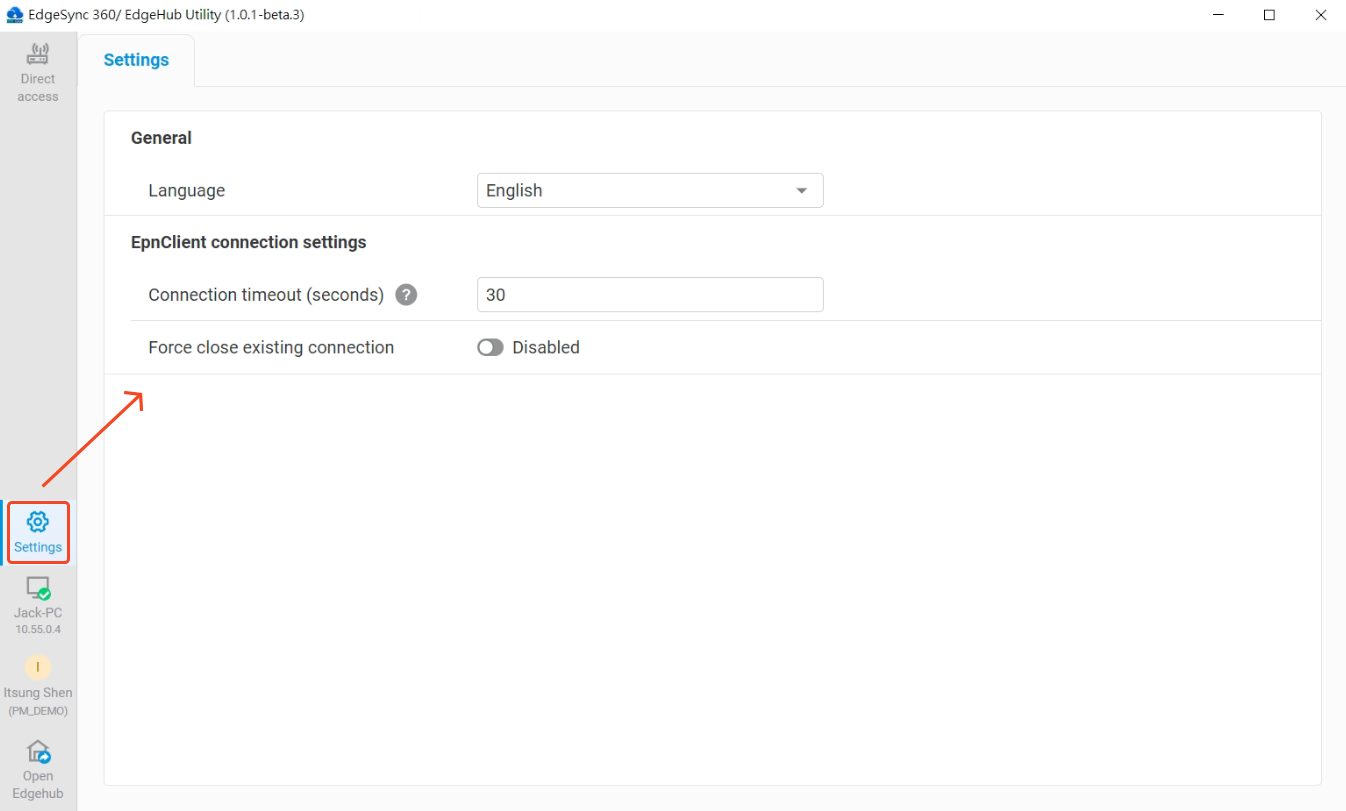
You can configure the following EdgeHub utility settings on the settings page:
-
General
- Language
- Choose your preferred language (English, 繁體中文, 简体中文)
- The app will update immediately after selection
- Language
-
EpnClient Connection Settings
- Connection Timeout
- Set the timeout (in seconds) when EpnClient connects
- Valid range: 15–90 seconds
- Force Close Existing Connection
- Whether to force close any existing connection when EpnClient connects
- Connection Timeout
7. User Authentication and Tenant Management
7.1 User Authentication
The EdgeHub Utility requires authentication to access certain features:
 Sign-in dialog with Account, Password, and Station fields
-
Sign In Process:
- Click on the Sign in EdgeHub option in the sidebar or tray menu
- In the sign-in dialog, enter your Account and Password
- Select a station from the dropdown
- Click Sign in to authenticate
- If authentication is successful, a tenant selection dialog will appear
- Select the tenant you wish to work with by clicking its checkbox
- Click Select to complete the sign-in process
-
User Profile Information:
- Once signed in, your profile icon will display your initial (e.g., "Z" for Zhirong Hsu)
- Clicking the profile icon shows your full name and email address
- The current tenant is also displayed
-
Sign Out Process:
- Click on the user profile icon to open the user menu
- Select Sign out to sign out of the application
- After signing out, you'll need to authenticate again to access restricted features
-
Forgot Password
- Click the
Forgot Passwordlink on the sign-in dialog. - A webview window will open and display the password reset page. Follow the instructions on that page to reset your password.
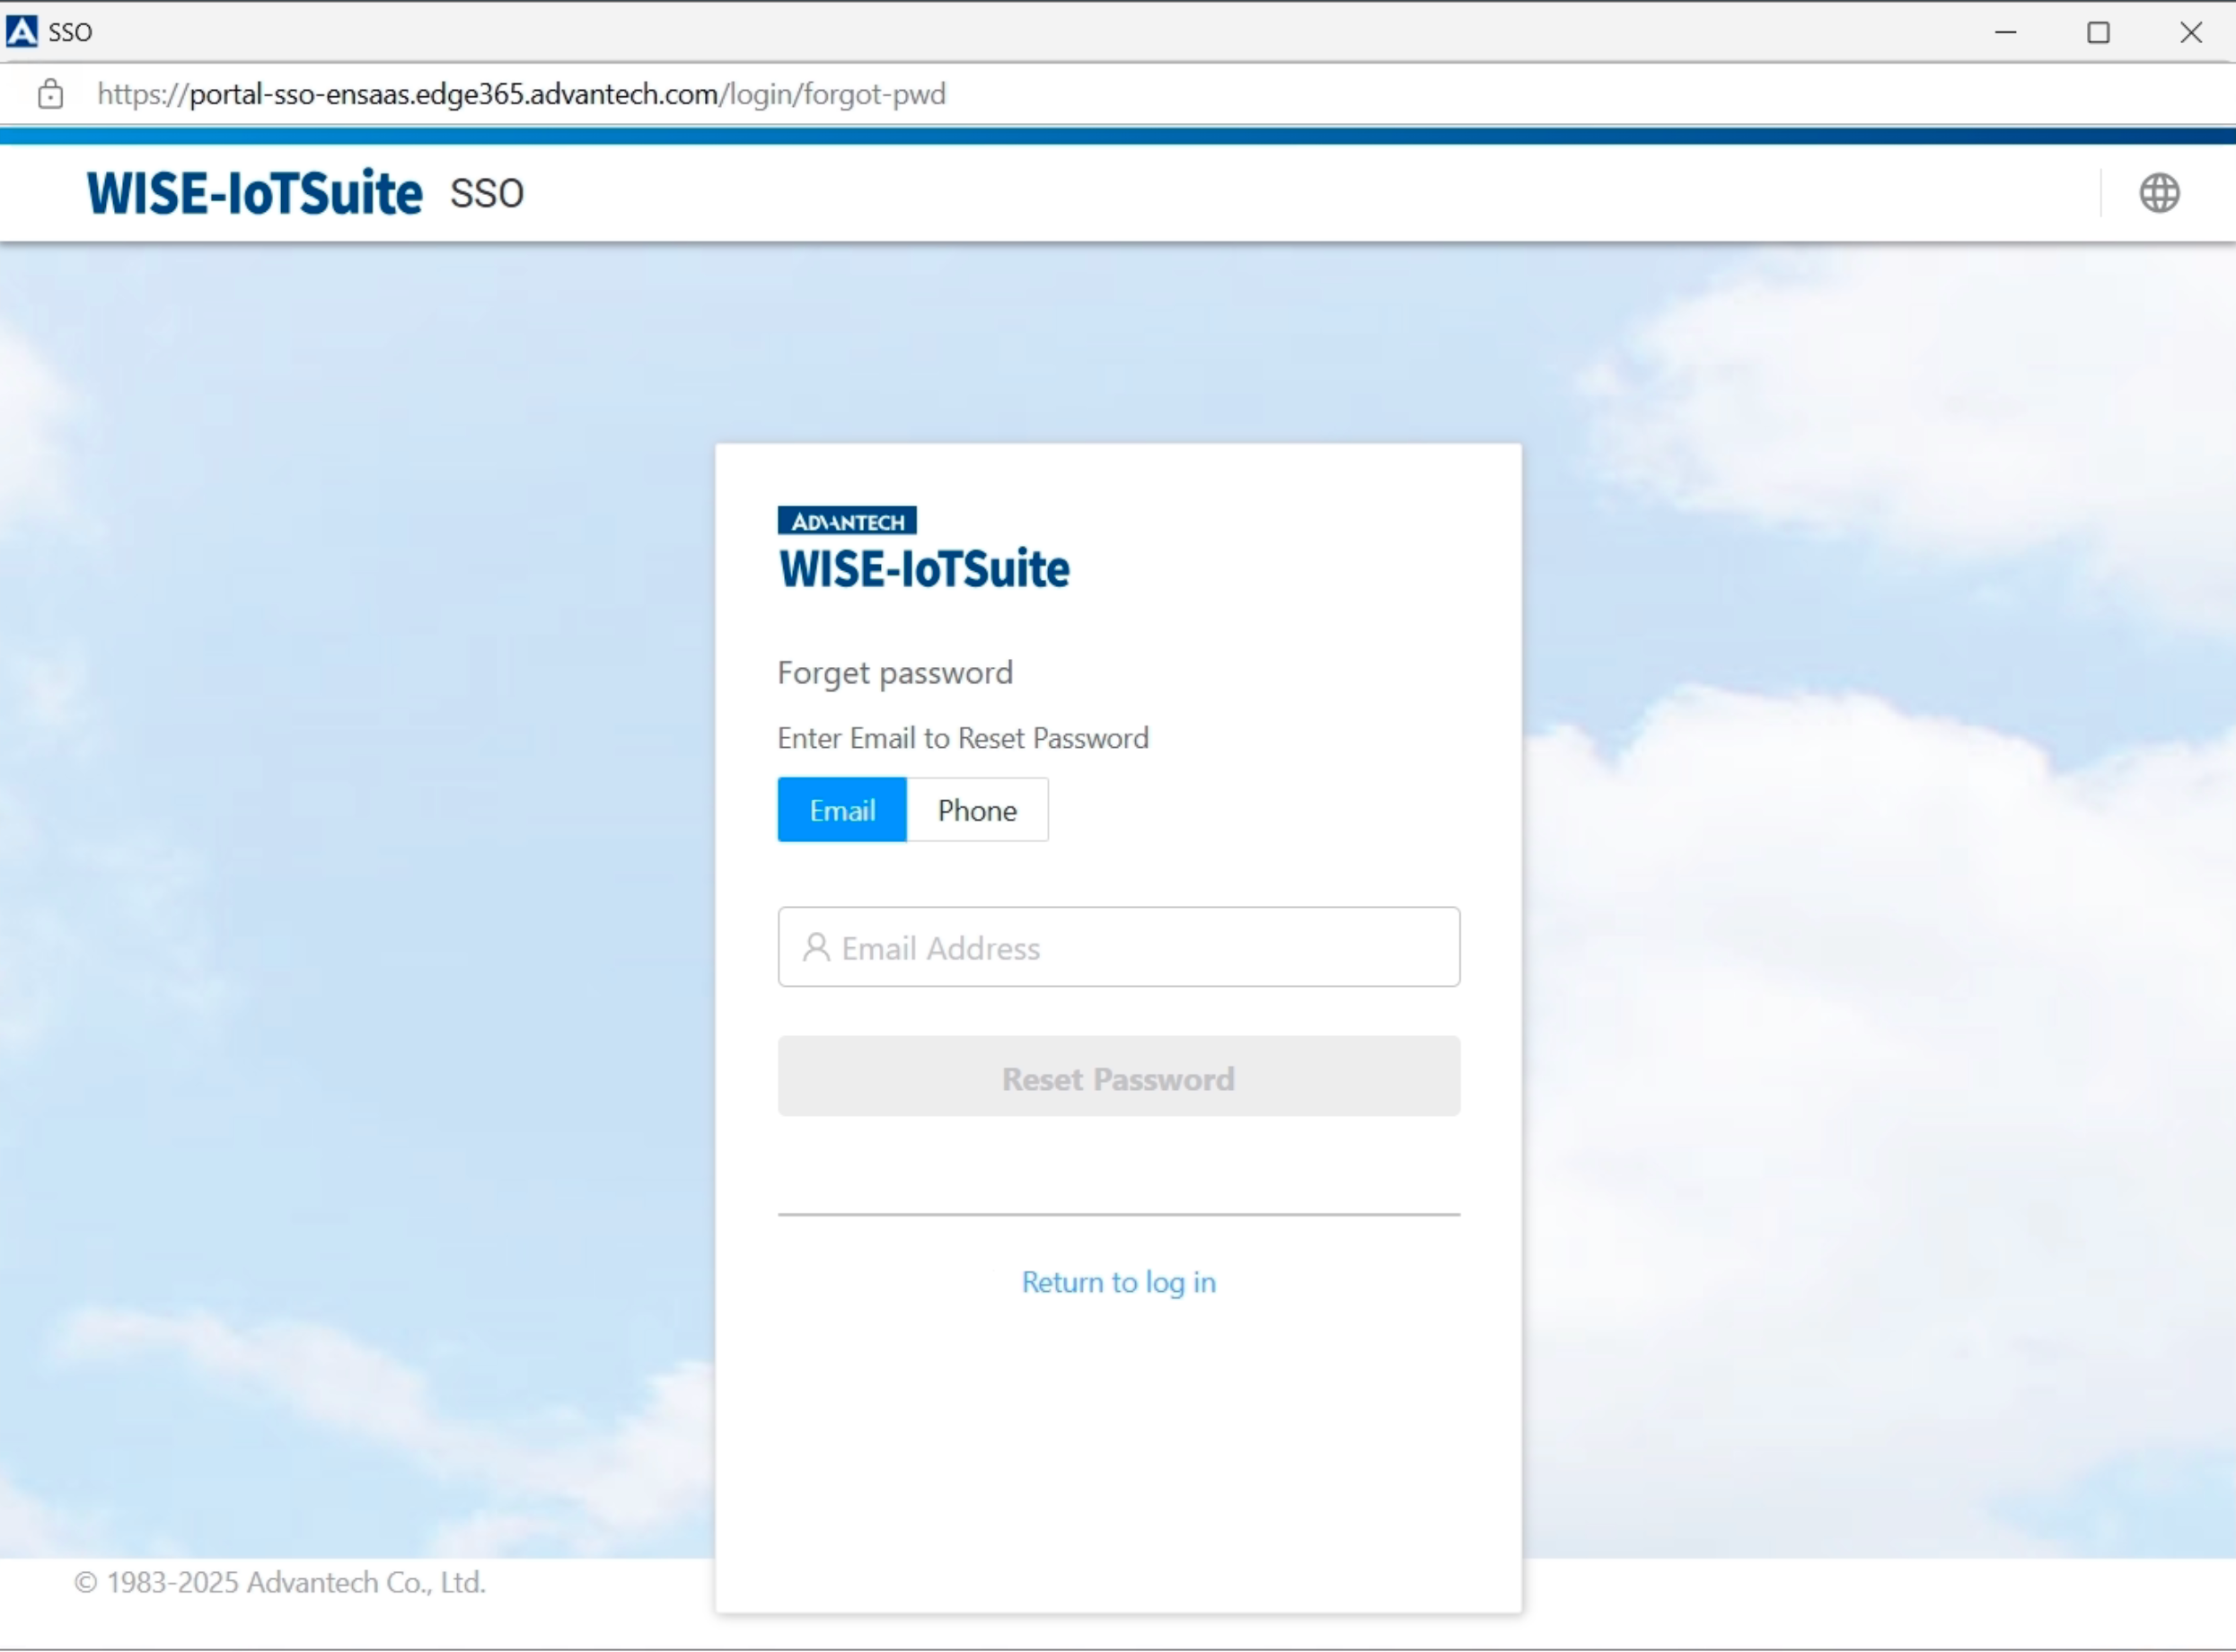 Forgot password page
 - Click the
-
Create an Account
- Click the
Create an Accountbutton on the sign-in dialog. - A webview window will open and display the EdgeHub free trial sign-up page. Follow the instructions on that page to create your account.
 EdgeHub free trial sign-up page
 - Click the
7.2 Tenant Management
EdgeHub Utility supports multi-tenant operations:
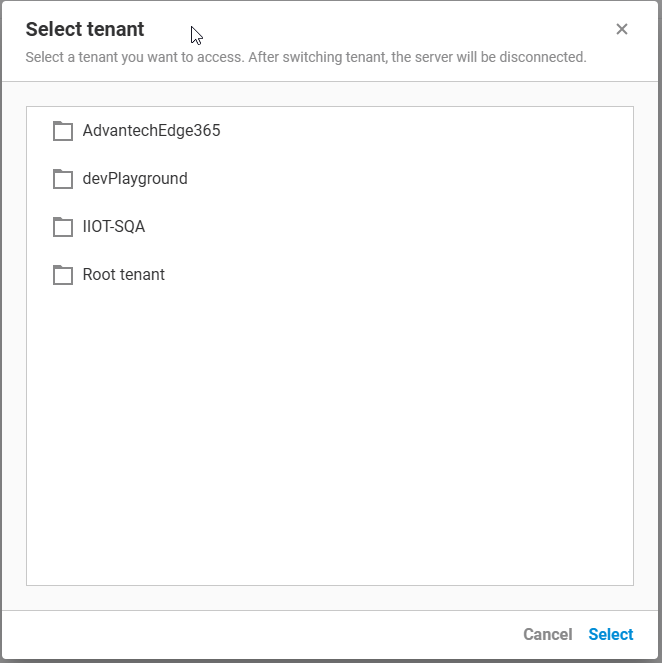 Tenant selection dialog showing available tenants with a note about server disconnection
7.2.1 Viewing Current Tenant
- Your current tenant is displayed in the user profile menu
- All operations are performed in the context of this tenant
7.3 Switching Tenants
- Click on the user profile icon to open the user menu
- Select "Switch tenant" from the options
- A tenant selection dialog will appear
- Select the tenant you wish to access
- Click Switch to switch tenants
- Note that after switching tenants, the EpnClient will be disconnected
7.4 Tenant-Specific Features
- Device onboarding is performed for the selected tenant
- EPN connections may vary based on tenant permissions
- Device management operations respect tenant boundaries
- Access controls are applied based on tenant-specific permissions
8. Troubleshooting
8.1 Common Error Messages
- Error message: General connection issue
- Your EpnClient is disabled: Access has been restricted by administrator
8.2 Connection Problems
If unable to connect to devices:
- Verify device power and network connection
- Check IP address configuration
- Ensure firewall settings allow communication
- Verify account permissions for device access
- Ensure there is no running OpenVPN connection (finding
openvpn.exein Task Manager)
8.3 EPN Registration Issues
If EpnClient registration fails:
- Verify internet connection
- Ensure account has registration privileges
- Contact administrator if access is denied
9. Appendices
9.1 Glossary
- ECU: Advantech Power Automation Gateways
- COM Port: Communication Port (serial interface)
- EPN: EdgeHub Private Network
- EpnClient: The EdgeHub Utility application running on your PC
- Virtual COM: Software-emulated serial port
- Virtual network: Private overlay network created by EPN (e.g., 10.176.x.x/24)
9.2 Support Resources
-
Official Documentation: https://docs.wise-paas.advantech.com/en/Guides_and_API_References/1676956646152508777/1677046206377513884/1677051715349911768
-
EdgeHub Utility Installer: