Sub Node Basic Guide
Overview
WEDA SubNode operates as a lightweight agent that handles bidirectional communication between edge devices and the cloud.
Core Capabilities
1. ⬆️ Uplink (Data Collection)
Collects telemetry data from edge devices and sends it to the cloud:
- Protocol Support: Modbus, MQTT, and custom protocols
- Data Pipeline: Collects → Transforms → Publishes
- Real-time Streaming: Continuous data flow to WEDA Core
2. ⬇️ Downlink (Device Command)
Receives commands from cloud to control edge devices remotely:
- Remote Control: Execute commands on physical devices
- Configuration Updates: Push settings changes to equipment
- Bidirectional Sync: Ensure desired state matches reported state
Open Source Repository
The WEDA SubNode SDK is open source and available on GitHub: WEDA Sub Node Repository.
You can find:
- Source Code: Full access to the SDK codebase for customization and contribution
- Documentation: Detailed guides, architecture explanations and feature references
- Example Projects: Ready-to-run templates for different development scenarios
If you want to get started quickly, check out the Quick Start section in the repository for step-by-step tutorials on setting up your first SubNode project.
Prerequisites
Before starting, ensure your development environment meets the following requirements:
- Framework: .NET 10.0 SDK or later
- Tools: A code editor (e.g., VS Code, Visual Studio, or Rider)
- Operating System: Windows, macOS, or Linux
- Repository: Clone the WEDA SubNode SDK repository
STEP 1: Install Sub Node SDK Templates
There are two ways to install templates:
1. Using Install Script (Recommended)
Navigate to the SDK repository root and run:
bash scripts/install-templates.sh
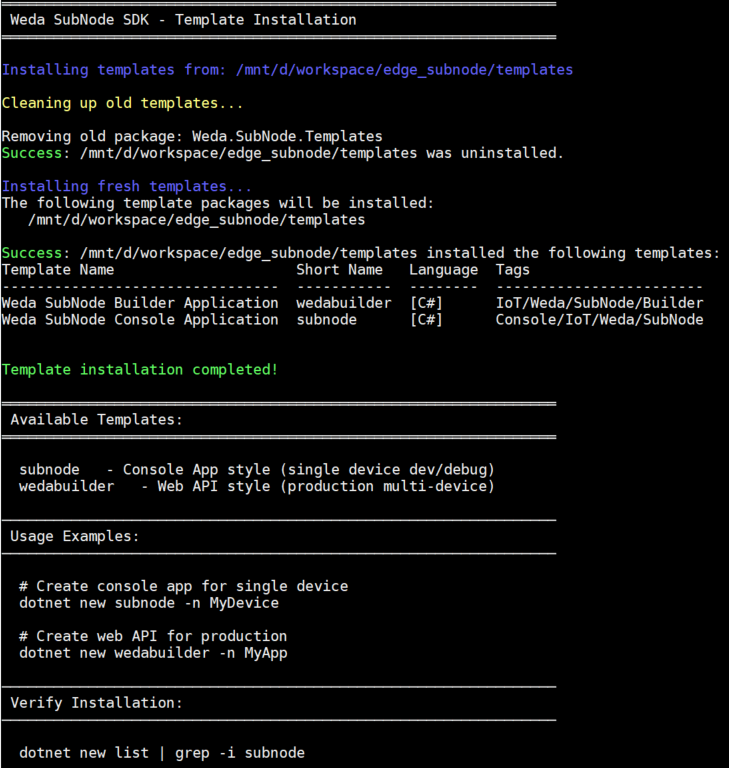
Expected output:
2. Manual Installation
If the script fails, each template can be installed manually:
cd /path/to/edge_subnode/templates

# Install subnode template
dotnet new install ./subnode

# Install wedabuilder template
dotnet new install ./wedabuilder
Verify Installation
Check that all templates are installed:
dotnet new list | grep -i subnode
Expected output:
Template Name                         Short Name   Language  Tags
------------------------------------  -----------  --------  -----------------------
Weda SubNode Console Application      subnode      [C#]      Console/IoT/Weda/SubNode
Weda SubNode Web API Application      wedabuilder  [C#]      Web/WebAPI/IoT/Weda/SubNode
If you see both templates listed, installation was successful! ✅
Uninstalling Templates
To remove all Weda SubNode templates:
dotnet new uninstall Weda.SubNode.Console
dotnet new uninstall Weda.SubNode.WebApi
Template Overview
The WEDA SubNode SDK provides two project templates optimized for different development scenarios:
| Template | Type | Use Case | Key Features |
|---|---|---|---|
| wedabuilder | Web API | Production deployment with multiple devices | Configuration-driven, minimal code, scalable |
| subnode | Console App | Single-device development and debugging | Event-driven, flexible, iterative development |
Template Details
wedabuilder - Web API
Production-ready architecture for managing multiple devices with RESTful endpoints and background services.
Best for:
- Fastest way to get started with zero code required
- Production environments requiring centralized management of multiple edge devices
- Scalable deployments with RESTful API access
- Configuration-driven development with minimal code changes
subnode - Console Application
Lightweight template for single-device prototyping with event-driven architecture and easy debugging.
Best for:
- Single-device development: Ideal for development and debugging workflows
- Rapid prototyping and testing
- Single-device custom integrations
- Learning the SDK fundamentals with hands-on control
Step 2: Create a Template project
Create a Wedabuilder project
Creates a project with:
- Minimal code using
CreateDefaultBuilderpattern - Configuration-driven (
appsettings.json) - Auto-initialization and device management
- Ideal for production deployment with multiple devices
# Projects must be created in the devices/ directory (required for project references).
# Templates use project references that require the project to be at the same depth level as the devices/ directory to resolve correctly to the parent SDK project.
# The -n parameter does not accept path separators; navigate to the directory first.

mkdir devices
cd devices

# Create a wedabuilder project. If you already have an existing template, use the '--force' option to overwrite it
dotnet new wedabuilder -n MyFirstApi

# Create a subnode project. If you already have an existing template, use the '--force' option to overwrite it
dotnet new subnode -n MyDevice --force
Quick Test
You can execute the template project on a built-in simulator, allowing local development and testing without physical devices.
The simulator emulates device data and interactions, enabling you to validate API endpoints and integration logic before deploying to real hardware.
If you want to test the simpler API template:
cd MyFirstApi
dotnet run
Expected output:
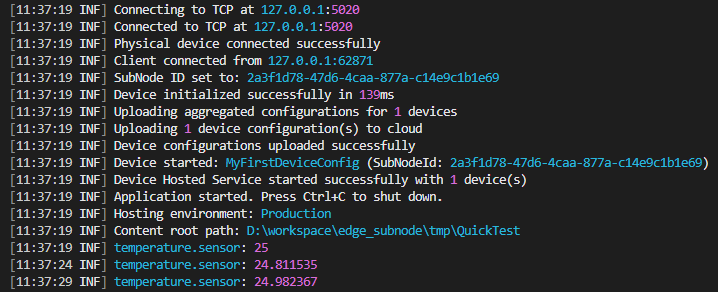
🎉 If the log continuously outputs temperature measurements, it indicates that the template project is running successfully and the device integration is functioning as expected.
Advanced: Transform
Transform is the first processing stage in the Data Pipeline, responsible for performing numerical transformations on raw sensor values. SubNode includes three built-in transforms: linear/curve calibration, unit conversion, and large data chunking. Each transform can be configured via JSON or code and supports dynamic parameter updates from the cloud. Find out for more details at SubNode Github. Here is an example of how to configure a linear calibration transform for a temperature sensor:
1. devicecfg.json
{
  "SubNode": {
    "Name": "MyModbusDevice",
    "SubNodeType": "AdamEthernet",
    "Manufacturer": "Advantech",
    "Model": "Demo",
    "SwVersion": "1.0.0"
  },
  "DeviceConfigs": {
    "MyFirstDevice": {
      "Enabled": true,
      "DeviceCommunication": {
        "Host": "127.0.0.1",
        "Port": 5020
      },
      "Dtdl": {
        "AutoGenEnabled": true
      },
      "Properties": {
        "SlaveId": 1
      },
      "Sensors": [
        {
          "Name": "temperature_sensor",
          "SensorGroup": "TEMP",
          "SensorInfo": {
            "DisplayName": "Temperature Sensor",
            "Description": "Main temperature reading",
            "Schema": "double"
          },
          "Parameters": {
            "RegisterType": "HoldingRegister",
            "RegisterAddress": 0,
            "RegisterCount": 2,
            "DataType": "Float32"
          },
          "Report": {
            "Enabled": true,
            "Interval": 1000,
            "Unit": "celsius",
            // add transform configuration
            "TransformPipeline": [
              {
                "Type": "calibration",
                "Parameters": {
                  "Scale": 0.1,
                  "Offset": -40
                }
              }
            ]
            // ------------------------------
          }
        }
      ]
    }
  }
}
2. Run the application
dotnet run
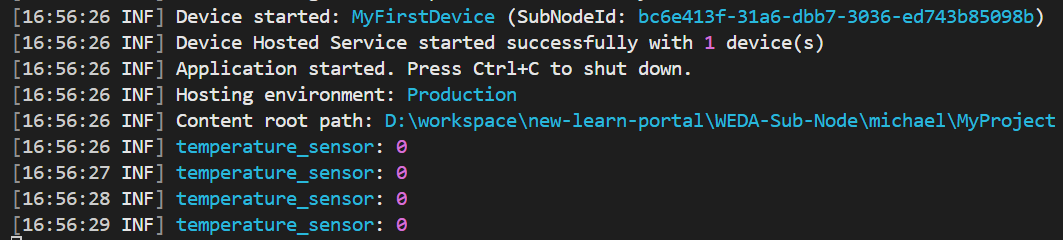
Expected output:

The SubNode SDK provides two events for data pipeline monitoring:
DataReceived- Triggered before Transform, passes raw sensor dataDataProcessed- Triggered after Transform, passes transformed data
If you don't see the transform output in your logs, verify that you are subscribing to the DataProcessed event to observe the transformed values. Subscribing to DataReceived will only show the original raw data before any transformations are applied.
Advanced: DspFilter
DSP (Digital Signal Processing) Filter is the second processing stage in the Data Pipeline, executed after Transform. Unlike Transform, DSP Filters are typically stateful—they retain historical data to compute results (for example, a moving average requires previous values). SubNode includes three built-in DSP Filters, each maintaining independent state per sensor. Find out for more details at SubNode Github. Here is an example of ReluFilter configuration:
1. devicecfg.json
{
  "SubNode": {
    "Name": "MyModbusDevice",
    "SubNodeType": "AdamEthernet",
    "Manufacturer": "Advantech",
    "Model": "Demo",
    "SwVersion": "1.0.0"
  },
  "DeviceConfigs": {
    "MyFirstDevice": {
      "Enabled": true,
      "DeviceCommunication": {
        "Host": "127.0.0.1",
        "Port": 5020
      },
      "Dtdl": {
        "AutoGenEnabled": true
      },
      "Properties": {
        "SlaveId": 1
      },
      "Sensors": [
        {
          "Name": "temperature_sensor",
          "SensorGroup": "TEMP",
          "SensorInfo": {
            "DisplayName": "Temperature Sensor",
            "Description": "Main temperature reading",
            "Schema": "double"
          },
          "Parameters": {
            "RegisterType": "HoldingRegister",
            "RegisterAddress": 0,
            "RegisterCount": 2,
            "DataType": "Float32"
          },
          "Report": {
            "Enabled": true,
            "Interval": 1000,
            "Unit": "celsius",
            "TransformPipeline": [
              {
                "Type": "calibration",
                "Parameters": {
                  "Scale": 0.1,
                  "Offset": -40
                }
              }
            ],
            // add DSP filter configuration
            "DspPipeline": [
              {
                "Type": "relu",
                "Enabled": true,
                "Parameters": {}
              }
            ]
            // ------------------------------
          }
        }
      ]
    }
  }
}
2. Run the application
dotnet run
Expected output:
Advanced: Add a new sensor
This tutorial demonstrates how to extend the WEDA Sub-Node framework by adding a humidity sensor. You will learn how to configure a new device, register it in the application, and simulate sensor data for testing purposes.
1. devicecfg.json
Add a humidity device configuration to the devicecfg.json file.
Editing content: devicecfg.json
{
  "SubNode": {
    "Name": "MyModbusDevice",
    "SubNodeType": "AdamEthernet",
    "Manufacturer": "Advantech",
    "Model": "Demo",
    "SwVersion": "1.0.0"
  },
  "DeviceConfigs": {
    "MyFirstDevice": {
      "Enabled": true,
      "DeviceCommunication": {
        "Host": "127.0.0.1",
        "Port": 5020
      },
      "Dtdl": {
        "AutoGenEnabled": true
      },
      "Properties": {
        "SlaveId": 1
      },
      "Sensors": [
        {
          "Name": "temperature_sensor",
          "SensorGroup": "TEMP",
          "SensorInfo": {
            "DisplayName": "Temperature Sensor",
            "Description": "Main temperature reading",
            "Schema": "double"
          },
          "Parameters": {
            "RegisterType": "HoldingRegister",
            "RegisterAddress": 0,
            "RegisterCount": 2,
            "DataType": "Float32"
          },
          "Report": {
            "Enabled": true,
            "Interval": 1000,
            "Unit": "celsius",
            "TransformPipeline": [
              {
                "Type": "calibration",
                "Parameters": {
                  "Scale": 0.1,
                  "Offset": -40
                }
              }
            ],
            "DspPipeline": [
              {
                "Type": "relu",
                "Enabled": true,
                "Parameters": {}
              }
            ]
          }
        },
        // Add a new sensor configuration for humidity
        {
          "Name": "humidity",
          "SensorGroup": "AI",
          "Parameters": {
            "RegisterType": "HoldingRegister",
            "RegisterAddress": 2,
            "RegisterCount": 2,
            "DataType": "Float32"
          }
        }
        // ------------------------------
      ]
    }
  }
}
2. appsettings.json configure simulator
Editing content: appsettings.json
{
  "Serilog": {
    "MinimumLevel": {
      "Default": "Information",
      "Override": {
        "Microsoft": "Warning",
        "System": "Warning",
        "Microsoft.Hosting.Lifetime": "Information"
      }
    },
    "WriteTo": [
      {
        "Name": "Console",
        "Args": {
          "outputTemplate": "[{Timestamp:HH:mm:ss} {Level:u3}] {Message:lj}{NewLine}{Exception}"
        }
      }
    ]
  },
  "TcpModbusSimulatorConfiguration": {
    "TcpConnection": {
      "IpAddress": "127.0.0.1",
      "Port": 5020
    },
    "ModbusProtocol": {
      "SlaveId": 1,
      "UseModbusAddressing": false,
      "HoldingRegisterBase": 0
    },
    "Simulation": {
      "GlobalUpdateIntervalSeconds": 1,
      "EnableValueChanges": true
    },
    "Sensors": [
      {
        "Name": "TemperatureSensor",
        "Type": "Temperature",
        "StartAddress": 0,
        "RegisterCount": 2,
        "DataType": "Float32",
        "SimulationParams": {
          "MinValue": 18.0,
          "MaxValue": 32.0,
          "InitialValue": 25.0,
          "ChangeRate": 0.2,
          "NoiseLevel": 0.1
        }
      },
      // Add a new sensor configuration for humidity
      {
        "Name": "HumiditySensor",
        "Type": "Humidity",
        "StartAddress": 2,
        "RegisterCount": 2,
        "DataType": "Float32",
        "SimulationParams": {
          "MinValue": 40.0,
          "MaxValue": 80.0,
          "InitialValue": 60.0,
          "ChangeRate": 0.5,
          "NoiseLevel": 0.2
        }
      }
      // ------------------------------
    ]
  }
}
3. Run the application
dotnet run
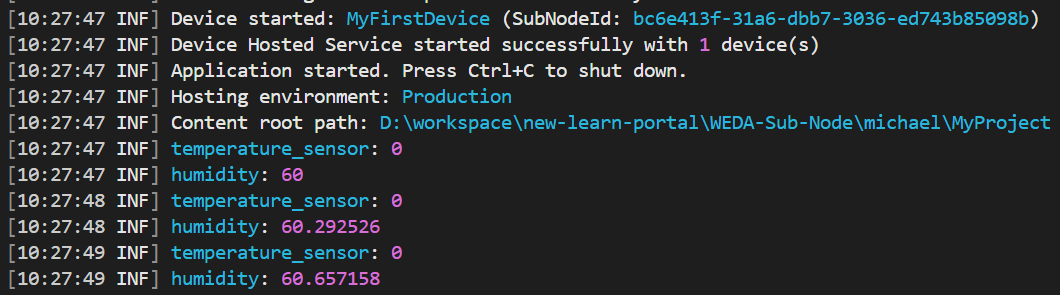
Expected output:
Advanced: Prepare for production environment
SubNode applications do not connect to WedaCore directly. Instead, they communicate through a local WedaNode (NATS Proxy). WedaNode is installed by the Device Activator and handles secure connections, credential management, and message routing. This article explains the differences between development and production modes, and how to configure various authentication strategies in systemcfg.json.
1. Program.cs remove simulator
var builder = WedaApplication.CreateDefaultBuilder(args);
    // Remove .UseMockCloud()

// Remove Simulator related code
// builder.Services.AddHostedService(sp => { ... });

var app = builder.Build();
await app.RunAsync();
2. appsettings.json configure NATS & device connection
{
  // NATS connection settings
  "WedaNode": {
    "Url": "127.0.0.1:4224",
    "AuthStrategy": "CredFile",
    "CredFile": "/path/to/credentials.creds"
  },

  //---------

  // Device configuration
  "Communication": {
    "Host": "192.168.1.100", // 真實裝置 IP
    "Port": 502, // Modbus 標準 Port
    "SlaveId": 1
  }
}
Step 3: Build and Deploy
After implementing your SubNode application, the next step is to build and deploy it to your target environment. The deployment process involves containerizing your application, uploading it to a registry, and deploying it to edge devices through WEDA's container management system.
Build Docker Image
- Create a
Dockerfilein your project directory: - Build the Docker image:
docker build -t mysubnode:1.0.0 .
Push to Container Registry
Tag and push your image to a container registry (Docker Hub, Azure Container Registry, or WEDA's private registry):
# Tag the image with your registry URL
docker tag mysubnode:1.0.0 <your-registry>/mysubnode:1.0.0

# Push to registry
docker push <your-registry>/mysubnode:1.0.0
Create Container Stack Configuration
Use WEDA Core Stack API to create a stack configuration that references your container image. Check the Stack API for details.
Deploy to Device
Use WEDA Core Deployment API to deploy the stack to your target edge devices. The deployment process will pull the container image, create the necessary containers, and start your SubNode application on the device. Check the Deployment API for details.