1. General Setting
The settings on the General Setting page will apply to the entire brand.
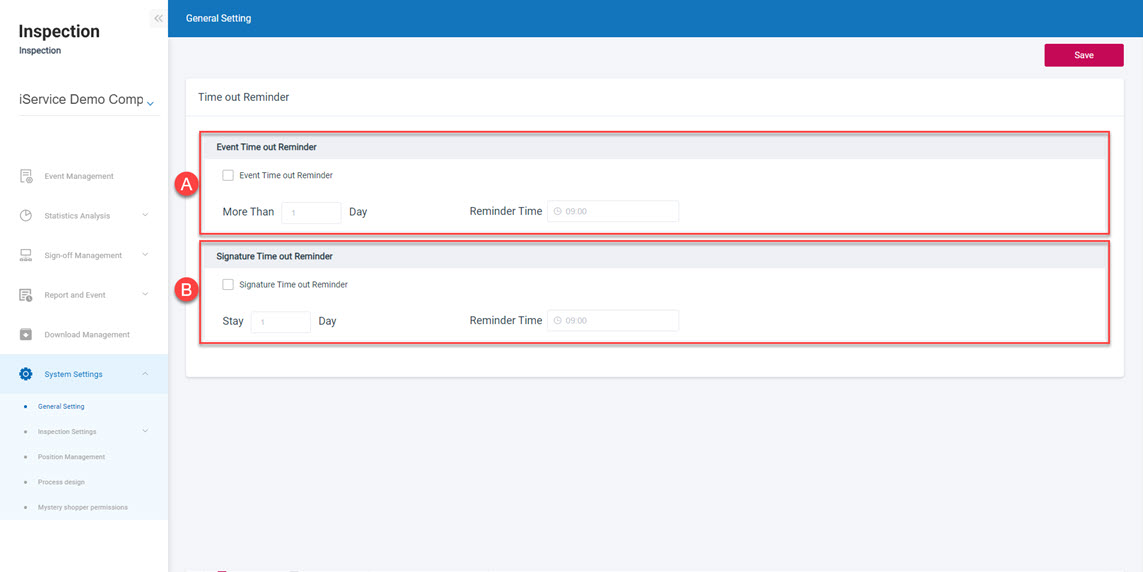
 A. Event Time out Reminder: If events are not handled within a certain number of days, the system can send a reminder at a specified time.
B. Signature Time out Reminder: If a pending approval event is not handled within a certain number of days, the system can send a reminder at a specified time.
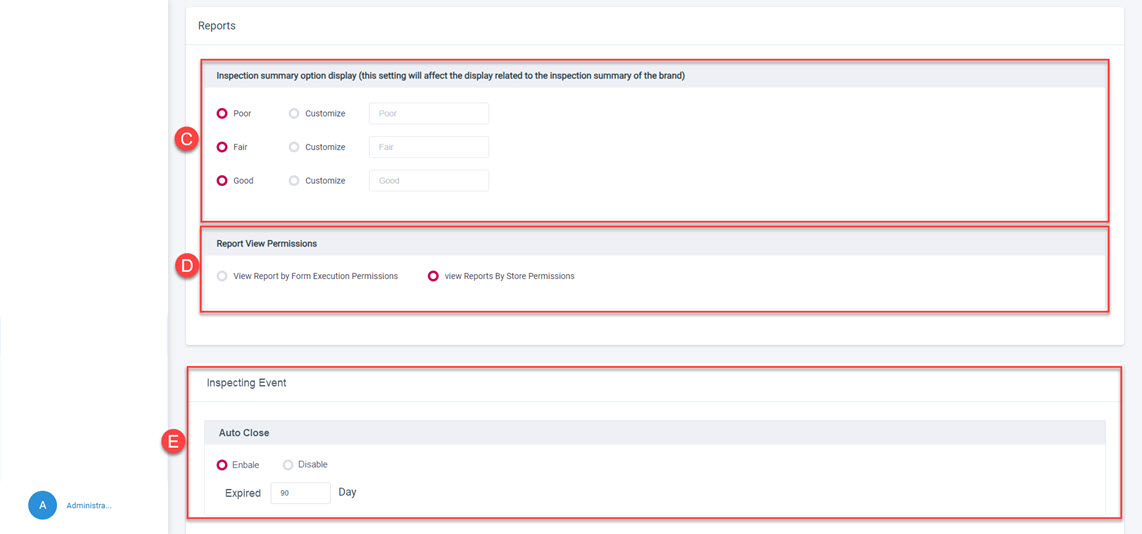
C. Inspection Summary Option Display: The user can use default inspection summary options such as 'Poor,' 'Fair,' and 'Good,' or use user-defined inspection summary options.
D. Report View Permission: The permission to view inspection reports can be differentiated. Administrators can restrict which inspection reports users can view based on whether they have permission to execute the inspection form or whether they have store access rights.
E. Events Auto Close: If an unresolved case does not have a status update within the specified number of days, the system will automatically close the unresolved cases without a status update and mark their status as "Expired".
A. Event Time out Reminder: If events are not handled within a certain number of days, the system can send a reminder at a specified time.
B. Signature Time out Reminder: If a pending approval event is not handled within a certain number of days, the system can send a reminder at a specified time.
C. Inspection Summary Option Display: The user can use default inspection summary options such as 'Poor,' 'Fair,' and 'Good,' or use user-defined inspection summary options.
D. Report View Permission: The permission to view inspection reports can be differentiated. Administrators can restrict which inspection reports users can view based on whether they have permission to execute the inspection form or whether they have store access rights.
E. Events Auto Close: If an unresolved case does not have a status update within the specified number of days, the system will automatically close the unresolved cases without a status update and mark their status as "Expired".
2. Inspection Settings
You may setup the inspection checklist and the inspection report templates under Inspection Settings.
2.1 Inspection List Settings
Download the inspection checklist sample for adopting site inspection checklist at the first time, and enter the items for inspection as shown in the sample, then import the inspection checklist from the web page and set up related rules and regulations for site inspection.
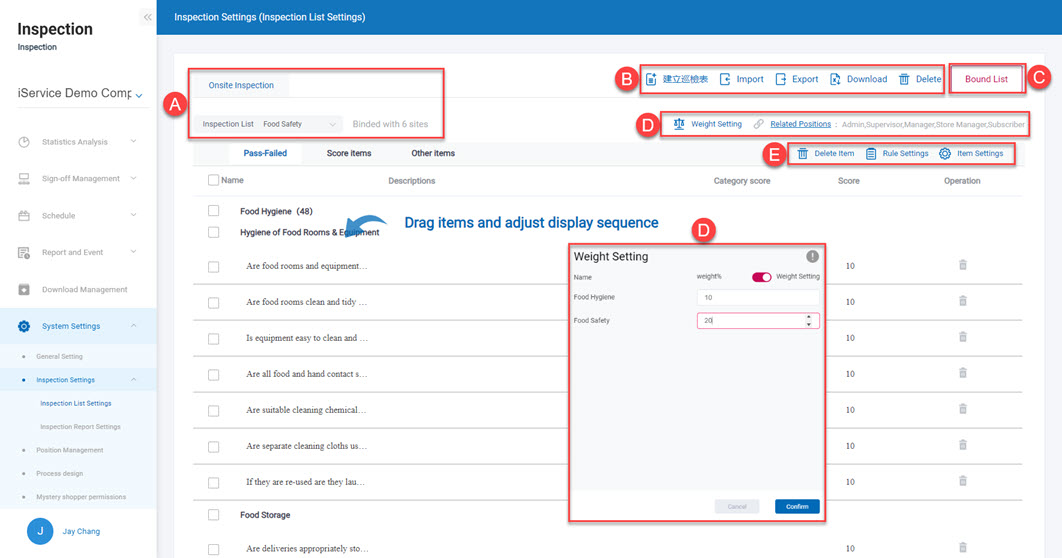 A. On-site inspection and inspection checklist options: Click to switch between on-site inspection, and choose to import the inspection checklist from the system. The number of sites bundled in the checklist will be displayed.
B. Create/Import/Export/Download/Delete: You may export or download the inspection checklist already uploaded to the system, download the inspection checklist sample, import the revised Excel file of the inspection checklist, or create a new simple inspection checklist.
C. Bundle the inspection checklist: bundle the inspection checklist with designated site.
D. Weight setup/associated job function: weight setup: the weight of each major categorie could be allocated in relevant proportion. Associated job function: bundle the inspection checklist with designated job function.
E. Inspection item and rules setup: you may delete or setup the items of inspection, you may also set up the rules for the inspection checklist and the scoring method.
> Note:
1.No more than 20 inspection checklist for a single company.
2.The setup of “inspection checklist bundling” and “job function association” is required, which means that only the person who have the priority of the site and corresponding job function may use the inspection checklist for site inspection.
3.In case of change in the inspection checklist, a new round of “inspection checklist bundling” and “job function association” is required.
A. On-site inspection and inspection checklist options: Click to switch between on-site inspection, and choose to import the inspection checklist from the system. The number of sites bundled in the checklist will be displayed.
B. Create/Import/Export/Download/Delete: You may export or download the inspection checklist already uploaded to the system, download the inspection checklist sample, import the revised Excel file of the inspection checklist, or create a new simple inspection checklist.
C. Bundle the inspection checklist: bundle the inspection checklist with designated site.
D. Weight setup/associated job function: weight setup: the weight of each major categorie could be allocated in relevant proportion. Associated job function: bundle the inspection checklist with designated job function.
E. Inspection item and rules setup: you may delete or setup the items of inspection, you may also set up the rules for the inspection checklist and the scoring method.
> Note:
1.No more than 20 inspection checklist for a single company.
2.The setup of “inspection checklist bundling” and “job function association” is required, which means that only the person who have the priority of the site and corresponding job function may use the inspection checklist for site inspection.
3.In case of change in the inspection checklist, a new round of “inspection checklist bundling” and “job function association” is required.
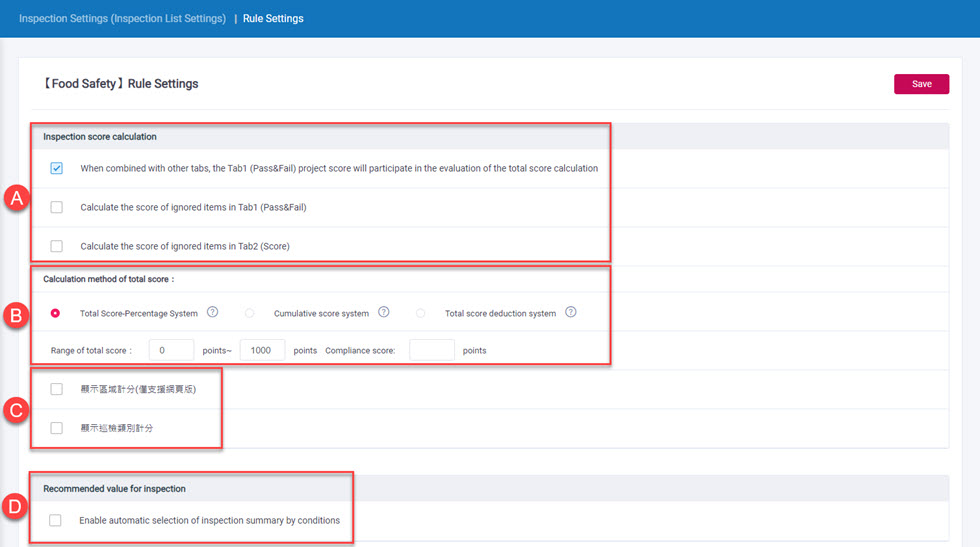
 A. Inspection scoring: consider to include the “passing rate assessment items” into total scoring as needed, and if the omitted (not applicable) items on the “passing rate assessment items” and “inspection scoring items” sheet should receive scoring.
B. Calculation of the total scoring in the evaluation: they are “Total scoring - proportion system”, “additional scoring system” and “score deduction system”. The calculation of “Total scoring - proportion system”: Total scoring in the evaluation = [SUM (scoring of each inspection item)/SUM (Tab1 and Tab2 site inspection total score) * 100] + scoring of the additional items. The calculation of the “additional scoring system”: Total scoring in the evaluation = SUM (scoring of each inspection item), the scope of total scoring and the target attainment scoring could be set up.The calculation of the “score deduction system”: Total scoring in the evaluation = SUM (scoring of each inspection item) + the score from which deduction starts. The score from which deduction starts, the scope of total scoring and the target attainment scoring could be set up.
C. Display field/inspection category scores: Determine whether to display the total score for each inspection category across different inspection categories.
D. Inspection recommended value: if there is failing items on the “passing rate assessment items” sheet, the result of this instance of site inspection is “immediate supervision”.
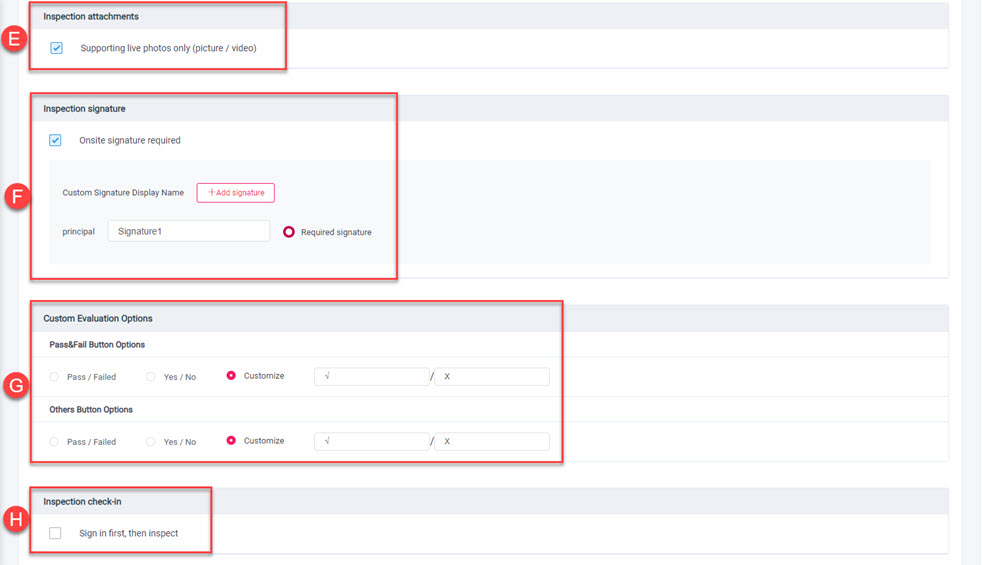
E. Inspection attachments: could be set up as whether photography or videotaping on the scene is allowed. If selection is canceled, the photo and image footage sited in the photo album of the mobile phone could be uploaded in the process of site inspection.
F. Inspection Signature: whether signature on the scene or not could be set up.
G. Custom Evaluation Options: the passing rate evaluation items and additional scoring items could be set up the description of word option.
H. Inspection sign-in: activate the function of sign-in before proceeding to site inspection or not.
I. Binding WorkFlow: Use in conjunction with the sign-off function to bind the inspection form to a specific sign-off process.
> Note:
1.Ascertain if the site address is correct before using “Inspection sign-in”.
A. Inspection scoring: consider to include the “passing rate assessment items” into total scoring as needed, and if the omitted (not applicable) items on the “passing rate assessment items” and “inspection scoring items” sheet should receive scoring.
B. Calculation of the total scoring in the evaluation: they are “Total scoring - proportion system”, “additional scoring system” and “score deduction system”. The calculation of “Total scoring - proportion system”: Total scoring in the evaluation = [SUM (scoring of each inspection item)/SUM (Tab1 and Tab2 site inspection total score) * 100] + scoring of the additional items. The calculation of the “additional scoring system”: Total scoring in the evaluation = SUM (scoring of each inspection item), the scope of total scoring and the target attainment scoring could be set up.The calculation of the “score deduction system”: Total scoring in the evaluation = SUM (scoring of each inspection item) + the score from which deduction starts. The score from which deduction starts, the scope of total scoring and the target attainment scoring could be set up.
C. Display field/inspection category scores: Determine whether to display the total score for each inspection category across different inspection categories.
D. Inspection recommended value: if there is failing items on the “passing rate assessment items” sheet, the result of this instance of site inspection is “immediate supervision”.
E. Inspection attachments: could be set up as whether photography or videotaping on the scene is allowed. If selection is canceled, the photo and image footage sited in the photo album of the mobile phone could be uploaded in the process of site inspection.
F. Inspection Signature: whether signature on the scene or not could be set up.
G. Custom Evaluation Options: the passing rate evaluation items and additional scoring items could be set up the description of word option.
H. Inspection sign-in: activate the function of sign-in before proceeding to site inspection or not.
I. Binding WorkFlow: Use in conjunction with the sign-off function to bind the inspection form to a specific sign-off process.
> Note:
1.Ascertain if the site address is correct before using “Inspection sign-in”.
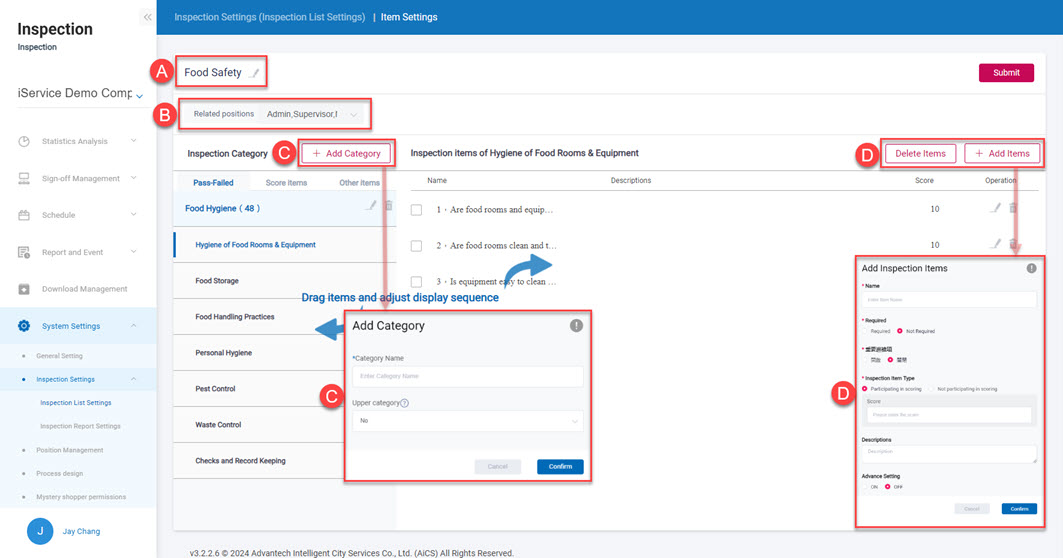 A. Name of Inspection Checklist: the name of the checklist can be changed.
B. Associated job function: bundle the existing inspection checklist and designated job function.
C. Add inspection type: add inspection type under the inspection items. Layer 1 and layer 2 relations could be set up.
D. Delete/add inspection items: add/delete inspection items by inspection type. Or, if individual items should be included into the mechanism of scoring, or to set up the required items.
A. Name of Inspection Checklist: the name of the checklist can be changed.
B. Associated job function: bundle the existing inspection checklist and designated job function.
C. Add inspection type: add inspection type under the inspection items. Layer 1 and layer 2 relations could be set up.
D. Delete/add inspection items: add/delete inspection items by inspection type. Or, if individual items should be included into the mechanism of scoring, or to set up the required items.
2.2 Inspection Report Configuration
Set up different site inspection report display sample as needed.
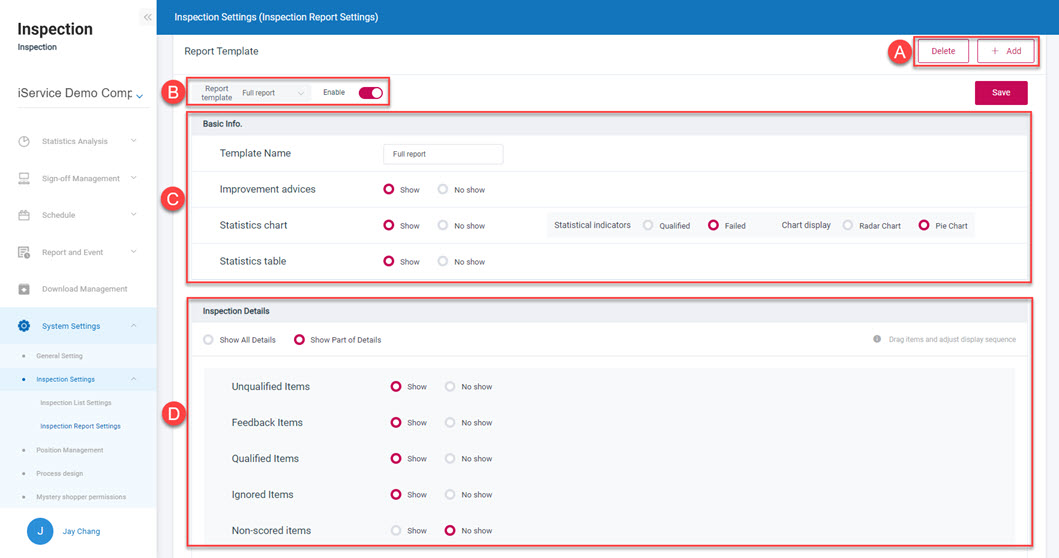 A. Delete/add template: add/delete inspection report template.
B. Choosing and activation of templates: choose the added report template, and set up if it could be activated.
C. Basic information: give name to this inspection report template, and set up the recommendation for inspection and if the statistics should be displayed. Statistics can be designed to show the passing and the failed items, and presented by radar chart or pie chart.
D. Inspection detail: set up to display the details in the inspection report or not, can also drag to rearrange the order of the items.
> Note:
1.Only up to 5 types of templates can be set up in the inspection report for a single company.
A. Delete/add template: add/delete inspection report template.
B. Choosing and activation of templates: choose the added report template, and set up if it could be activated.
C. Basic information: give name to this inspection report template, and set up the recommendation for inspection and if the statistics should be displayed. Statistics can be designed to show the passing and the failed items, and presented by radar chart or pie chart.
D. Inspection detail: set up to display the details in the inspection report or not, can also drag to rearrange the order of the items.
> Note:
1.Only up to 5 types of templates can be set up in the inspection report for a single company.
3. Job function management
Set up the available items in smart inspection based on different job functions.
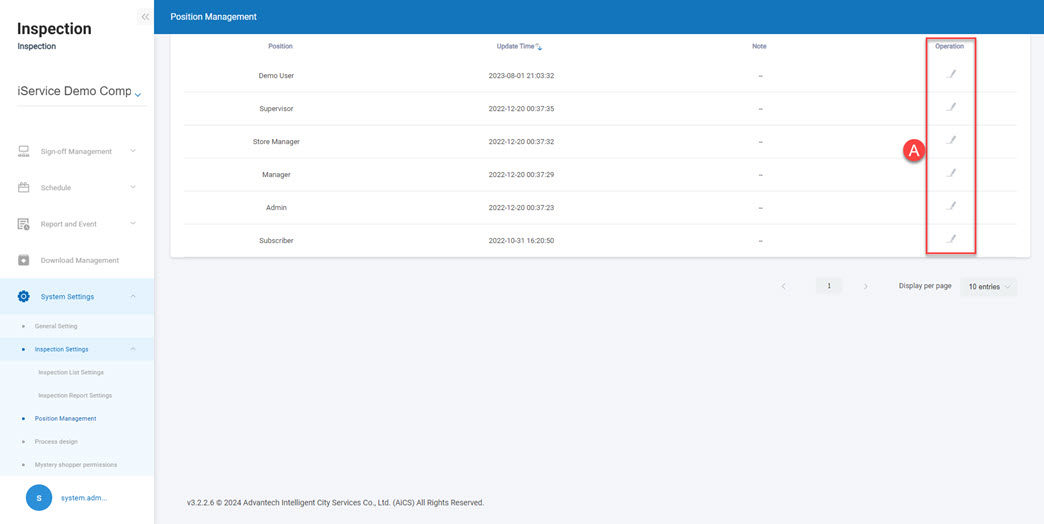 A. Operation: set up the available items in smart inspection according to the job function.
> Note:
1.For adding job functions, operation in “system setup”. Consult the “WISE-iService main system management setup - 6.2 employee job functions”
A. Operation: set up the available items in smart inspection according to the job function.
> Note:
1.For adding job functions, operation in “system setup”. Consult the “WISE-iService main system management setup - 6.2 employee job functions”
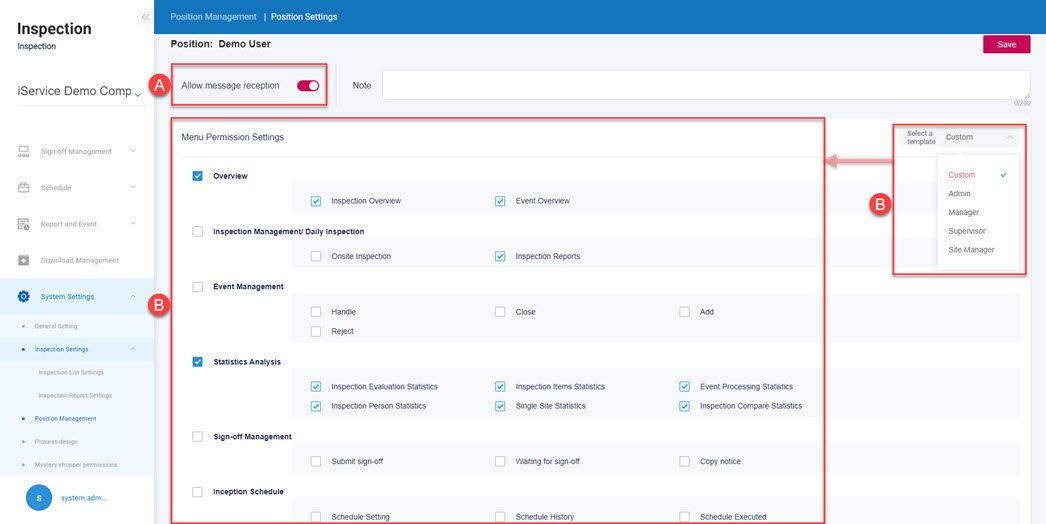 A. Monitoring application and notice setup: Confirm whether to enable the system and APP notification push function for this job role. Once this feature is activated, the app can receive inspection-related messages pushed by the mobile system and the inspection system.
B. Job role permission setup: Assign different inspection functions based on different job roles.
A. Monitoring application and notice setup: Confirm whether to enable the system and APP notification push function for this job role. Once this feature is activated, the app can receive inspection-related messages pushed by the mobile system and the inspection system.
B. Job role permission setup: Assign different inspection functions based on different job roles.
4. Process Design
For this chapter, plase refer to "Sign-Off Management" function.
5. Mystery Shopper Permissions
For this chapter, plase refer to "Mystery Shopper Permissions" function.