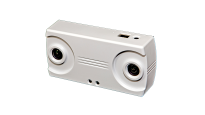
People Counting Camera (UCAM-130)
Items You Will Need:
- UCAM-130 People Counting Camera
- PoE network switch or PoE injector
- At least two RJ-45 Ethernet cables, with lengths depending on user site requirements
- Access to the《CountingBI》service on the WISE-iService cloud platform and a valid user account
- The "Register Key" information for the site (below will explain how to obtain the "Register Key" information).
Step 1: How to obtain the "Register Key" information for the site.
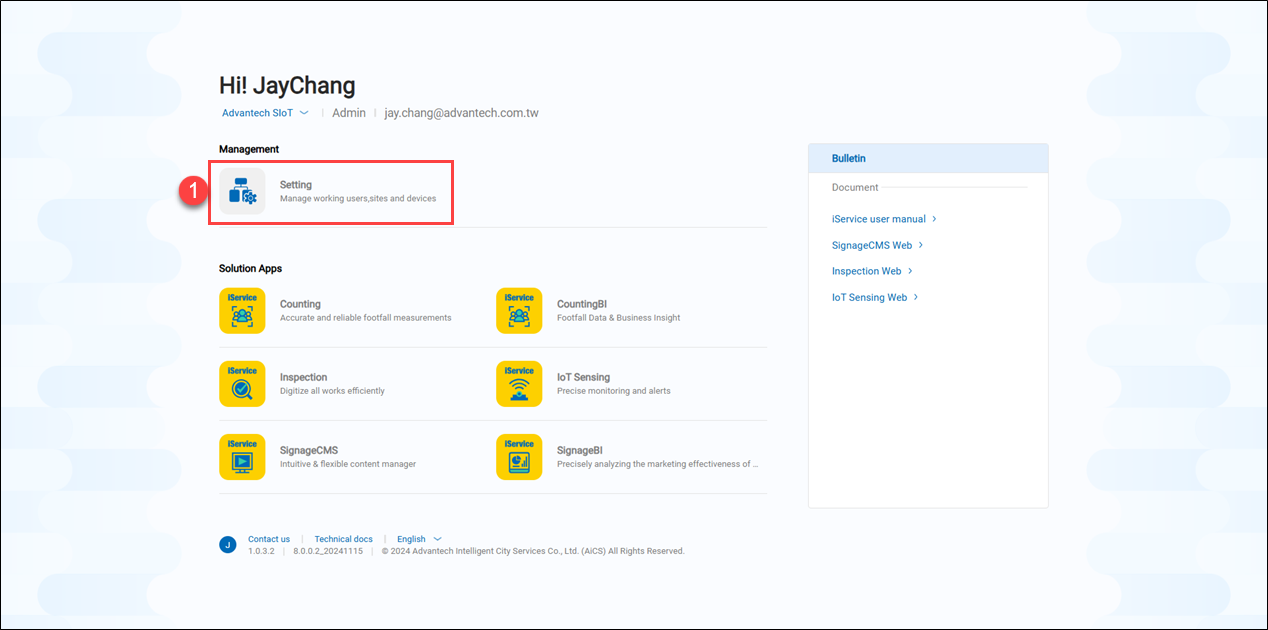 1. Please log in to the WISE-iService platform (https://apps.wise-iservice.com/), and click on "Setting."
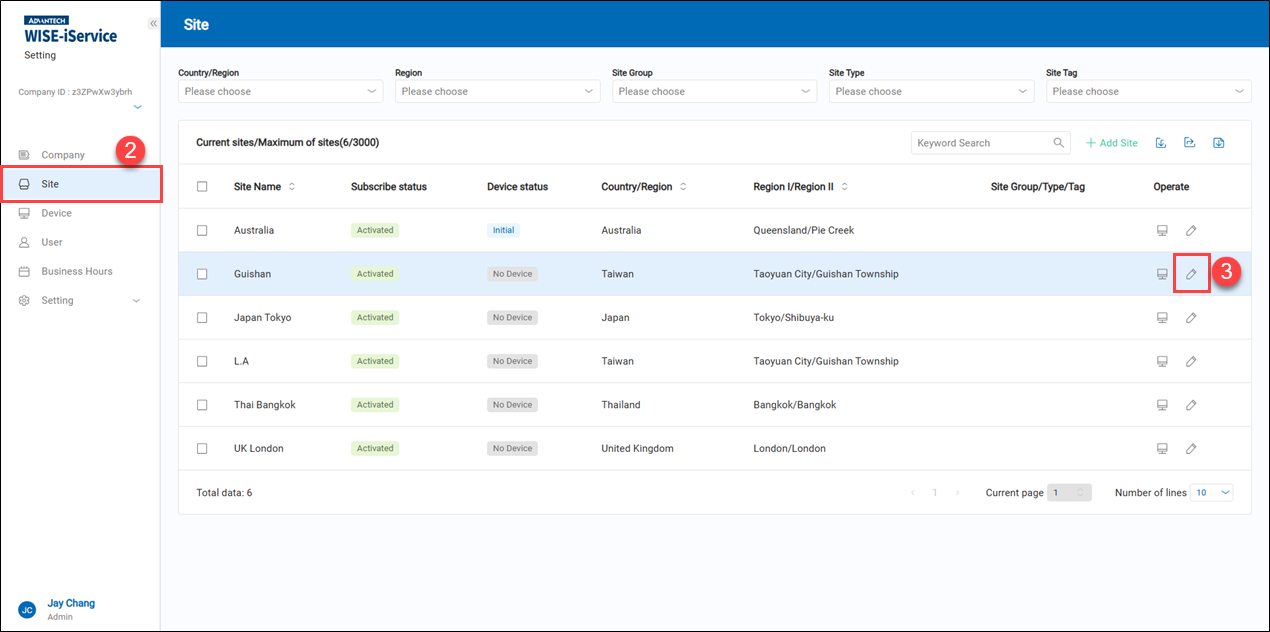 2. Click on the "Site" page.
3. Click the edit icon on the site where the UCAM-130 is to be registered, for example, the "Guishan."
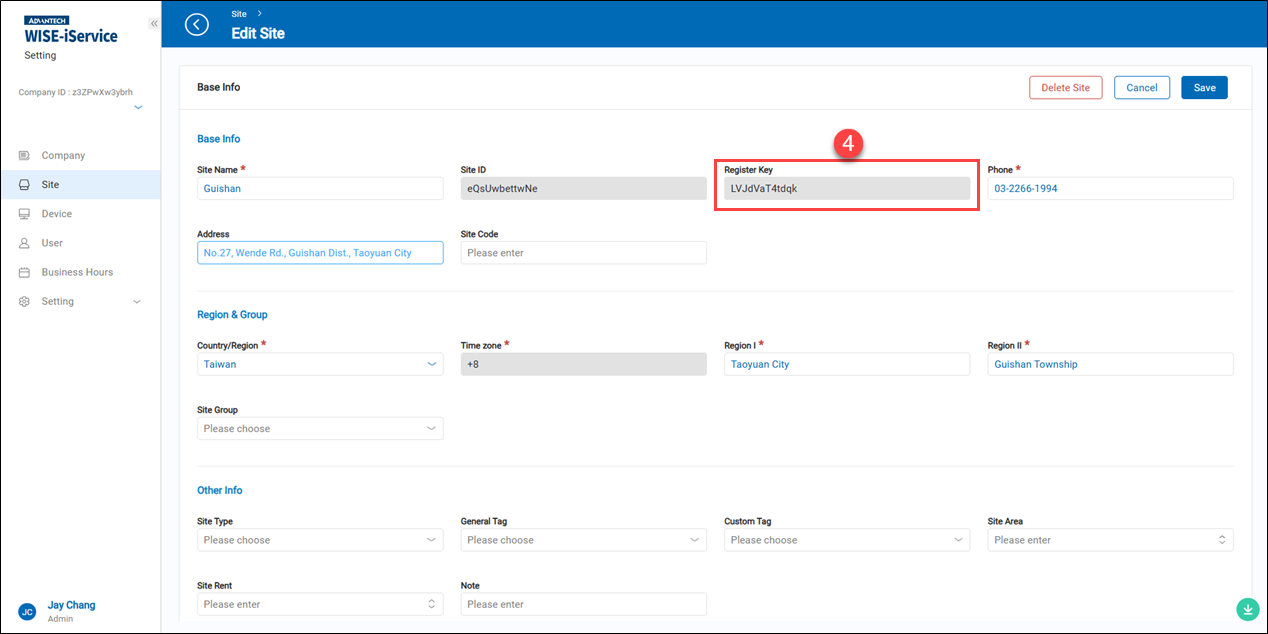 4. Please copy or note down the alphanumeric string in the "Register Key" field. This string will need to be entered into the UCAM-130 camera settings later.
Step 2: Basic system settings for the UCAM-130 camera, drawing the "Entrance and Exit Counting area," and registering it to the《CountingBI》service platform.
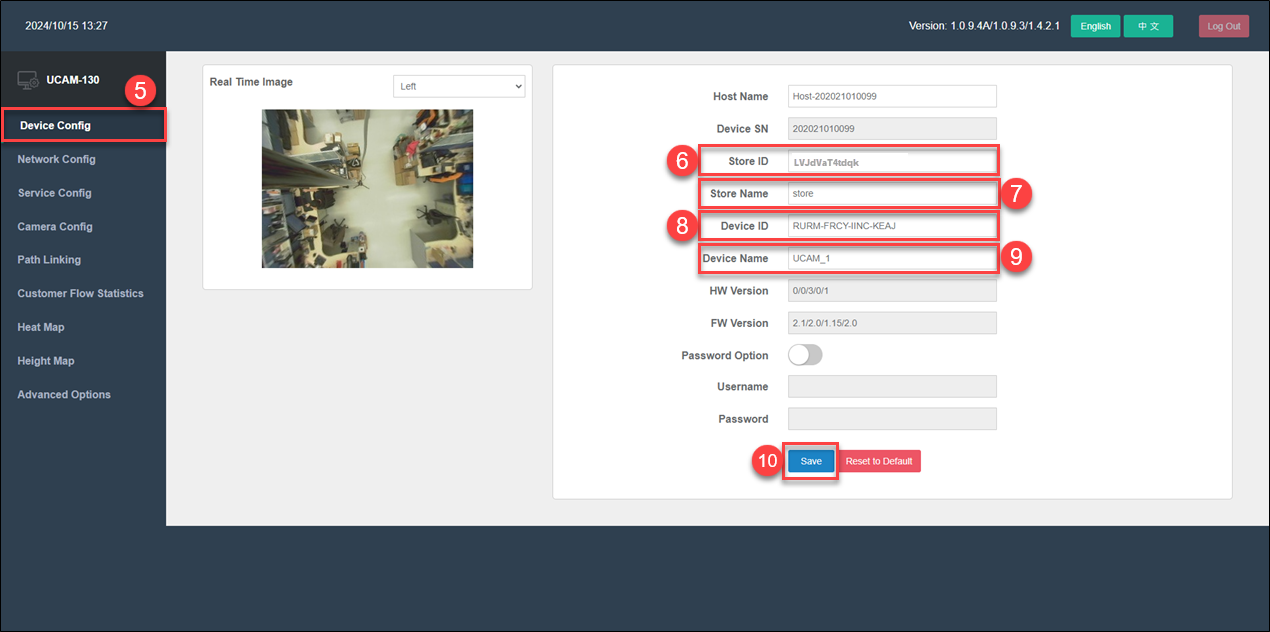 5. Log in to the UCAM-130 camera management webpage and click on "Device Config" in the left-side function menu.
6. In the "Store ID" field, enter the "Register Key" for the site.
7. In the "Store Name" field, enter any name that is easy for users to recognize for the site.
8. In the "Device ID" field, enter the 16-character serial number of the UCAM-130 camera (which can be found on the serial number sticker on the camera's casing).
9. In the "Device Name" field, enter any name that is easy for users to recognize for this specific UCAM-130 camera.
10. Click "Save" to apply the settings.
5. Log in to the UCAM-130 camera management webpage and click on "Device Config" in the left-side function menu.
6. In the "Store ID" field, enter the "Register Key" for the site.
7. In the "Store Name" field, enter any name that is easy for users to recognize for the site.
8. In the "Device ID" field, enter the 16-character serial number of the UCAM-130 camera (which can be found on the serial number sticker on the camera's casing).
9. In the "Device Name" field, enter any name that is easy for users to recognize for this specific UCAM-130 camera.
10. Click "Save" to apply the settings.
click on "Service Config" in the left-side function menu.
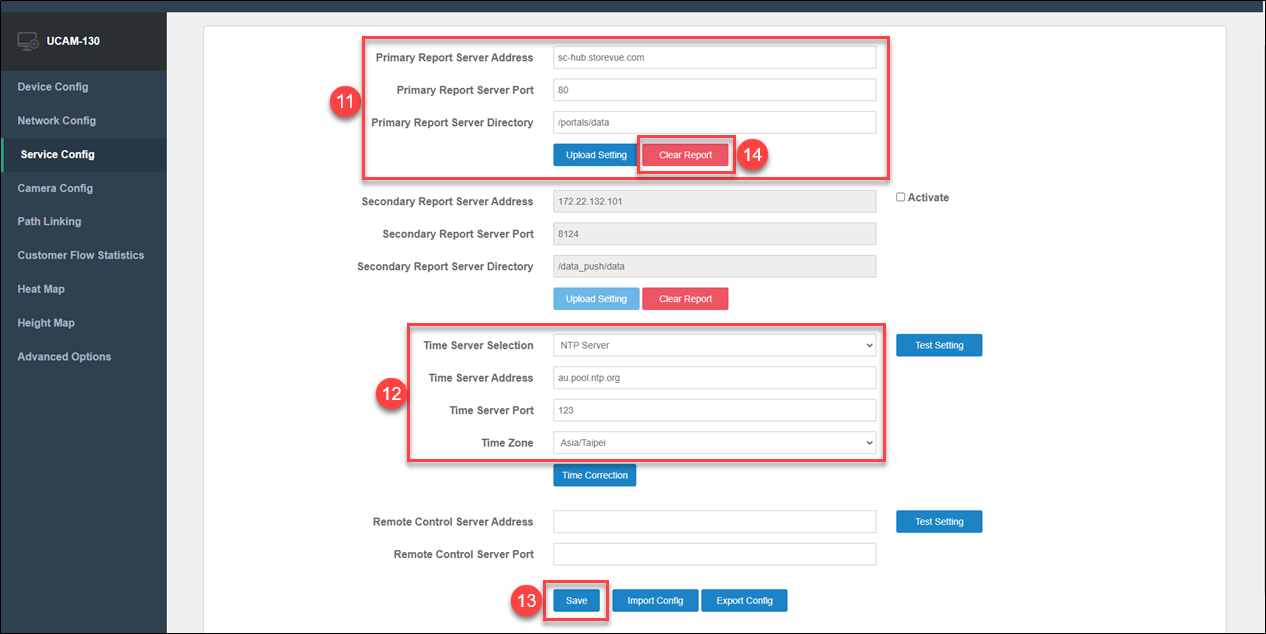 11. Fill in the relevant information for the 《CountingBI》 service platform, following the example below:
- Primary Report Server Address: sc-hub.storevue.com
- Primary Report Server Port: 80
- Primary Report Server Directory: /portals/data
12. Enter the valid NTP server address to enable the UCAM-130 camera to automatically synchronize the system time.
13. Click "Save" to apply the settings.
14. Click "Clear Report" to clear the temporary people flow records.
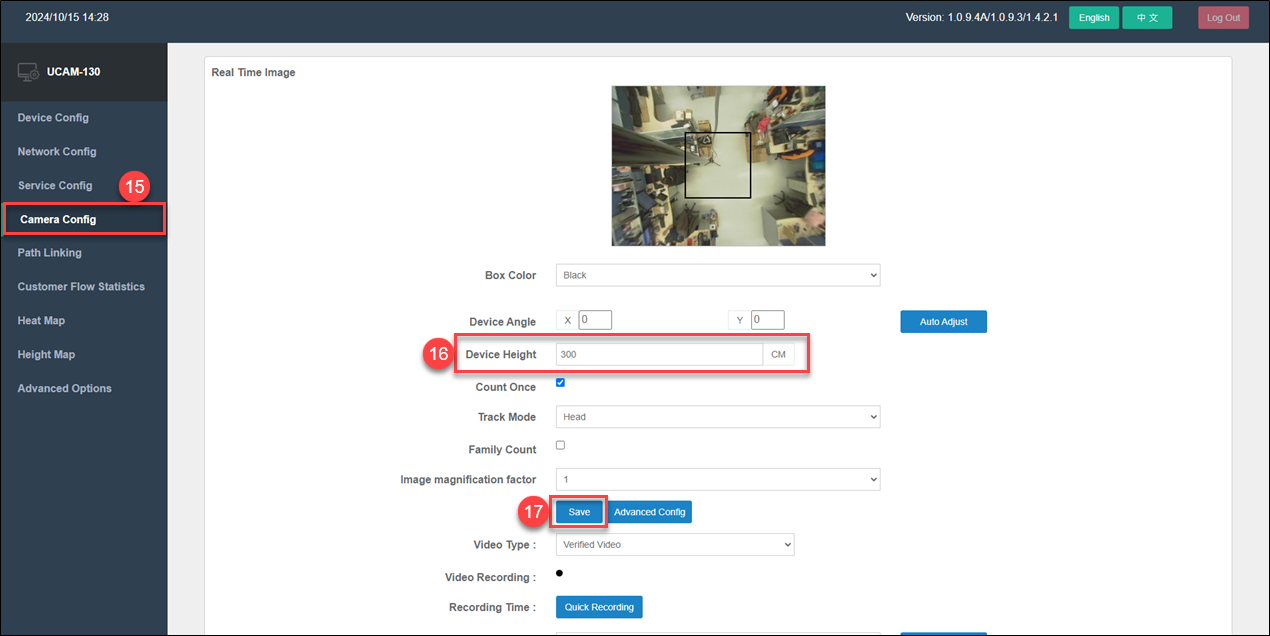 15. Click on "Camera Config" in the left-side feature list.
16. In the "Device Height" field, enter the actual installation height of the UCAM-130 camera from the ground. (Height unit: centimeters)
17. Click "Save" to apply the settings.
15. Click on "Camera Config" in the left-side feature list.
16. In the "Device Height" field, enter the actual installation height of the UCAM-130 camera from the ground. (Height unit: centimeters)
17. Click "Save" to apply the settings.
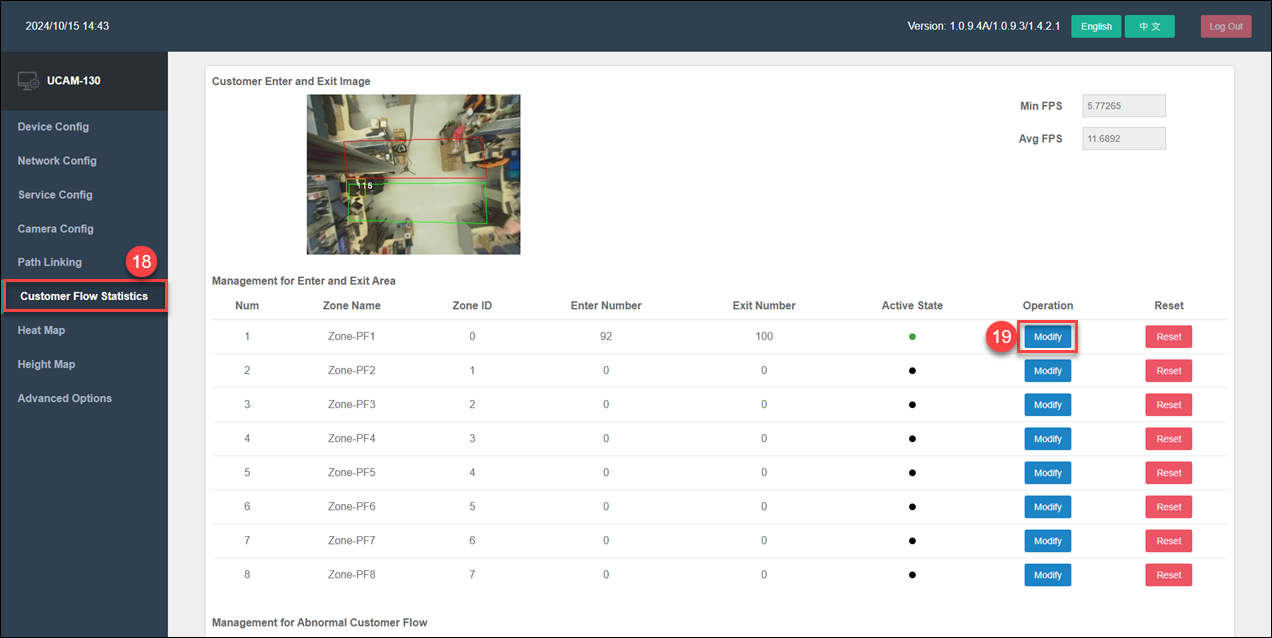 18. Click on "Customer Flow Statistics" in the left-side feature list. Next, you will need to define the detection areas for "Entrance" and "Exit."
19. In the first set of settings (Zone PF-1), click "Modify" to proceed to the next step.
18. Click on "Customer Flow Statistics" in the left-side feature list. Next, you will need to define the detection areas for "Entrance" and "Exit."
19. In the first set of settings (Zone PF-1), click "Modify" to proceed to the next step.
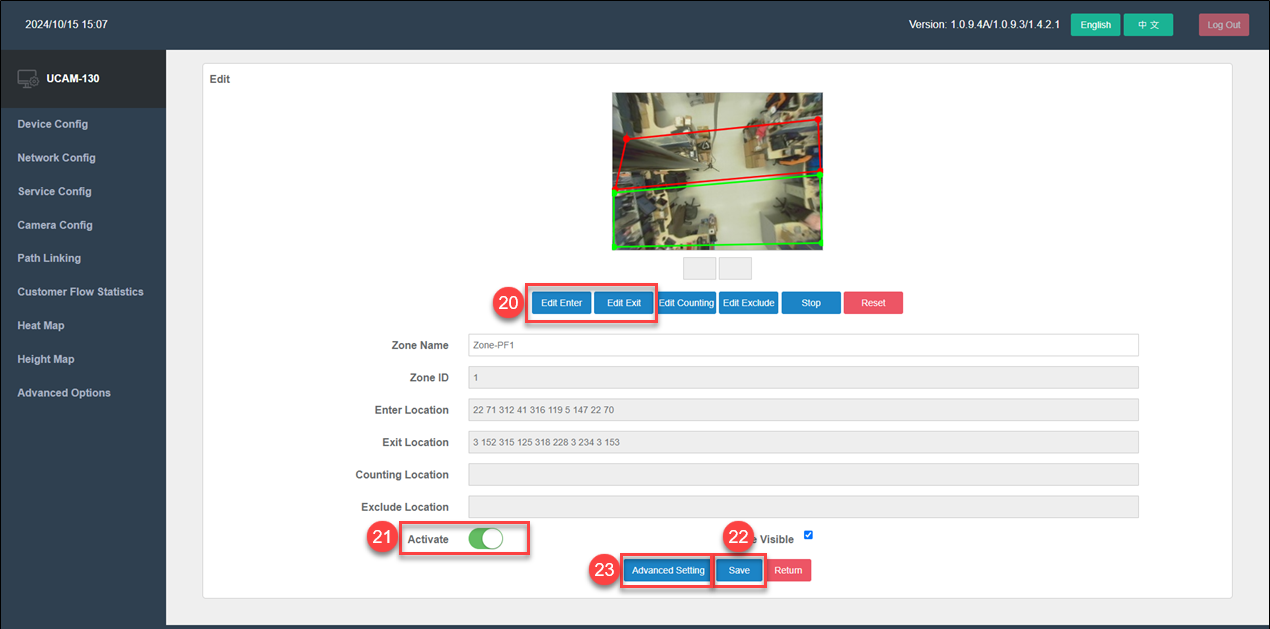 20. Click "Edit Enter" and "Edit Exit" in sequence to define the detection areas for "Entrance" and "Exit."
21. Click "Activate" to enable this setting.
22. Click "Save" to apply the settings.
23. Click "Advanced Setting" to proceed to the next step.
20. Click "Edit Enter" and "Edit Exit" in sequence to define the detection areas for "Entrance" and "Exit."
21. Click "Activate" to enable this setting.
22. Click "Save" to apply the settings.
23. Click "Advanced Setting" to proceed to the next step.
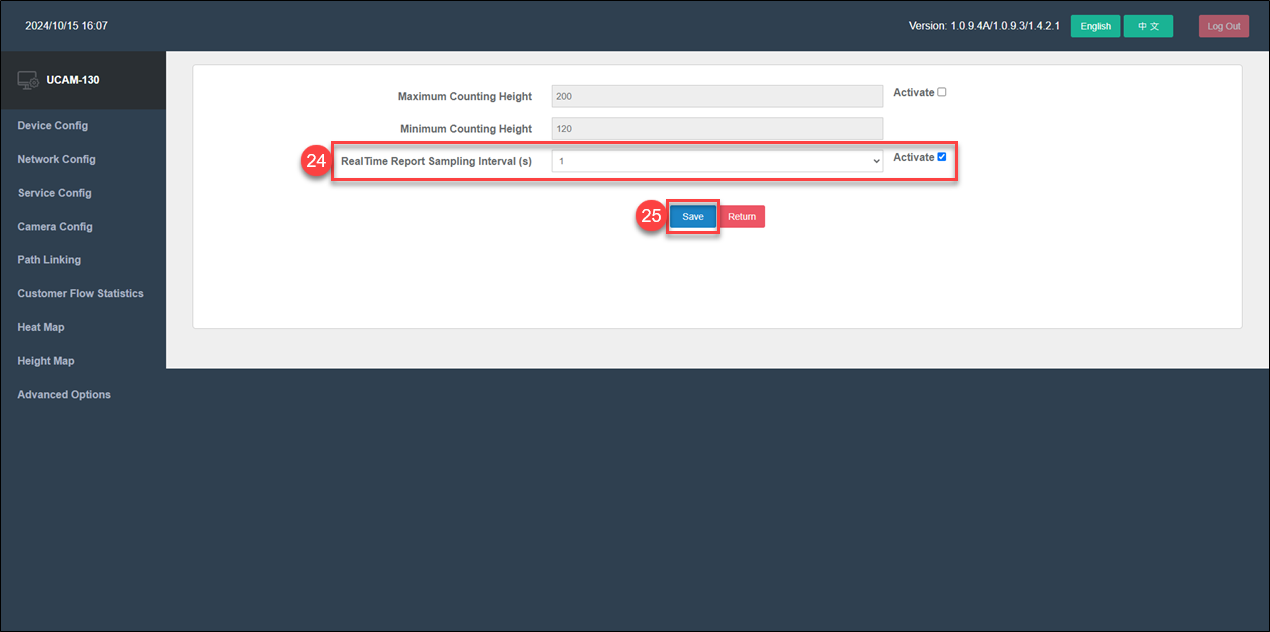 24. Check "Activate" for the RealTime Report Sampling Interval (s).
25. Click "Save" to apply the settings.
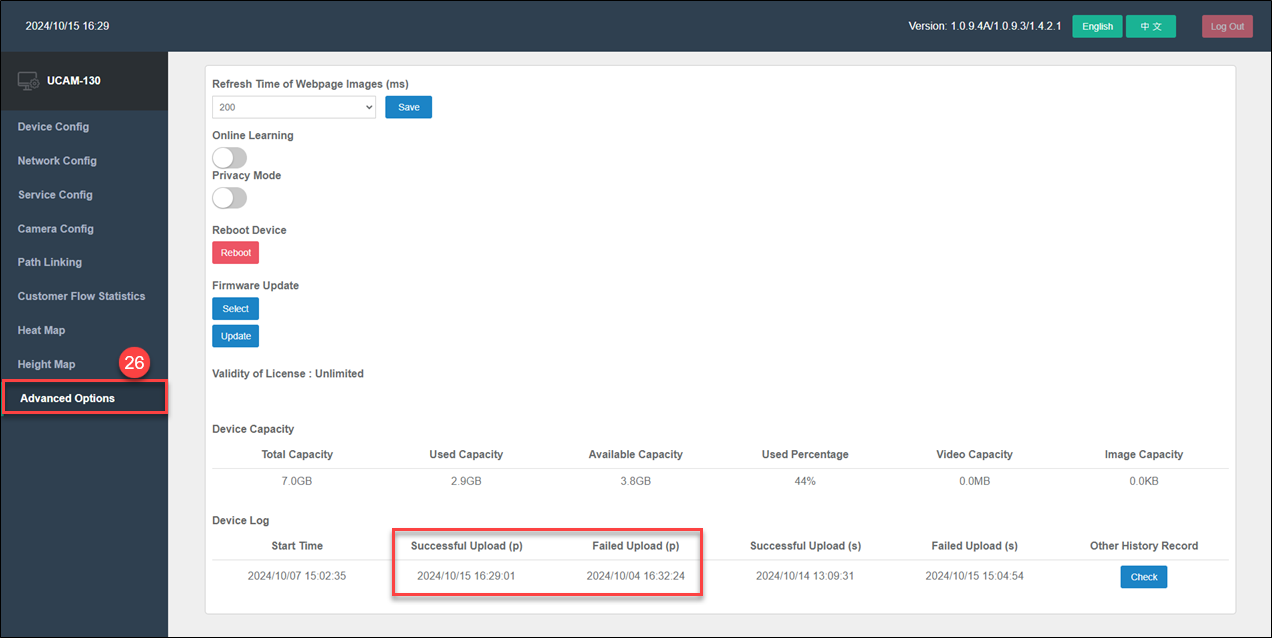 26. Select "Advanced Options" from the menu on the left, and check whether the time for Successful Upload (p) is later than the time for Failed Upload (p). If so, it indicates that the UCAM-130 camera is correctly configured to upload traffic data.
> Reminder: After this stage is complete, the UCAM-130 camera has been successfully registered to the designated site in the CountingBI service. Next, go to the "Subscription service website" to activate the UCAM device. Once activated, you can proceed to the CountingBI service to configure counting units related to the UCAM-130.
Step 3: Adding a Counting Unit (People Counting) in the《CountingBI》Service
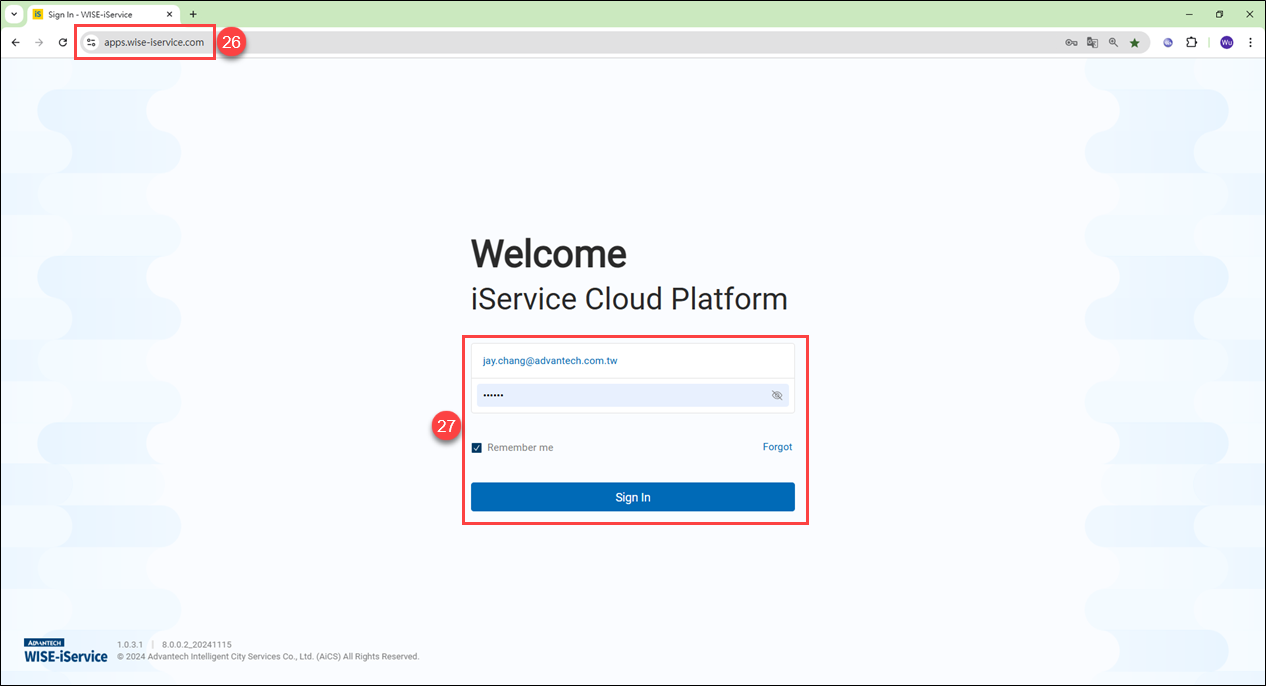 26. Open Chrome on any PC and connect to the WISE-iService cloud platform at https://apps.wise-iservice.com.
27. Enter your username and password, then click "Log In."
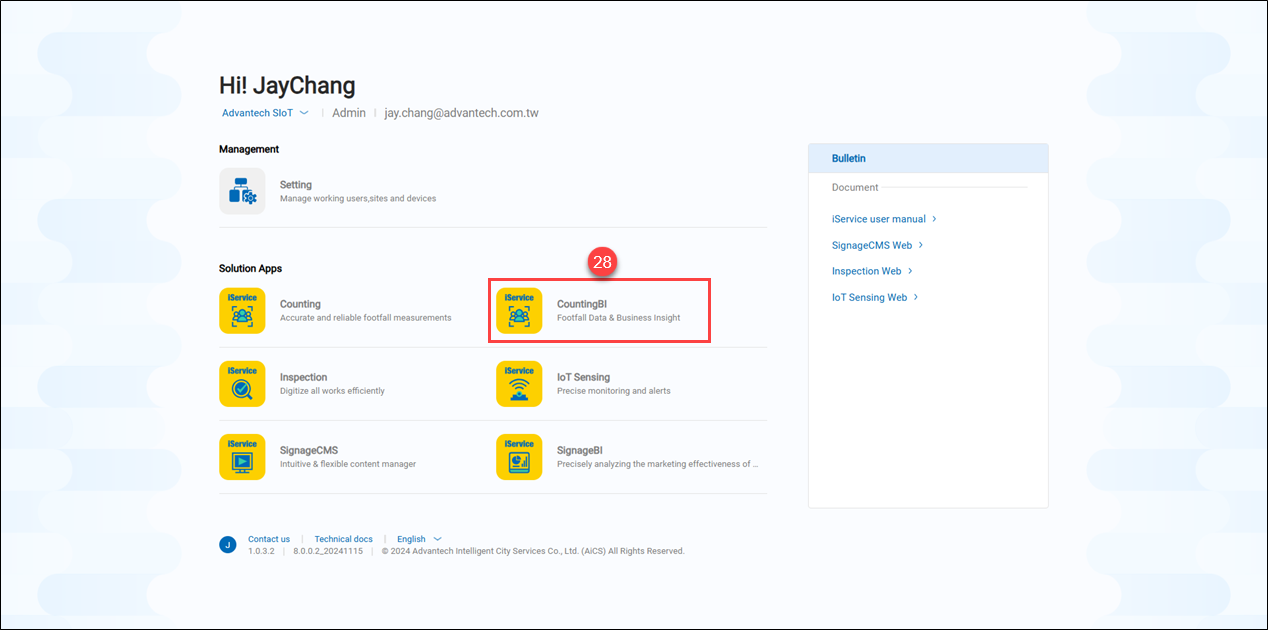 28. Click on the "CountingBI" service entry.
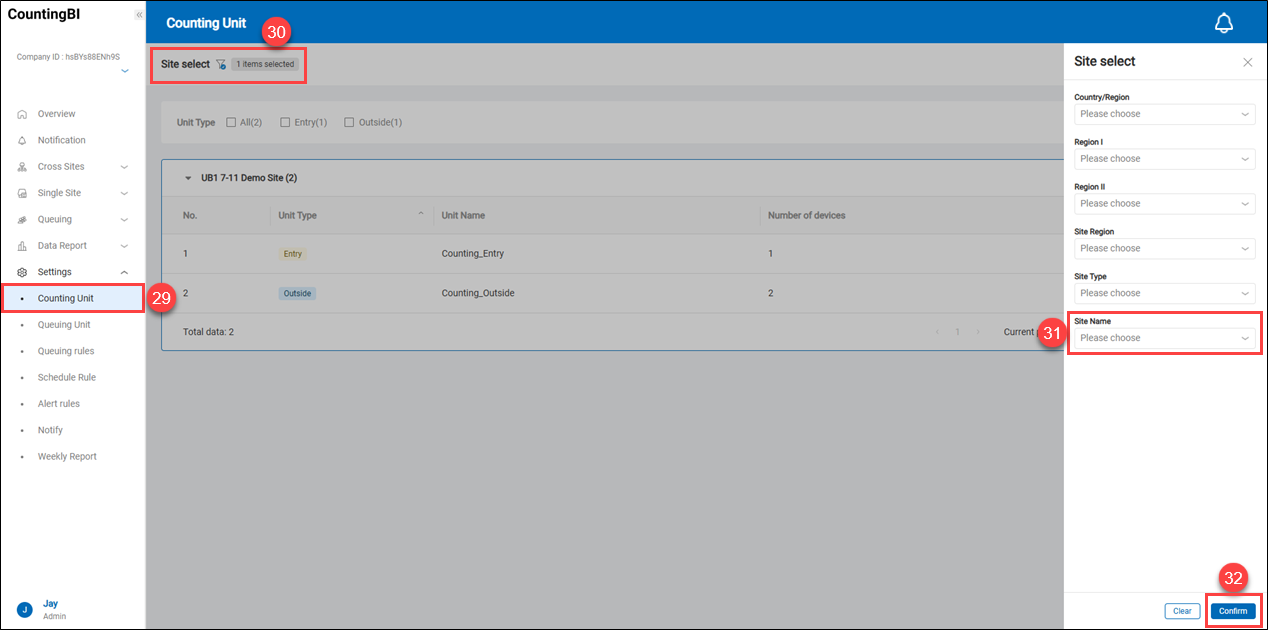 29. Click on "Counting Unit."
30. Click on the filter icon
29. Click on "Counting Unit."
30. Click on the filter icon ![]() to open the filter menu.
31. Select the site where you want to add a counting unit.
32. Click "Confirm" to proceed to the next step, then click "+ Add Unit."
to open the filter menu.
31. Select the site where you want to add a counting unit.
32. Click "Confirm" to proceed to the next step, then click "+ Add Unit."
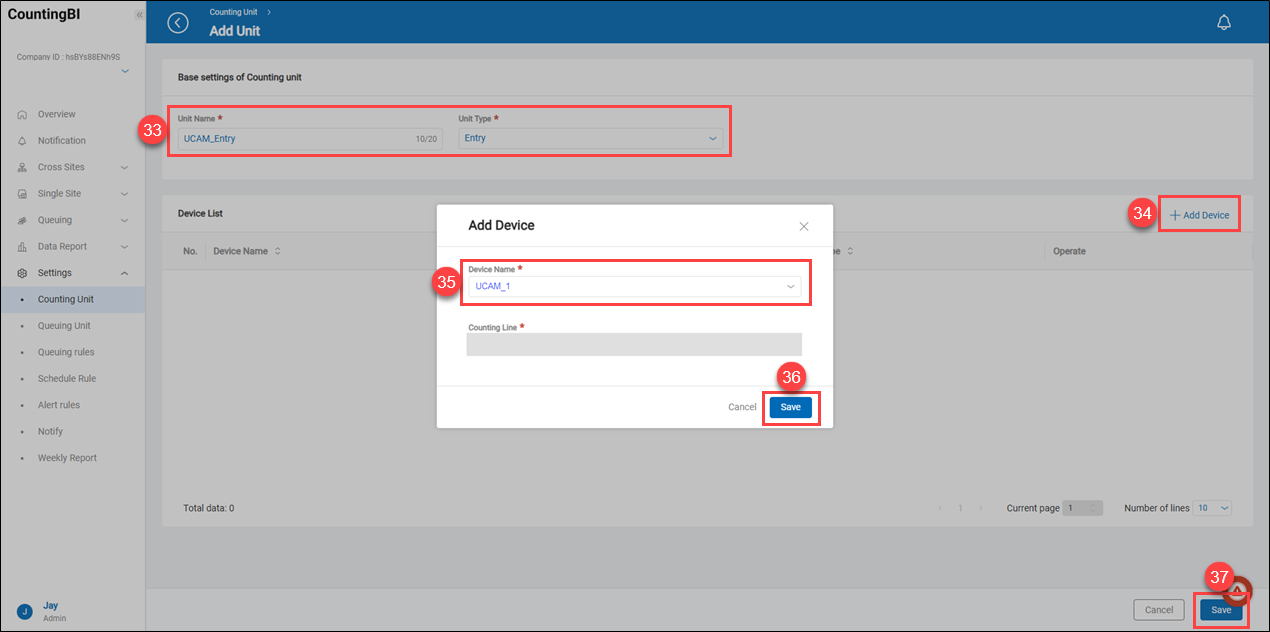 33. Enter a unit name that allows users to easily identify this counting unit. In this example, select "Entry" as the "Unit Type" to count in-store foot traffic.
34. Click "+ Add Device."
35. In the "Device Name" dropdown menu, select the UCAM_1 device, which is the already registered UCAM-130 camera.
36. Click "Save" to apply the settings.
37. Click "Save" to confirm the settings.
33. Enter a unit name that allows users to easily identify this counting unit. In this example, select "Entry" as the "Unit Type" to count in-store foot traffic.
34. Click "+ Add Device."
35. In the "Device Name" dropdown menu, select the UCAM_1 device, which is the already registered UCAM-130 camera.
36. Click "Save" to apply the settings.
37. Click "Save" to confirm the settings.
At this step, the addition of the counting unit for "People Counting" in the《CountingBI》service is complete.
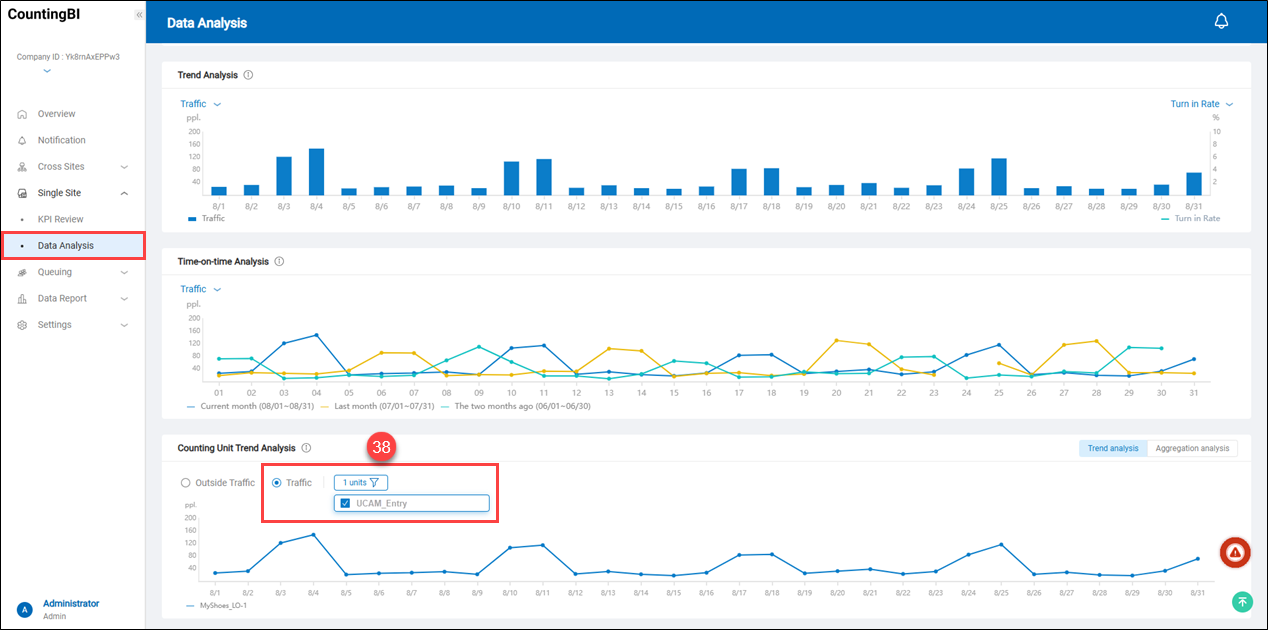 38. Users can quickly view statistical data by selecting "Traffic" and the chosen counting unit under "Single Site -> Data Analysis" in the "Counting Unit Trend Analysis" section.
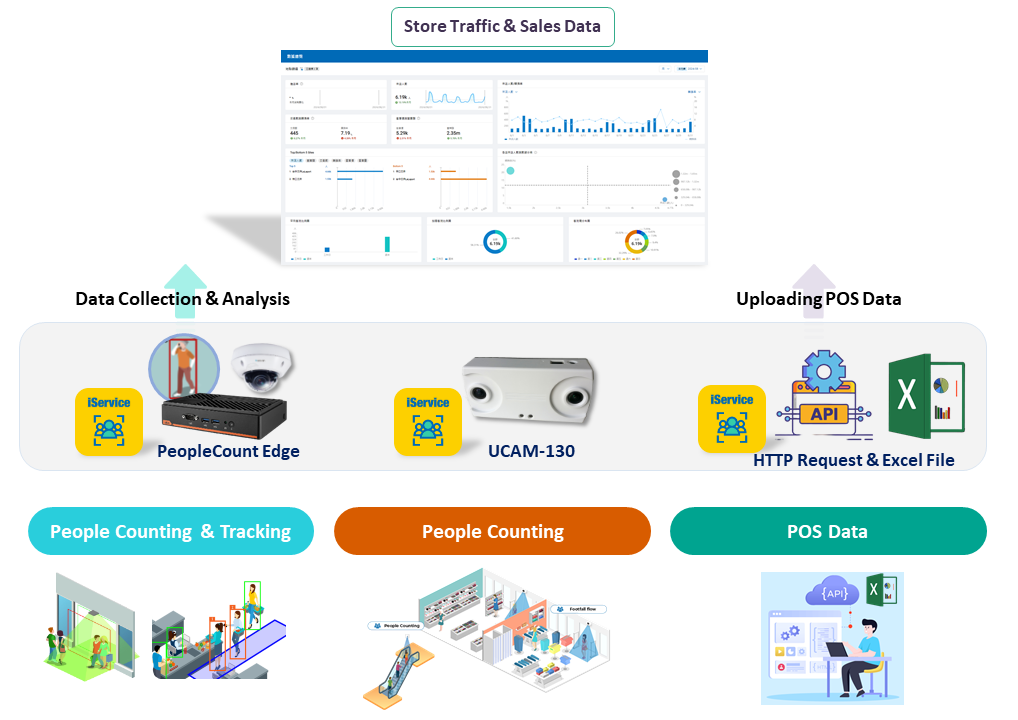
Product Information
【People Counting Camera UCAM-130】
【CountingBI】Architecture